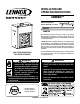
INSTALLATION AND OPERATION INSTRUCTIONS CAMBRIA™ Wood-Burning Fireplace P/N 850,057M REV. C 11/2008 TM MODEL CAMBRIA This installation manual will enable you to obtain a safe, efficient and dependable installation of your fireplace system. Please read and understand these instructions before beginning your installation or operating the fireplace. CAUTION: Do not alter or modify the fireplace or its components under any circumstances.
IMPORTANT! GENERAL SAFETY PRECAUTIONS. READ AND UNDERSTAND THESE SAFETY RULES BEFORE YOUR FIRST FIRE. WARNING The CAMBRIA™ fireplace must be installed with an outside air kit intake, which is included with the fireplace WARNING THE FIREPLACE MUST BE OPERATED WITH THE DOORS FULLY OPENED OR DOORS FULLY CLOSED. IF THE DOORS ARE LEFT PARTLY OPENED, GAS AND FLAME MAY BE DRAWN OUT OF THE FIREPLACE OPENING, CREATING RISKS OF BOTH FIRE AND SMOKE.
Congratulations! OPTIONAL EQUIPMENT In selecting this Lennox Hearth Products wood-burning appliance you have chosen one of the finest fireplaces available. The Cambria™ fireplace is an efficient heat circulating fireplace that is designed to provide you dependable service as well as warmth and enjoyment for many years to come. • 5” flexible venting system (central forced Please carefully read and follow all of the instructions found in this manual.
First Fires Before using the fireplace make sure to remove the plastic wrapping on the door. Remove all remaining glue with mild soap. Make sure the doors are properly adjusted, thus avoiding color change to finish due to overheat. The first 5 or 6 fires should be small fires of short duration (about 30 to 60 minutes). This will help cure the refractory bricks.
Building a Fire A) To start a fire, place several crumpled up balls of newspaper in the firebox. Place small dry pieces of kindling on top of the paper, criss-crossing the kindling so that there are air spaces in between. The kindling should be placed at the center of the firebox so as to allow for sufficient air circulation. B) Open the dampers and light the newspaper. Leave the doors partially opened (1 to 2 inches) to facilitate the start-up.
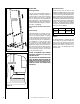
IMPORTANT CAUTIONS A. Do not block the hot air vents to the fireplace as this will cause the fireplace to overheat. B. Never use gasoline, gasoline-type lantern fuel, kerosene, charcoal lighter fluid, or similar liquids to start or ‘freshen up’ a fire in this fireplace. Keep all such liquids well away from the fireplace while it is in use. C. Do not burn coal. The sulphur in coal will corrode the firebox and chimney. D. Keep combustible materials at least 48” (1.
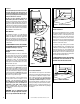
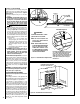
Figure 8 1. Front Refractory Brick 2. Andirons 3. Side Refractory Supports 4. Side Refractory Bricks 5. Back Refractory Brick 6. Bottom Refractory 1. Adjustment Screw (adjusts tightness of door seal) 2. Slider Stoppers Door Lock Adjustment Screws Tighten Figure 6 WARNINGS • Use only a Lennox Hearth Products glass doors, specifically designed for the Cambria fireplace. • The fireplace cannot be operated without a door. Consult your dealer to select the correct door model.
Unscrew the nuts to change the bearings GLASS CARE Gasket Replacement Glass Replacement Remove the doors from the unit (see Door Installation on Page 6) and lay them on a clean nonabrasive surface. To replace the gasket, first remove all of the old gasket and gasket cement. Make sure that the surface is totally clean before applying new cement (a high temperature silicone caulking rated at 500°F / 260°C, is suitable) or adhesion problems may result.
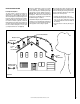
FIREPLACE INSTALLATION Locating The Fireplace The best location to install your fireplace is determined by considering the location of windows, doors, and the traffic flow in the room where the fireplace is located, allowing space in front of the unit for the hearth extension and the mantel, and taking into consideration the location of the hot air ducts (optional), outside air kit and chimney.
Framing, Facing And Mantel The construction of the framing, facing, and mantel must be in accordance with the standards and the following illustrations (Figures 15 through 20): A. Frame the fireplace using 2” x 3” or heavier lumber. Fireplace D. WARNING: The fireplace must not be in contact with any insulation or loose filling material. Cover the insulation with drywall panels or any other rigid material around the fireplace. Fireplace Free Space u Tile or Marble B.
Framing Dimensions - Model Cambria™ 2” x 3” Min. Do not fill the space above the fireplace with any material CORNER INSTALLATION 32-7/8” D (835mm) J F 27-7/8” E 7’ 6” (2.3m) Min.
Insulate Joists Same As Ceiling Insulated Chase Construction Storm Collar Roof Support Flashing Attic Radiation Shield Draft Stops Floor Ceiling Wall Note: Floor and wall below the attic must be insulated using the same insulation. 1/2” Plywood FIREPLACE Opening Optional Insulation In Outside Walls Of Chase 8’8' (2.4 m) Level Level Drywall or Any Rigid Material 2” x 4” Figure 16 12 CTDT Termination • Must have the same firestopping Nonresistance asNote: adjacent wall.
Facing Optional Fireplace Blower (UZY5) Mantel and Facing (Side View) IMPORTANT The facade must be removable once installed. The facade is designed to overlap any facing material installed on the front of the fireplace. If thicker material is installed, use the facade as a template and make sure it can be easily removed for servicing. 1. Combustible material must be installed flush with the fireplace. It may not project in front of and on the fireplace (i.e.
HOT AIR DUCTING INSTALLATION (OPTIONAL) Different hot air ducting systems can be installed with the Cambria™ fireplace: • Gravity kit • Forced air kit The gravity kit is used when the rooms are on same level or floor as the fireplace or on an upper level or floor. If the heat to be distributed is on a lower level or floor or through the central heat duct of a furnace, then the forced air kit MUST be used.
The duct system must be installed respecting the following: 1. Remove the plates closing up the 8” (203mm) diameter holes on top of the fireplace. Then, cut the insulation in order to obtain two 8” (203mm) diameter openings. Fix the adaptors on the fireplace openings by turning clockwise (see Figure 21). 2. Maintain at least a 2” (50 mm) clearance between the ducts and any combustible material; the required hole size is 13” x 13” (330 mm x 330 mm).
OUTSIDE AIR OUTSIDE CONNECTION It is mandatory to install an outside air connection to the Cambria™ fireplace. The following components are required and are included with the fireplace: • Outside air kit • 4” adapter for fireplace connection Outside Intake Plastic Cover The outside air assembly must be installed according to the following requirements: A) Duct length should be kept to a minimum. The maximum length of a 4” interior diameter (100 mm) insulated flexible duct is 20 feet (6.1 m).
THE CHIMNEY system Chimney Installation Notes 1. If possible, install an interior chimney as it will provide better performance. In areas with continuous temperatures below 0°F (18°C), the use of an exterior chimney increases the likelihood of operating problems such as low draft, high rate of creosoting, and poor start-up characteristics. Exterior chimneys are also prone to down-drafting and flow reversal.
2. 3. 4. 5. 6. From below, install a firestop in each ceiling/ floor separation through which the chimney will pass. At the attic level, install an attic radiation shield from above (see Figures 30a and 30b). For Secure TempASHT+ / Nova TempHT6103+ chimneys, place the first chimney length on the fireplace. To lock it in place, turn 1/4 of a turn clockwise. With the AC chimney, you must use a starter section before installing the first chimney length (Figure 31).
CHIMNEY MODEL AC OFFSET CHIMNEY INSTALLATION Chimney Collar After reaching the location requiring the elbow, proceed as follows. The minimum chimney height when using elbows is: Minimum Chimney Height When Using Elbows Fireplace Model Chimney Model Flashing Figure 32 Cambria™ Secure TempASHT+ / Nova TempHT6103+ / AC Vertical Installation 15 feet (4.57 meters) Two (2) Elbows 18 feet (5.49 meters) Four (4) Elbows 20 feet (6.
Offset Dimensions B Total Height A Chimney Elbow Offset & Height 12” 18” 24” 36” 48” 8” & 48” 12” & 48” 18” & 48” 24” & 48” 36” & 48” 48” & 48” A 4-1/4” (108mm) 5-3/4” (146mm) 7-1/4” (184mm) 10-1/4” (260mm) 13-1/4” (337mm) 15-1/4” (387mm) 16-1/4” (413mm) 17-3/4” (451mm) 19-1/4” (489mm) 22-1/2” (572mm) 25-1/2” (648mm) B 16-1/2” (419mm) 20-1/4” (514mm) 26-1/4” (749mm) 32” (813mm) 43-1/2” (1105mm) 55-1/2” (1410mm) 62” (1575mm) 65-3/4” (1670mm) 71-1/2” (1816mm) 77-1/4” (196
OFFSET CHIMNEY INSTALLATION Straps Support Straps Chimney AC AC Starter Section Note: This illustration is not to scale. It represents how the chimney must be supported. A 30 degree offset only is allowed in the USA and a 45 degree maximum offset is allowed in Canada.
ANGLED WALL RADIATION SHIELD (RSMI30, RSMI45, AC10RSMI30) When traversing a combustible wall with the chimney at a 30º or 45º angle, an angled firestop or wall radiation shield must be installed. Only one is required. Note: 45º angle for Canada only In cold climate locations, we recommend that you use the insulated wall radiation shield since it will maintain the home’s thermal barrier. RSMI30, RSMI45, AC10RSMI30 Chimney (10” dia.
Optional installation accessories Chimney - PARTS AND COMPONENTS LISTs Installation Accessories AC Chimney* Description (10” Diameter AC - Air Cooled) Cat./Part No. Outside Air Kit (included with fireplace) Outside air kit, UZI UZI UZI outside air kit fireplace adaptor, UZIAD * AC Chimney is NOT recommended at elevations above 4,000 feet or in cold climates (climates where temperatures will fall below 32° F / 0° C).
Chimney - PARTS AND COMPONENTS LISTs Secure Temp ASHT+ 1” High Temp. Insulated Stainless Steel Chimney 10” I.D., Double-Wall Stainless Steel, Listed to CAN/UCL-S604 & UL-103HT Description Part/Cat. No. Lengths and Misc. Chimney Components 8” length, 10” Dia., 10L8-N 10L8-N 12” length, 10” Dia., 10L12-N 10L12-N 18” length, 10” Dia., 10L18-N 10L18-N 24” length, 10” Dia., 10L24-N 10L24-N 36” length, 10” Dia., 10L36-N 10L36-N 48” length, 10” Dia., 10L48-N 10L48-N Adjustable Length 12”, 10” Dia.
REPLACEMENT PARTS LIST SPECIFICATIONS Cambria™ - Replacement Parts Description Cat./Part No. Front Edge Refractory Brick PR-SR2693 Back Refractory Brick PR-SR2821 Right Side Refractory Brick PR-SR2823 Left Side Refractory Brick PR-SR2822 Bottom Refractory Brick Wooden Door Handle Cat. No.
Warranty Your fireplace is covered by a limited warranty. Please read the warranty to be familiar with its coverage. Retain this manual. File it with your other documents for future reference. Product reference information We recommend that you record the following important information about your fireplace. Please contact your Lennox Hearth Products dealer for any questions or concerns. For the number of your nearest Lennox Hearth Products dealer, please call 1-800-9-LENNOX.