
User Guide
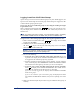

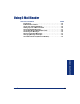
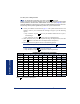

Table Of Contents
- Front Cover
- Quick Reference Guide
- Pocket Quick Reference Guide
- Notice
- Product Disposal Instructions
- Finding Your Way
- Getting Started
- Introduction
- Adjusting Your Endpoint’s Viewing Angle
- Adjusting Your Endpoint’s LCD Contrast
- Setting Up Voice Mail
- Making and Receiving Calls
- Placing Calls On Hold
- Placing Conference Calls
- Transferring Calls
- Using Reverse Transfer
- Forwarding Calls
- Redialing a Number
- Displaying Information on Your Endpoint
- Using a Headset
- Using the Speaker and Microphone
- Using the Message Button
- Accessing Your Mailbox
- Disabling and Enabling ASR
- Accessing Voice Mail Messages
- Using Do-Not-Disturb Mode
- Using Reminder Messages
- Moving On
- Introduction
- Setting Endpoint Preferences
- Setting Mailbox Preferences
- Speed Dialing
- Using Record-A-Call
- Paging
- Performing a “Hookflash” During a Call
- Programming Your Feature Buttons
- Programming Direct Station Selection Buttons
- Programming Secondary Extension Buttons
- Using Account Codes
- Screening Calls
- Using Call Logging
- Using Directories
- Programming Remote Feature Access
- Requesting Agent Help
- Working in Hunt Groups
- Using E-Mail Reader
- Learning More
- Index
- Standard Mailbox Flowchart
- Back Cover
86
Inter-Tel
®
Model 8560/8660 User Guide
USING E-MAIL READER
To enter your e-mail password:
NOTE: To repeat menu instructions, say “Help” or press at any time.
ALSO: If you enter an incorrect password, or if you choose to skip setting a new E-Mail
Reader password, the Main Menu E-Mail Reader Count option (see page 89) is auto-
matically disabled to prevent having to hear the invalid password prompt for each sub-
sequent login and to protect against being locked out of your e-mail account.
1. Access your mailbox as described on page 37. The system announces that it was
unable to retrieve your e-mail and fax messages, and gives you the following
options:
• Say “Continue” or press to access your mailbox without access to your e-
mail messages.
• Say “Password” or press to enter your new e-mail password.
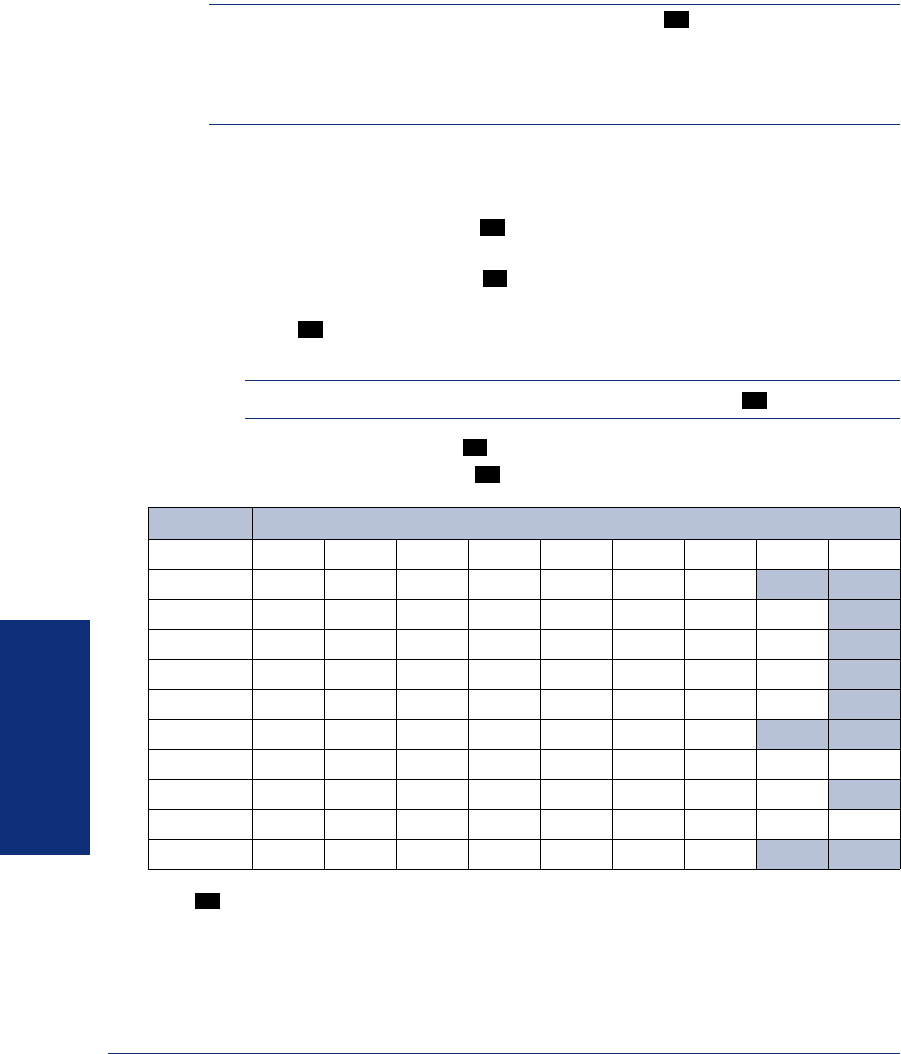
2. When prompted, enter your e-mail password using the dialpad buttons, and then
press . (Refer to the table below for dialpad button descriptions.)
3. Your new password is played. You have the following options:
NOTE: For a description of special character locations, press .
• Say “Accept” or press to accept the password.
• Say “Re-enter” or press to erase and re-enter the password.
*Press seven times for a blank space.
0
#
1
#
2
#
3
NUMBER OF TIMES BUTTON IS PRESSED
BUTTON123456789
1 1 - & ( ) _ space*
2 abc2‘ ABC
3 def 3! DEF
4 ghi 4* GHI
5 jkl5#JKL
6 mno6MNO
7 pqr s7PQRS
8 t uv8?TUV
9 wxyz9WXYZ
0 0@:.,/+
1