
User Guide
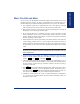
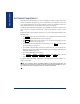
Table Of Contents
- Front Cover
- Quick Reference Guide
- Pocket Quick Reference Guide
- Notice
- Product Disposal Instructions
- Finding Your Way
- Getting Started
- Introduction
- Adjusting Your Endpoint’s Viewing Angle
- Adjusting Your Endpoint’s LCD Contrast
- Setting Up Voice Mail
- Making and Receiving Calls
- Placing Calls On Hold
- Placing Conference Calls
- Transferring Calls
- Using Reverse Transfer
- Forwarding Calls
- Redialing a Number
- Displaying Information on Your Endpoint
- Using a Headset
- Using the Speaker and Microphone
- Using the Message Button
- Accessing Your Mailbox
- Disabling and Enabling ASR
- Accessing Voice Mail Messages
- Using Do-Not-Disturb Mode
- Using Reminder Messages
- Moving On
- Introduction
- Setting Endpoint Preferences
- Setting Mailbox Preferences
- Speed Dialing
- Using Record-A-Call
- Paging
- Performing a “Hookflash” During a Call
- Programming Your Feature Buttons
- Programming Direct Station Selection Buttons
- Programming Secondary Extension Buttons
- Using Account Codes
- Screening Calls
- Using Call Logging
- Using Directories
- Programming Remote Feature Access
- Requesting Agent Help
- Working in Hunt Groups
- Using E-Mail Reader
- Learning More
- Index
- Standard Mailbox Flowchart
- Back Cover

17
Inter-Tel
®
Model 8560/8660 User Guide
GETTING STARTED
ADJUSTING YOUR ENDPOINT’S LCD CONTRAST
Your endpoint has a feature that allows you to adjust the Liquid Crystal Display
(LCD) contrast. This feature is only available when the endpoint is in the idle state.
You can choose from eight different contrast levels by using the volume button, using
the LCD menu buttons, or by using the dialpad buttons.
To adjust your endpoint’s LCD contrast:
1. With the handset in the cradle, dial .
2. Adjust the contrast level of the LCD screen by one of the following methods:
EITHER, Use the volume button ( = darker, = lighter).
OR, Use the LCD menu buttons.
OR, Press a number on the dialpad (1=lightest through 8=darkest) that corre-
sponds to your desired contrast level.
3. Accept and save the contrast level by one of the following methods:
EITHER, Press .
OR, Lift and replace the handset.
OR, Press the ACCEPT menu button on the LCD screen.
SETTING UP VOICE MAIL
To begin using your mailbox you will need to complete a few basic set-up procedures
to initialize your mailbox, customize your personal greetings, and record your voice
mail directory name.
NOTE: If your telephone system uses Enterprise Messaging (EM), your mailbox may
have the Automatic Speech Recognition (ASR) feature enabled. When ASR is enabled
for your mailbox, you have the option of issuing a spoken command or pressing a dial-
pad button. See page 12 for ASR guidelines.
ALSO: If your mailbox has E-Mail Reader enabled, you have an advanced mailbox.
See page 81 for information and instructions about using E-Mail Reader features.
3 0 3