
User Guide


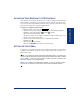
Table Of Contents
- Front Cover
- Quick Reference Guide
- Pocket Quick Reference Guide
- Notice
- Product Disposal Instructions
- Finding Your Way
- Getting Started
- Introduction
- Adjusting Your Endpoint’s Viewing Angle
- Adjusting Your Endpoint’s LCD Contrast
- Setting Up Voice Mail
- Making and Receiving Calls
- Placing Calls On Hold
- Placing Conference Calls
- Transferring Calls
- Using Reverse Transfer
- Forwarding Calls
- Redialing a Number
- Displaying Information on Your Endpoint
- Using a Headset
- Using the Speaker and Microphone
- Using the Message Button
- Accessing Your Mailbox
- Disabling and Enabling ASR
- Accessing Voice Mail Messages
- Using Do-Not-Disturb Mode
- Using Reminder Messages
- Moving On
- Introduction
- Setting Endpoint Preferences
- Setting Mailbox Preferences
- Speed Dialing
- Using Record-A-Call
- Paging
- Performing a “Hookflash” During a Call
- Programming Your Feature Buttons
- Programming Direct Station Selection Buttons
- Programming Secondary Extension Buttons
- Using Account Codes
- Screening Calls
- Using Call Logging
- Using Directories
- Programming Remote Feature Access
- Requesting Agent Help
- Working in Hunt Groups
- Using E-Mail Reader
- Learning More
- Index
- Standard Mailbox Flowchart
- Back Cover

16
Inter-Tel
®
Model 8560/8660 User Guide
GETTING STARTED
INTRODUCTION
Now that you know what your endpoint can do, it’s time to start using it. In this sec-
tion, you’ll learn how to make and receive calls, transfer calls, retrieve voice mail
messages, and much more.
ADJUSTING YOUR ENDPOINT’S VIEWING ANGLE
Your endpoint has an adjustable base that allows you to tilt your endpoint to enhance
the viewing angle. There are two types of bases available on the endpoint, each of
which allow you to adjust the angle of the endpoint. Use the appropriate instructions
(listed below) to adjust the angle of your endpoint.
If your endpoint has a support mechanism that fits into holes on the base:
1. Position the bottom of the endpoint’s base on a flat surface.
2. Tilt the endpoint to the desired angle.
3. Place the “feet” of the support mechanism in the holes on the base to secure the
position of the endpoint.
If your endpoint has buttons located on the back to release the locking base:
1. Position the bottom of the endpoint’s base on a flat surface.
2. Press both buttons on the back of the endpoint to disengage the base’s locking
mechanism.
3. Tilt the endpoint to the desired angle.
4. Release both buttons to lock the base in place.endpoint
NOTE: If you position your endpoint’s viewing angle to 60 degrees or greater, it is rec-
ommended that you flip the handset hanger down to the horizontal position.