
Indoor Fireplace User Manual


11
NOTE: DIAGRAMS & ILLUSTRATIONS ARE NOT TO SCALE.
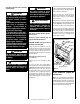
Front Glass Enclosure Panel, Removal
and Installation
WARNING
Any safety screen or guard
removed for servicing the appli-
ance must be replaced prior to
operating the appliance.
AVERTISSEMENT
Tout écran ou protecteur retiré
pour permettre l’entretien de
l’appareil doit être remis en
place avant de mettre l’appareil
en marche.
WARNING
• Do not attempt to substitute
the materials used on this door,
or replace cracked or broken
glass.
•Handlethisglasswithextreme
care! Glass is susceptible to
damage – Do not scratch or
handle roughly while reinstall-
ing the glass door frame.
•Theglassdoor(s)ofthisappli-
ance must only be replaced as a
complete unit as provided by the
manufacturer. Do not attempt
to replace broken, cracked or
chipped glass separately.
•Donotattempttotouchthefront
enclosure glass with your hands
while the fireplace is in use.
WARNING
Do not operate appliance with
the glass front removed, cracked
or broken.
AVERTISSEMENT
Ne pas utiliser l'appareil si le
panneau frontal en verre n'est
pas en place, est craqué ou
brisé.
Only doors certified with the appliance
shall be used.
Seules des portes certifiées pour cet
appareil doivent être utilisées.
CAUTION: DO NOT abuse glass door by
striking or slamming shut.
These are direct-vent appliances. They are
designed to operate only when the front glass
enclosure panels are installed. Generally the
front glass enclosure panel should not be re-
moved except to gain access to the components
within the firebox.
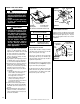
Removing Glass Enclosure Panels
(see Figure 4 )
Remove the top louver assembly or radiant
panel.
To access the glass door securing latches,
first open the lower control compartment door
(Figure 4 ) by pushing in simultaneously the left
and right top corners of the door. (The door
is hinged at the bottom.) Remove the bottom
compartment door by sliding the hinge pin,
located at the door’s left side, to the right until
it disengages from the left corner post hole.
Pull the door diagonally to the left, away from
the fireplace.
Figure 4
Locate the two (2) latches at the top of the
control compartment and disengage them from
the door frame bottom vee-flange, pulling down
on their handles to open them.
Retrieve the glass door. Visually inspect the
gasket on the backside of the frame. Gasket
surface must be clean, free of irregularities
and seated firmly.
Position the door in front of the firebox opening
with the bottom of the door held away from the
fireplace (Figure 4 ). Hook the top flange of the
door frame over the top of the firebox frame.
Let the bottom of the door frame swing gently
in towards the fireplace ensuring that the gasket
seats evenly as the door frame draws shut.
Fasten the two latches located underneath the
firebox floor to the door's vee-flange. Close
both the latches securely.
Glass Door Latch
Lower Compartment Door and Hinge
Glass Door
Firebox Floor
Bottom Vee-flange
Glass Door Frame
Top Flange
Glass Door Frame
INSTALL VERMICULITE, GLOWING EM-
BERS AND LOGS
NOTE: Turn off all electricity to the appliance
before you install vermiculite, embers and logs.
DO NOT attempt to install the logs until the ap-
pliance installation has been completed, the gas
line connected and tested for leaks and the initial
burner operation has been checked out.