User’s Manual TT-34 Wooden turntable with USB connection
CAUTION The lightning flash with arrowhead symbol, within an equilateral triangle is intended to alert the user to the presence of uninsulated ‘dangerous voltage’ within the product’s enclosure that may be of sufficient magnitude to constitute a risk of electric shock to persons.
PREPARATION FOR USE UNPACKING AND SET UP • Carefully remove the unit from the display carton and remove all packing material from the unit. • Unwind the AC power plug and extend it to its full length. • Place the unit on a stable, level surface, convenient to an AC outlet, out of direct sunlight, and away from source of excess heat, dust, moisture, humidity or strong magnetic field. • Connect the plug to your AC outlet. • Raise the lid to expose the phonograph.
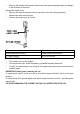
• Remove the opaque while plastic stylus cover from the phonograph stylus by sliding it in the direction of the arrow. Discard the stylus cover. • Remove the twist-tie that was used to secure the tone arm during shipment. • Release the tone arm lock lever. • Connect the plug to your AC outlet. EN EN TONE ARM LOCK LEVER TONE ARM LOCK LEVER STYLUS COVER STYLUS COVER POWER SOURCE • This system uses an AC adaptor. • You should have your outlet changed by a qualified licensed electrician.
PROTECT YOUR FURNITURE This model is equipped with non-skid rubber “feet” to prevent the product from moving when you operate the controls. These “feet” are made from non-migrating rubber material specially formulated to avoid leaving any marks or stains on your furniture. However certain types of oil based furniture polishes, wood preservatives, or cleaning sprays may cause the rubber “feet” to soften, and leave marks or a rubber residue on the furniture.
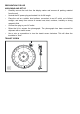
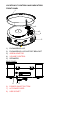
LOCATION OF CONTORLS AND INDICATORS FORNT PANEL 1 2 3 4 5 1) PHONOGRAPH LID 2) PHONOGRAPH LID SUPPORT BRACKET 3) 45RPM ADAPTOR 4) VOLUME CONTROL 5) SPEAKERS BACK PANEL 6 6) 7) 8) 7 8 POWER ON/OFF BUTTON AC POWER CORD USB SOCKET
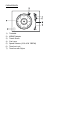
PHONOGRAPH 1) 2) 3) 4) 5) 6) 7) Turntable 45RMP Adaptor Transit Screw Cue Lever Speed Selector (33 & 45 & 78RPM) Tone Arm Lock Tone Arm with Stylus
PLAYING RECORDS This system includes a full-size, 3-speed, belt-drive turntable. You can play 33, 45, and 78RPM records. 1) Press the POWER button to turn on the unit. 2) Make sure that you have removed the stylus cover from the stylus and have released the Tone Arm Lock that secured the tone arm to the tone arm rest. 3) Set the turntable Speed Selector to the appropriate speed, 33, 45, or 78RPM. If you are playing 45RPM singles, place the 45RPM adapter on the center spindle.
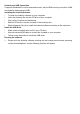
Audacity and USB Connection It supports Windows95 or more advanced version, with the EMS memory more than 128M and Audacity takes space of 5MB. Installing the Audacity Software • To install the Audacity software on your computer: • Insert the Audacity disc into the CD drive of your computer. • Click on My Computer on the desktop. • Dblclick CD drive to view the contents of the Audacity disc. • Dblclick Audacity Set Up to install the Audacity software according to the instruction.
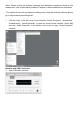
*Note: Please review the software licensing and distribution restrictions found on the software disc. Use of the Audacity software is subject to those conditions and restrictions. **For additional help with recording and editing music using the Audacity software, please go to: http://audacity.sourceforge.net. 1. Click the “start” in the left corner of the computer, Select “Programs”, “Accessories”, “Entertainment”, “Sound Recorder” to open the sound record interface.
3. Select Edit and click “Audio Properties” in the bottom of the menu to open “Audio Properties” interface; 4.
Audacity and USB Connection 5. Select sound recording volume and open “Recording Control” interface: Adjust the line in volume to max or medium, and the sound wave will show on the interface when recording.
1. 2. Using the attribute controls button at the top of the screen, go to beginning, Play, Record, Pause, Stop and go to end. Use the File, Edit, View, Project, Generate, Effect and Analyze menus to Save, Export, and edit the music. Select preferences at the bottom of the menu which will open up Audacity Preferences. You can set the Audio I/O, Quality, File Formats, Spectrograms, Directories Interface, Keyboard and Mouse in the Audacity preference Interface.
Audacity and USB Connection Audacity Preference 3. Adjust the output and input volume.
4. Select the record button interface.
5.1 Press this button , start recording. 5.2 Click the button to skip to start; 5.3 Click the button to skip to end; 5.4 Click the button to play; 5.5 Click the button to pause the record play; 5.6 Click the button to stop the recording. 6. • • • Export the Music Files for WAV, MP3, Ogg. Once you have finished recording, you should save your music to the computer. Click File menu and move down to Export as WAV format, Mp3 format or Ogg format.
Audacity and USB Connection Specific Steps as follows: 1) Download “lame_enc.dll” file, and install it to the software list. 2) After starting the program, you have to click at "edit" in the menu bar, “Preference”, “File Formats”, and click the “search”.
Audacity and USB Connection 3) After opened, it will come to the following message box, click “YES” to go to “Lame_enc.dll”, and find the file’s location: 4) After you find the “Lame_enc.
Service and support For helpdesk support and more information, please visit: www.lenco.com Lenco offers service and warranty in accordance with European law, which means that in case of repairs (both during and after the warranty period) you should contact your local dealer. Important note: It is not possible to send products that need repairs to Lenco directly. Important note: If this unit is opened or accessed by a non-official service center in any way, the warranty expires.
Benutzerhandbuch TT-34 Holzplattenspieler mit USB-Anschluss
ACHTUNG Der Blitz mit Pfeilspitze innerhalb eines gleichseitigen Dreiecks warnt den Benutzer vor nicht isolierter „gefährlicher Spannung“ im Inneren des Produktgehäuses, die stark genug ist, Stromschläge zu verursachen. GEFAHR VON ELEKTRISCHEM SCHOCK NICHT ÖFFNEN ACHTUNG: NIEMALS DIE ABDECKUNG (ODER RÜCKSEITE) DES GERÄTES ÖFFNEN; UM DIE GEFAHR EINES ELEKTRISCHEN SCHOCKS ZU VERRINGERN. KEINE DURCH DEN NUTZER WARTBAREN TEILE IM INNEREN DES GERÄTES. SERVICE NUR DURCH QUALIFIZIERTES FACHPERSONAL.
13) Überlasten Sie niemals die Wandsteckdose. Benutzen Sie die Stromquelle nur wie angegeben. 14) Benutzen Sie Austauschteile nur wie durch den Hersteller vorgegeben. 15) Sollte es notwendig sein, kann nur durch den Hersteller das Gerät an der Wand montiert werden. 16) Bitten Sie einen Servicemitarbeiter nach Fertigstellung irgendwelcher Reparaturoder Wartungsarbeiten um Durchführung von Sicherheitsüberprüfungen.
VORBEREITUNG FÜR DIE ANWENDUNG AUSPACKEN UND AUFSTELLEN • Nehmen Sie das Gerät vorsichtig aus dem Displaykarton und entfernen Sie dann jegliches Verpackungsmaterial vom Gerät. • Wickeln Sie das Netzkabel vollständig ab, um seine volle Länge zu erhalten. • Stellen Sie das Gerät in Nähe einer Netzsteckdose auf einer stabilen, ebenen Oberfläche auf, wo es weder direktem Sonnenlicht noch Quellen starker Hitze, Staub, Nässe, Feuchtigkeit oder starken Magnetfeldern ausgesetzt ist.
• Entfernen Sie die undurchsichtige Plastik-Tonkopfabdeckung des Phonographentonkopfes durch Abziehen in Richtung des Pfeiles. Entsorgen Sie diese Tonkopfabdeckung. • Entfernen Sie den verdrillten Draht, mit dem der Tonarm während des Transportes gesichert wurde. • Lösen Sie den Tonarmsicherungshebel. • Stecken Sie den Netzstecker in die Netzsteckdose. EN DE TONE ARM LOCK LEVER TONARMSICHERUNGSHEBEL STYLUS COVER TONKOPFABDECKUNG STROMQUELLE • Dieses System wird über ein Netzteil betrieben.
SCHÜTZEN SIE IHRE MÖBEL Dieses Modell besitzt zur Vorbeugung gegen ungewolltes Verrutschen während der Bedienung Antirutsch-„Füßchen“. Diese „Füßchen“ bestehen aus einem abriebfesten Gummimaterial, das speziell dafür entwickelt wurde, keine Flecken oder Spuren auf Ihren Möbeln zu hinterlassen. Jedoch können einige Arten ölbasierter Möbelpolituren, Holzschutzmittel oder Reinigungssprays diese „Gummifüßchen“ weich machen und so zu Spuren oder Gummiabrieb auf Ihren Möbeln führen.
LAGE DER BEDIEN- UND ANZEIGEELEMENTE FRONTSEITE 1 2 3 4 5 1) PHONOGRAPHENDECKEL 2) PHONOGRAPHENDECKELSTÜTZE 3) 45 U/min-ADAPTER 4) LAUTSTÄRKEREGLER 5) LAUTSPRECHER RÜCKSEITE 6 6) 7) 8) 7 8 EIN/AUS-SCHALTER AC STROMKABEL USB-PORT
PHONOGRAPH 1) 2) 3) 4) 5) 6) 7) Plattenteller 45 U/min-Adapter Transportsicherungsschraube Lifthebel Drehzahlwähler (33, 45 und 78 U/min) Tonarmverriegelung Tonarm mit Tonkopf
AUFNAHMEN ABSPIELEN Dieses System besitzt einen riemengetriebenen Plattenteller mit drei Umdrehungsgeschwindigkeiten. Hiermit können Sie Platten für 33, 45 und 78 U/min abspielen. 1) Drücken Sie zum Einschalten des Geräts die EIN/AUS-Taste. 2) Kontrollieren Sie, ob Sie die Tonkopfabdeckung vom Tonkopf entfernt haben und entriegeln Sie die Tonarmverriegelung, die den Tonarm am Gerät fixiert. 3) Stellen Sie am Plattenteller-Umdrehungszahlwähler die gewünschte Umdrehungszahl von 33, 45 oder 78 U/min ein.
Audacity und USB-Anschluss Es wird Windows ab der Version 95 mit einem EMS-Speicher größer als 128 MB unterstützt. Audacity belegt 5 MB EMS-Speicher. Installation des Programms Audacity • Für die Installation des Programms Audacity auf Ihren Computer: • Legen Sie die Audacity-CD in das CD-Laufwerk Ihres Computers ein. • Klicken Sie auf das Symbol Arbeitsplatz Ihres Desktops. • Doppelklicken Sie auf das Symbol des CD-Laufwerks, um den Inhalt der Audacity-CD zu lesen.
*Hinweis: Bitte lesen Sie sich die auf der CD befindliche Softwarelizenzierung und Distributionseinschränkung durch. Die Nutzung des Programms Audacity erfolgt zu diesen Bedingungen und Beschränkungen. **Bitte besuchen Sie folgende Seite für weiterführende Hilfe zur Aufnahme und zum Editieren von Musik mit Audacity: http://audacity.sourceforge.net. 1.
3. Klicken Sie zum Öffnen des Fensters mit den Audioeigenschaften in der Menüleiste auf „Edit“ (Bearbeiten) und dann auf „Audio Properties” (Audioeigenschaften) im Auswahldialog unten. 4.
Audacity und USB-Anschluss 5. Wählen Sie Aufnahmelautstärke aus und öffnen Sie dann das „Recording Control” (Aufnahmeeinstellungen)-Fenster: Stellen Sie den Lautstärkeregler auf Maximum oder Medium ein. Die Klangwelle wird während der Aufnahme im Fenster angezeigt.
1. Steuern Sie das Programm mit den Bediensymbolen in der oberen Fensterleiste: an den Anfang springen, Abspielen, Aufnehmen, Pausieren, Anhalten und ans Ende springen. Benutzen Sie zum Speichern, Exportieren und Editieren der Musik die Menüs Datei, Bearbeiten, Ansicht, Projekt, Generieren, Effekte und Analyse. 2. Die Auswahl von Einstellungen unten in der Auswahlliste des Menüs Bearbeiten öffnet das Fenster mit den Audacity-Einstellungen.
Audacity und USB-Anschluss Audacity konfigurieren 3. Stellen Sie die Wiedergabelautstärke und den Aufnahmepegel ein.
4. Drücken Sie zur Aufnahme der Platte auf die Aufnahmeschaltfläche . Im Fenster wird die linke und rechte Aufnahmespur angezeigt.
5.1 Drücken Sie auf diese -Schaltfläche, wird die Aufnahme gestartet. 5.2 Klicken Sie die -Schaltfläche, um zum Anfang zu springen; 5.3 Klicken Sie die -Schaltfläche, um zum Ende zu springen; 5.4 Klicken Sie die 5.5 Klicken Sie die -Schaltfläche für die Wiedergabe; -Schaltfläche für ein Unterbrechen der Wiedergabe bzw. der Aufnahme; 5.6 6. • Klicken Sie die -Schaltfläche zum Beenden der Aufnahme. Exportieren von Musikdateien in das WAV-, MP3- und Ogg-Format.
Audacity und USB-Anschluss Die Schritte im Einzelnen: 1) Laden Sie die Datei „lame_enc.dll” herunter und installieren Sie diese in Ihre Softwareliste. 2) Nach dem Start des Programms müssen Sie in der Menüleiste auf „edit" (bearbeiten) klicken, danach „Preference” (Einstellungen) und „File Formats” (Dateiformat) auswählen und dann „search” (Suche) anklicken.
Audacity und USB-Anschluss 3) Nach Öffnen des Suchfensters erscheint ein Hinweisfenster, in dem Sie auf „YES” (Ja) klicken, um die Datei „Lame_enc.dll” zu lokalisieren und einzubinden. 4) Nachdem Sie die Datei „Lame_enc.dll” lokalisiert haben, gehen Sie auf „open“ (öffnen) und klicken Sie abschließend auf „Y” (Ja), um die Installation zu beenden.
Service und Unterstützung Schauen Sie bitte für unseren Helpdesk-Support und weitere Informationen auf unserer Homepage nach: www.lenco.com Lenco bietet Leistungen und Garantien im Einklang mit Europäischem Recht. Im Falle von Reparaturen (sowohl während als auch nach Ablauf der Garantiezeit) sollten Sie deshalb Ihren Einzelhändler kontaktieren. Wichtiger Hinweis: Es ist nicht möglich, Geräte für Reparaturen direkt an Lenco zu schicken.
Gebruikershandleiding TT-34 Houten platenspeler met USB-aansluiting
LET OP The lightning flash with arrowhead symbol, within an equilateral triangle is intended to alert the user to the presence of uninsulated ‘dangerous voltage’ within the product’s enclosure that may be of sufficient magnitude to constitute a risk of electric shock to persons.
14) Gebruik uitsluitend vervangingsonderdelen gespecificeerd door de fabrikant. 15) Het product mag alleen aan de muur worden gemonteerd wanneer aanbevolen door de fabrikant. 16) Nadat onderhoud of reparatie is uitgevoerd, vraag de monteur dit product op veiligheid te controlerne. VOORBEREIDING VOOR GEBRUIK UITPAKKEN EN INSTELLEN • Haal het apparaat voorzichtig uit de verpakking en verwijder alle verpakkingsmaterialen van het apparaat. • Rol het netsnoer volledig uit.
• Verwijder de ondoorzichtige, kunststof naaldcover van de platenspeler door deze in de richting van het pijltje te schuiven. U kunt deze naaldcover afdanken. • Verwijder de binder waar de toonarm mee vast is gezet voor transportveiligheid. • Ontgrendel het hendel van de toonarm. • Steek de stekker in een stopcontact. EN NL TONE ARM LOCK LEVER VERGRENDELHENDEL VAN TOONARM STYLUS COVER NAALDCOVER VOEDINGSBRON • Dit systeem maakt gebruik van een lichtnetadapter.
BESCHERM UW MEUBILAIR Dit model is voorzien van rubberen “voetjes” met antisliplaag om te voorkomen dat het apparaat beweegt wanneer u de bedieningen gebruikt. Deze “voetjes” zijn vervaardigd van niet-migrerend rubber materiaal, speciaal ontwikkeld ter voorkoming van markeringen of vlekken op uw meubilair.
LOCATIE VAN BEDIENINGEN EN INDICATIES VOORPANEEL 1 2 3 4 5 1) DEKSEL VAN DRAAIPLATEAU 2) DEKSELSTEUN 3) 45RPM ADAPTER 4) VOLUMEREGELAAR 5) LUIDSPREKERS ACHTERPANEEL 6 6) 7) 8) 7 8 AAN/UITTOETS AC-NETSNOER USB-AANSLUITING
PLATENSPELER 1) 2) 3) 4) 5) 6) 7) Draaiplateau 45RMP adapter Transportschroef Toonarmbediening Toerenschakelaar (33 & 45 & 78TPM) Toonarmvergrendeling Toonarm met naald
PLATEN AFSPELEN Dit systeem bevat een compleet, riemaangedreven draaiplateau met 3 snelheden. U kunt 33, 45 en 78TPM langspeelplaten afspelen. 1) Druk op de AAN/UITTOETS om het apparaat in te schakelen. 2) Zorg ervoor dat de naaldcover van de naald is verwijderd en dat de toonarmvergrendeling, waarmee de toonarm vast zit op de toonarmsteun, los zit. 3) Stel de toerenschakelaar in op de vereiste snelheid, 33, 45 of 78TPM. Als u 45TPM singles afspeelt, dient u de 45TPM adapter op de middenas te plaatsen.
Audacity- en USB-aansluiting Het apparaat ondersteunt Windows95 of hogere versie, met het EMS-geheugen van meer dan 128M en Audacity neemt 5MB ruimte in beslag. De Audacity Software installeren • De Audacity software op uw computer installeren: • Steek de Audacity disk in de CD-drive van uw computer. • Klik op Mijn Computer op het bureaublad. • Dubbelklik op de CD-drive om de inhoud van de Audacity disk te zien. • Dubbelklik op Audacity Set Up om de Audacity software volgens de instructies te installeren.
Audacity- en USB-aansluiting 2.
3. Selecteer “Edit” (Bewerken) en klik op “Audio Properties” (Audio-eigenschappen) onder in het menu om de interface “Audio Properties” (Audio-eigenschappen) te openen; 4.
Audacity- en USB-aansluiting 5. Selecteer het opnamevolume en open de interface “Recording Control” (Opnamebediening): Pas het lijn-in volume aan op maximum of gemiddeld, de interface laat de geluidsgolf zien tijdens de opname.
1. 2. Gebruik de bedieningstoetsen boven in het scherm voor de functies Ga naar begin, Start, Opnemen, Pauze, Stop en Ga naar einde. Gebruik de menu’s Bestand, Bewerken, Open, Project, Genereren, Effect en Analyse om de muziek te bewerken, op te slaan en te exporteren. Selecteer Voorkeur onder in het menu om het menu Audacity Voorkeur te openen. U kunt in het Audacity Voorkeursmenu de opties Audio I/O, Kwaliteit, Bestandsformaat, Spectrogrammen, Folderinterface, Toetsenbord en Muis instellen.
Audacity- en USB-aansluiting Audacity Voorkeur 3. Pas het uitgang- en ingangsvolume aan.
4. Selecteer de opnametoets om de plaat op te nemen, de linker en rechter tracks zullen in de interface worden weergegeven.
5.1 Druk op de toets 5.2 Klik op de toets om naar het begin te gaan; 5.3 Klik op de toets om naar het einde te gaan; 5.4 Klik op de toets om af te spelen; 5.5 Klik op de toets om het afspelen te pauzeren; 5.6 Klik op de toets om de opname te stoppen. 6. • • om de opname te starten. Exporteer de muziekbestanden naar WAV, MP3 of Ogg. Nadat de opname is voltooid, dient u uw muziek op de computer op te slaan.
Audacity- en USB-aansluiting Specifieke stappen: 1) Download het bestand “lame_enc.dll” en installeer het in de softwarelijst. 2) Klik na het starten van het programma op 'edit' (bewerken) in de menubalk en vervolgens op 'Preference' (voorkeuren), 'File Formats' (bestandsformaten) en klik dan op 'search' (zoeken).
Audacity- en USB-aansluiting 3) Na het openen verschijnt het volgende berichtenvak. Klik hier op 'Yes' (ja) om naar 'Lame_enc.dll' te gaan en zoek het bestand op: 4) Nadat u het bestand “Lame_enc.dll” hebt gevonden, open het en klik op “Y” (Ja) om de installatie af te ronden.
Service en ondersteuning Voor klantendienst en meer informatie, bezoek a.u.b.: www.lenco.com Lenco biedt service en garantie aan overeenkomstig met de Europese wetgeving. Dit houdt in dat u, in het geval van reparaties (zowel tijdens als na de garantieperiode), uw lokale handelaar moet contacteren. Belangrijke opmerking: Het is niet mogelijk om producten die gerepareerd moeten worden direct naar Lenco te sturen.
Mode d'emploi TT-34 Tourne-disque en bois avec port USB
ATTENTION Le symbole d'éclair avec une flèche dans un triangle équilatéral vous indique la présence d'une « tension dangereuse » non isolée dans le boîtier de ce produit qui pourrait être suffisamment forte pour constituer un risque de décharge électrique pour les personnes. RISQUE DE DÉCHARGE ÉLECTRIQUE NE PAS OUVRIR AVERTISSEMENT : AFIN DE RÉDUIRE LE RISQUE DE CHOC ÉLECTRIQUE, N'ENLEVEZ PAS LE CACHE (OU L'ARRIÈRE) DE L'APPAREIL.
15) Ce produit doit être monté sur un mur uniquement si le fabricant le recommande. 16) Une fois la réparation ou l'entretien terminé, demandez à un technicien d'effectuer des vérifications de sécurité. PRÉPARATION AVANT UTILISATION DÉBALLAGE ET INSTALLATION • Sortez soigneusement l’appareil du carton et enlevez tous les emballages. • Déroulez entièrement le cordon d'alimentation CA. • Posez l’appareil sur une surface plane et stable, à proximité d’une prise CA.
• Enlevez la protection de la pointe de lecture en plastique blanc opaque qui est sur la pointe de lecture du phonographe en la glissant dans le sens de la flèche. Jetez la protection de la pointe de lecture. • Enlevez le lien torsadé qui servait à immobiliser le bras de lecture lors du transport. • Libérez le levier de blocage du bras de lecture. • Branchez la fiche d'alimentation sur une prise électrique CA.
PROTECTION DES MEUBLES Ce modèle est équipé de pieds antidérapants pour éviter qu’il ne bouge pendant que l’utilisateur effectue les réglages. Ces pieds sont en caoutchouc spécialement formulé pour éviter les traces ou les marques sur vos meubles.
EMPLACEMENT DES BOUTONS ET VOYANTS FAÇADE 1 2 3 4 5 1) COUVERCLE DU PHONOGRAPHE 2) SUPPORT DU COUVERCLE DU PHONOGRAPHE 3) ADAPTATEUR 45 TOURS 4) RÉGLAGE DU VOLUME 5) ENCEINTES PANNEAU ARRIÈRE 6 6) 7) 8) 7 8 BOUTON MARCHE/ARRÊT CORDON D’ALIMENTATION SECTEUR CONNECTEUR USB
PHONOGRAPHE 1) 2) 3) 4) 5) 6) 7) Tourne-disque Adaptateur 45 tours Vis de transport Lève-bras Sélecteur de vitesse (33, 45 et 78 tours) Blocage du bras de lecture Bras de lecture avec pointe de lecture
LECTURE DE DISQUES Ce système inclut un tourne-disque entraîné par courroie à 3 vitesses grandeur nature. Il permet de lire des disques 33, 45 et 78 tours. 1) Appuyez sur le bouton MARCHE/ARRÊT pour mettre en marche l'appareil. 2) Vérifiez que vous avez bien enlevé la protection de la pointe de lecture et avez libéré le bras de lecture qui immobilisait le bras de lecture sur son support. 3) Réglez le sélecteur de vitesse du tourne-disque sur la vitesse appropriée : 33, 45 ou78 tours par minute.
Audacity et port USB Il prend en charge Windows 95 ou les versions ultérieures, avec une mémoire EMS faisant plus de 128 M et Audacity prend 5 Mo d'espace. Installation du logiciel Audacity • Pour installer le logiciel Audacity sur votre ordinateur : • Insérez le CD Audacity dans le lecteur de CD de votre ordinateur. • Cliquez sur Ordinateur sur le bureau. • Faites un double clic sur le lecteur de CD pour afficher le contenu du disque Audacity.
*Remarque : Veuillez lire les restrictions de licence et de distribution de logiciel contenues dans le disque du logiciel. L'utilisation du logiciel Audacity est soumise à ces conditions et restrictions. **Pour obtenir davantage d'aide concernant l'enregistrement et la modification de musique grâce au logiciel Audacity, visitez : http://audacity.sourceforge.net. 1.
3. Sélectionnez Modifier et cliquez sur « Audio Properties » (propriétés audio) en bas du menu pour ouvrir l'interface « Audio Properties » (propriétés audio). 4.
Audacity et port USB 5. Sélectionnez le volume d'enregistrement audio et ouvrez l'interface « Recording Control » (contrôle d'enregistrement) : Réglez le volume d'entrée de ligne sur max ou moyen, puis l'onde acoustique s'affichera sur l'interface pendant l'enregistrement.
1. 2. Utilisez les boutons de commande d'attributs en haut de l'écran pour aller au début, lire, enregistrer, faire pause, arrêter et aller à la fin. Utilisez les menus pour modifier, visualiser, projeter, générer, ajouter des effets et analyser le fichier pour ensuite enregistrer, exporter et modifier votre musique. Sélectionnez Préférences en bas du menu pour ouvrir les préférences Audacity.
Audacity et port USB Préférences Audacity 3. Réglez le volume d'entrée et de sortie.
4. Sélectionnez le bouton Enregistrement pour enregistrer le disque, les pistes de gauche et droite s'afficheront sur l'interface.
5.1 Appuyez sur le bouton Enregistrement 5.2 Cliquez sur le bouton pour revenir au début. 5.3 Cliquez sur le bouton pour aller à la fin. 5.4 Cliquez sur le bouton pour lire. 5.5 Cliquez sur le bouton pour mettre en pause la lecture de l'enregistrement. 5.6 Cliquez sur le bouton 6. • • pour démarrer l'enregistrement. pour arrêter l'enregistrement. Exporter les fichiers de musique au format WAV, MP3 ou OGG.
Audacity et port USB Suivez la procédure suivante : 1) Téléchargez le fichier « lame_enc.dll », puis installez-le dans la liste du logiciel. 2) Après avoir démarré le programme, vous devez cliquer sur « Édition » dans la barre de menu, sur « Préférences », « Formats de fichiers », puis sur « Rechercher ».
Audacity et port USB 3) Une fois que cela est ouvert, le message suivant s'affichera, cliquez sur « Oui » pour aller à « Lame_enc.dll » et trouver l'emplacement du fichier. 4) Une fois que vous avez repéré le fichier « Lame_enc.dll », ouvrez-le et cliquez sur « Y » (oui) pour terminer l'installation.
Service et assistance Pour obtenir de l'assistance et en savoir plus, visitez : www.lenco.com Lenco propose un service et une garantie conformément à la législation européenne, ce qui signifie qu’en cas de besoin de réparation (aussi bien pendant et après la période de garantie), vous pouvez contacter votre revendeur le plus proche. Remarque importante : Il n’est pas possible de renvoyer l’appareil pour réparation directement à Lenco.
Manual de usuario TT-34 Tocadiscos de madera con conexión USB
PRECAUCIÓN El símbolo del rayo con cabeza de flecha dentro de un triángulo equilátero tiene como finalidad alertar de la presencia de “tensión peligrosa” sin aislar dentro de la carcasa del producto que puede tener una magnitud suficiente como para constituir un riesgo de descarga eléctrica a las personas.
15) El producto puede montarse en una pared sólo si lo recomienda el fabricante. 16) Tras la finalización de cualquier mantenimiento o reparación a este producto, solicite al técnico de mantenimiento que realice las comprobaciones de seguridad. PREPARACIÓN PARA EL USO DESEMBALAJE Y CONFIGURACIÓN • Retire con cuidado la unidad del cartón de muestra y retire todo el material de embalaje de la unidad. • Desenrolle la toma de alimentación CA y extiéndala hasta alcanzar su longitud máxima.
• Retire la pata de la aguja blanca opaca de la aguja del fonógrafo deslizándola en la dirección de la flecha. Elimine la cubierta de la aguja. • Retire la atadura de alambre que se ha empleado para asegurar el brazo del tocadiscos durante el envío. • Suelte la palanca de bloqueo del brazo del tocadiscos. • Conecte el enchufe a la toma CA.
PROTEJA SU MOBILIARIO Este modelo está equipado “pies” de goma "antideslizantes" para evitar que el producto se mueva cuando opere los controles. Estos “pies” están fabricados en material de goma antidesplazamiento formulado especialmente para evitar dejar marcas o manchas en el mobiliario. Sin embargo, cierto tipo de ceras para muebles basadas en aceite, conservantes de la madera o sprays de limpieza pueden provocar que los “pies” de goma se suavicen y dejen marcas o residuos de goma en el mobiliario.
UBICACIÓN DE LOS CONTROLES E INDICADORES PANEL FRONTAL 1 2 3 4 5 1) 2) TAPA DEL FONÓGRAFO ABRAZADERA DE APOYO DE LA TAPA DEL FONÓGRAFO 3) ADAPTADOR DE 45RPM 4) CONTROL DE VOLUMEN 5) ALTAVOCES PANEL POSTERIOR 6 6) 7) 8) 7 8 BOTÓN DE ENCENDIDO/APAGADO CABLE DE ALIMENTACIÓN DE CA PUERTO USB
FONÓGRAFO 1) 2) 3) 4) 5) 6) 7) Tocadiscos Adaptador de 45RMP Tornillo de transporte Palanca de señales Selector de velocidad (33 & 45 y 78RPM) Bloqueo del brazo del tocadiscos Brazo del tocadiscos con aguja
REPRODUCIR DISCOS Este sistema incluye un tocadiscos propulsado por correa de 3 velocidades de gran tamaño. Puede reproducir discos de 33, 45, y 78RPM. 1) Pulse el botón de ENCENDIDO para encender la unidad. 2) Asegúrese de que ha retirado la tapa de la aguja de la misma y ha soltado el bloqueo del brazo del tocadiscos que asegura el brazo al punto de descanso del mismo. 3) Fije el selector de velocidad del tocadiscos a la velocidad adecuada, 33, 45, o 78RPM.
Audacity y conexión USB Es compatible con Windows95 o una versión más avanzada, con una memoria EMS superior a 128M y Audacity ocupa un espacio de 5MB. Instalación del software Audacity • Para instalar el software Audacity en el ordenador: • Inserte el disco de Audacity en la unidad de CD de su ordenador. • Haga clic en Mi PC en el escritorio. • Haga doble clic en la unidad del CD para ver los contenidos del disco Audacity.
*Nota: Por favor, revise la licencia de software y las restricciones de distribución que se encuentran en el disco de software. El uso del software Audacity está sujeto a esas condiciones y restricciones. **Para obtener una ayuda adicional con la grabación y edición de música usando el software Audacity, por favor, vaya a: http://audacity.sourceforge.net. 1.
3. Seleccione Editar y haga clic en “Audio Properties (Propiedades de audio)” situado en la parte inferior de los menús para abrir la interfaz “Audio Properties (Propiedades de audio)”; 4.
Audacity y conexión USB 5. Seleccione el volumen de grabación de sonido y abra la interfaz “Recording Control (Control de grabación)”: Ajuste la línea en volumen a máximo o medio, y la onda sonora se mostrará en la interfaz cuando grabe.
1. 2. Usando el botón de control de atributos situado en la parte superior de la pantalla, vaya al principio, Reproducción, Grabara, Pausa, Parada e ir al final. Use los menús Archivo, Editar, Ver, Proyecto, Generar, Efecto y Analizar para Guardar, Exportar y Editar la música. Seleccione Preferencias en la parte inferior del menú que abrirá las Preferencias de Audacity.
Audacity y conexión USB Preferencias de Audacity 3. Ajuste el volumen de entrada y salida.
4. Seleccione el botón de grabación para grabar el disco; se mostrarán las pistas izquierda y derecha en la interfaz.
5.1 Pulse este botón ; se inicia la grabación. 5.2 Haga clic en el botón para saltar a inicio; 5.3 Haga clic en el botón para saltar a final; 5.4 Haga clic en el botón para reproducirlo; 5.5 Haga clic en el botón para hacer una pausa en la reproducción del disco; 5.6 Haga clic en el botón 6. • • para detener la grabación. Exporte archivos de música a formatos WAV, MP3, Ogg. Una vez que haya finalizado la grabación, debe guardar la música en el ordenador.
Audacity y conexión USB Los pasos específicos son los siguientes: 1) Descargue el archivo “lame_enc.dll” e instálelo en la lista de software. 2) Tras iniciar el programa, tiene que hacer clic en "editar" en la barra del menú, en “Preferencias”, “Formato de archivo”, y hacer clic en “buscar”.
Audacity y conexión USB 3) Una vez que se haya abierto, aparecerá el siguiente cuadro de mensajes; haga clic en “SÍ” para ir a “Lame_enc.dll”, y encontrar la ubicación del archivo: 4) Una vez que encuentre el archivo “Lame_enc.dll”, ábralo y haga clic en “Y (S)” para finalizar la instalación.
Servicio y asistencia Para obtener soporte de escritorio y más información, por favor visite: www.lenco.com Lenco ofrece servicio y garantía en cumplimiento con las leyes de la Unión Europea, lo cual implica que, en caso de que su producto precise ser reparado (tanto durante como después del periodo de garantía), deberá contactar directamente con su distribuidor. Nota importante: No es posible enviar sus reparaciones directamente a Lenco.