
Manual


WARNING: To prevent possible hearing damage, do not listen at high volume
levels for long periods.
WARNING: When participating in the traffic listening to a personal music
player can make the listener less aware of potential dangers such as
approaching cars.
WARNING
Class 1 Laser Product
UNPACKING AND SET UP
•
Carefully remove the unit from the display carton and remove all packing
material from the unit.
•
Unwind the AC power cord and extend it to its full length.
•
Unwind the FM Antenna wire and extend it to its full length.
•
Place the unit on a stable, level surface, convenient to an AC outlet away from a
strong magnetic field.
•
Connect the plug to your AC outlet.
•
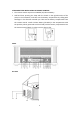
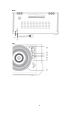
Raise the lid to expose the phonograph. The phonograph has been secured for
shipment with a transit screw. Use a coin or screwdriver to turn the
transportation locking screw clockwise. This will allow the turntable to "float".
Transportation locking screw
•
Remove the opaque white plastic stylus cover from the phonograph stylus by
sliding it in the direction of the arrow (refer to the picture on the right side).
•
During this operation pay attention to the stylus, because damage to the stylus is
not covered by the guarantee.
•
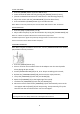
Remove the twist-tie that was used to secure the tone arm during shipment.
•
Release the tone arm lock lever (see Fig.1 below).
•
Connect the plug to your AC 230V, 50Hz outlet.
4