Contents z Introduction z Warning z Caution z Main Unit Description z Remote Control z OSD basic adjustment z DTV Features z USB Features z DVD manual z Specifications z Trouble Shooting 1
Introduction Thank you very much for your purchase of our product of LCD TV. It serves as a normal colour TV and PC monitor. To enjoy your TV to the full from the very beginning, read this manual carefully and keep it handy for ready reference. INSTALLATION ķ Locate the TV in a room where direct light does not strike the screen. Total darkness or a reflection on the picture screen can cause eyestrain. Soft and indirect lighting is recommended for comfortable viewing.
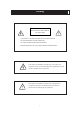
Warning CAUTION RISK OF ELECTRIC SHOCK DO NOT OPEN CAUTION: TO AVOID THE RISK OF ELECTRIC SHOCK. DO NOT REMOVE COVER (OR BACK). NO USER- SERVICEABLE PARTS INSIDE. REFER SERVICING TO QUALIFIED SERVICE PERSONNEL. This symbol is intended to alert the user to avoid the risk of electric shock, do not disassemble this equipment by anyone except a qualified service personnel.
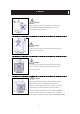
Caution Caution - High voltages are used in the operation of this product. Do not open the product's casing. Refer servicing to qualified service personnel . Caution To prevent fire or electrical shock hazard, Do not expose the main unit to moisture. Caution Do not drop or push objects into the television cabinet slots or openings. Never spill any kind of liquid on the television receiver. Caution Avoid exposing the main unit to direct sunlight and other sources of heat.
Caution Caution Never stand on, lean on, push suddenly the product or its stand. You should Pay special attention to children. Caution Do not place the main unit on an unstable cart stand, shelf or table. Serious injury to an individual, and damage to the television, may result if it should fall. Caution When the product is not used for an extended period of time, it is advisable to disconnect the AC power cord from the AC outlet. Caution The LCD panel used in this product is made of glass.
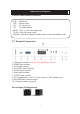
Main unit description Control Panel Button Function VOL+ : Volume up. VOL- : Volume down. CH+ : TV channel up. CH- : TV channel down. MENU : Press to select the main menu. TV/AV : Select the input signal. POWER : Switch on when in standby mode or enter the standby mode. TV Terminal Connections 1. USB input terminal (Only used for upgrading software). 2. HDMI input terminal. 3. VGA input terminal. 4. PC AUDIO input terminal. 5. SCART input terminal. 6. Video input terminal . 7. AUDIO input terminal. 8.
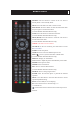
Remote control POWER: Press this button to switch on the TV when at standby mode or enter standby mode. MUTE: Press this button to mute or restore sound. DVD SETUP: Press this button to enter the DVD main menu and press again to exit the main menu. (Used for models with DVD function only) TITLE: Press this button to return the title menu. (Used for models with DVD function only) MENU(BLUE): Press this button to return the root menu or exit the DVD main menu.
CH+/CH-: Change the channel up and down. VOL+/VOL-: Adjust the volume. INFO: Display some information of current program in DTV mode. (Used for models with DTV function only) AUDIO: Press to select the DTV audio or DVD audio. (Used for models with DTV or DVD function only) FAV: Switch between custom set “Favourite List”. (Used for models with DTV function only) TV/RADIO: Switch between DTV program and radio program (only audio but not image).
REVEAL: Press this button to reveal the hidden information in Teletext page. Press again to hide the information. (Used for European region only) ˖Skip to previous chapter (Used for models with DVD function only) SUBPAGE: Carry out the function of SUBCODE in the text while enter the text display mode. (Used for European region only) ˖Skip to next chapter (Used for models with DVD function only) ZOOMġSelect the zoom picture.
OSD basic adjustment Installation Guide If this is the first time you are turning on the TV and there are no programs in the TV memory, the “Installation Guide” menu will appear on the screen. 1. Press the “e/f” button to select the local language. 2. Press “c/d” button to select “Auto Scan” and press the “f” button or “ENTER” button to “MENU” button to skip, or press the “EXIT” button to exit if necessary.
11. Press “c/d” button to select “Blue” and press the “e/f” button to adjust . 12. Press “c/d” button to select “Aspect Ratio” and press the “e/f” button to select the size which you desire. Note: When the current source is “PC”, the “Aspect Ratio” item only has two options for “16:9” and “4:3”. 13. Press “c/d” button to select “Noise Reduction” and press the “e/f” button to select open or close the noise reduction function . SOUND You can select the type of sound, which best corresponds to your listening.
6. Press “c/d” button to select “Auto Sleep” and press the “e/f” button to select the function “On” or “Off”. 7. Press “c/d” button to select “Time Zone” and press the “e/f” button to select the local time zone. OPTION 1. Press the “MENU” button to enter the OSD menu. Then press “e/f” button to select the “OPTION” menu. Enter the “OPTION” menu by pressing “d” button or “ENTER” button. 2. Press “c/d” button to select “Language” and press the “e/f” button to select the OSD language which you desire. 3.
“Off” .Setting to On enables Program Blocking . 3. Press “c/d” button to select “Change Password” and press the “f” button or “ENTER” button to enter to change password . 4. Press “c/d” button to select “Block Programme ” and press the “f” button or “ENTER” button to enter. Press “c/d” button to select the item which you want to lock . Press “GREEN” button to lock the item and press “GREEN” button again to unlock. Press “MENU” button to return the previous menu. Press “EXIT” button to exit the menu. 5.
4. Press “c/d” button to select “ATV Manual Scan” and press the “f” button or “ENTER” button to do DTV manual search. Press “MENU” button to return the previous menu. Press “EXIT” button to exit the menu. Press “RED” button to save the program. 5. Press “c/d” button to select “Programme Edit” and press the “f” button or “ENTER” button to enter. a. DELETE Press “c/d” button to select the program and press “RED” button twice to delete the program. b.
5. Press “c/d” button to select “Size” and press the “e/f” button to adjust. 6. Press “c/d” button to select “Phase” and press the “e/f” button to adjust. DTV CHANNEL 1. Press the “MENU” button to enter the OSD menu. Then press “e/f” button to select the “CHANNEL” menu. Enter the “CHANNEL” menu by pressing “d” button or “ENTER” button. 2. Press “c/d” button to select “Auto Scan” and press the “f” button or “ENTER” button to do auto search. Press “MENU” button to return the previous menu.
DTV Features Favourite List When the source is selected as DTV, users can enter FAVOURITE LIST by pressing “FAV” button. The “Favourite LIST” window is illustrated as follows: Program Information When the source is selected as DTV, you can press “INFO” button to display the channel’s information. The PROGRAM INFORMATION window is illustrated as follows: Audio When the source is selected as DTV, users can enter “Audio channel” by pressing “AUDIO” button.
Electronic Program Guide˄EPG˅ Electronic Program Guide provides program information which will be broadcasted now or in the future. The system will display EPG window by pressing “EPG” button. DATE and TIME information is displayed on the right of the window. The left side shows all channels. The right side shows the programs in the channel. The selected program is also displayed on the top of the screen. When you have selected a program, you can press “INFO” button to display the program’s detail.
DVD manual BASIC PLAY BACK Preparations Stop playback Press the TV/AV button on the front panel or SOURCE button to select the DVD source. Basic playback 1. Press STOP button to go to stop mode, the TV screen will show the start-up logo, For some disc the player can recall the location where stopped, such as DVDs and audio CDs,. Press PLAY/PAUSE or ENTER to resume playback from the location where playback is stopped, 3. Press STOP twice to stop completely 1.
IMPORTANT NOTE; ALL DESCRIBING FUNCTION IS FOR DVD DISCS. IF YOU PLAY OTHER FORMAT DISC, THE OPERATION AND DISPLAY ON SCREEN MAY DIFFERENT. SUBTITLE Press “ SUBTITLE ”, the screen will display “ SUBTI-TLE 01/XX XXXXX “, “01” indicates the ordinal number of this language; “XX” indicates total number of language; “XXXXX” indicates the language of country, (the number of language depends on disc). This function can select up to 32 languages display-ed on screen.
SPECIAL FUNCTION PLAYBCK You can view Kodak picture CD and JPEG picture CD on this TV. Playback Insert a Kodak picture CD or JPEG picture CD into the tray and the disc will be loaded Automatically. If the disc type can be identified, the player will start showing the pictures one by one (slide show mode).if a navigation menu will be displayed use the navigation buttons to select a file, then press the ENTER button.
DVD SYSTEM SETUP General Setup Process press the DVD-SETUP button, the general setup page, preference page will be displayed in turn, press or to select, the item, then press to enter the submenu. press or to select, then press PLAY/PAUSE or ENTER to confirm. press DVD SETUP repeatedly to exit the set-up menus. General setup page ASPECT RATIO DESCRIPTION When using the DVD with the internal TV, select 4:3/LB. The following information applies only when the DVD output is connected to an external TV.
DVD SYSTEM SETUP(CONTINUED) General Setup Page TV Display: user can select different display wide model such as 4:3 PS, 4:3 LB, 16:9 WIDE. On Screen Display (OSD) Language: Users can select on-screen display Language. Screen Saver: if the screen saver is on, then there will be an animated picture of DVD on the screen whenever the DVD player is idle for more than 3 minutes. Last memory: memorize the chapter you have just watched.
Preference page The preference page is only available when there is no disc in the player . these settings are applied consistently to all discs which are inserted and played. TV Type: this player Supports different TV output, including Auto, NTSC, and PAL systems. Usually please set to Auto Parental:the parental control function works in conjunction with the different censorship classes assigned to DVDs.
Password change; You can change your password. by entering 4 digits. Your must confirm the 4 digits before the new password can be accepted NOTE: If you forget your password or a password is accidentally set enter 8888 as the password, this will enable you to regain control.
Default: resets all settings (except password and parental lock status) for this DVD player back to the manufacturers original settings, press ENTER to perform the reset, Note; Some functions may not be available depending no the type of disc. ANALOG AUDIO SETUP PAGE 1.Press the DVD-SETUP button,the Analog Audio Setup Page, Preference Page will be displayed in turn. 2.press c or d to select,the item,then press to enter the submenu. 3.Press c or d to select then press PLAY/PAUSE or ENTER to comfirm. 4.
PLAYABLE DISCS The following discs can be played; DISCS LABEL CONTENTS DIMENSION DVD VIDEO Audio + video (moving picture) 12cm AUDIO CD Audio 12cm JPEG Video(picture) 12cm KODAK CD Video(picture) 12cm CD-R Audio or video (moving picture) 12cm CD-RW Audio or video (moving picture) 12cm CD+G Video(picture) 12cm MPEG4 Audio or video (moving picture) 12cm Support discs DVD, VCD, CD-R, CD-RW, SVCD, DVCD, HDCD, JPEG, CD+G, MPEG-4 Kodak CD , W MA.
DICS PROTECTION AND DVD CHARACTERSTICS ON HANDLING DISCS ON STORING DISCS Do not touch the playback side of the disc. . Do not store discs in a place subject to direct sunlight or near heat Do not attach paper or tape to disc. source, Do not store discs in place subject to moisture and dust such as a bathroom or near a humidifier. Store discs vertically in a case. Stacking or placing object on discs outside of their case may cause warping.
SPECIFICATIONS RGB INPUT Mode Resolution Horizontal Frequency (KHz) Vertical Frequency (HZ) DOS 720x400 31.5 70 VGA 640x480 31.5 60 SVGA 800x600 37.9 60 XGA 1024x768 48.4 60 WXGA 1360x768 47.7 60 WXGA+ 1440x900 55.9 60 *1360x768 is only used for 22” and 23” LCD TV . *1440x900 is only used for 19” LCD TV . HDMI INPUT Mode Resolution Horizontal Frequency (KHz) VGA 640 x 480 31.47 480i 720 x480i 15.73 576i 720 x 576i 15.63 50 480p 720 x480p 31.47 59.
COMPONENT VIDEO (YPbPr) INPUT Mode Resolution Horizontal Frequency (KHz) Vertical Frequency (HZ) 480i 720 x480i 15.73 59.94/60 576i 720 x 576i 15.63 50 480p 720 x480p 31.47 59.94/60 576p 720 x 576p 31.26 50 720p 1280 x 720p 37.50 44.96 50 28.13 50 1080i 1920 x 1080i 59.94/60 33.75 29 59.
Trouble Shooting Before consulting service personnel, check the following chart for possible solutions. PROBLEM TV will not turn on SOLUTION ƽMake sure the power cord is plugged in. ƽThe batteries in the remote control may be Exhausted ; replace the batteries. ƽCheck the cable between TV and antenna/ external AV device. No picture, no sound ƽPress the power button on the remote. ƽPress the SOURCE button the remote, then press the ĀŸ/źābutton repeatedly to select the TV source.
If at any time in the future you should need to dispose of this product please note that: Waste electrical products should not be disposed of with household waste. Please recycle where facilities exist. Check with your Local Authority or retailer for recycling advice.
Inhaltsverzeichnis z Vorwort z Warnung z Sicherheitshinweise z Beschreibung der Haupteinheiten z Fernbedienung z OSD Grundeinstellung z DTV Merkmale z USB Merkmale z DVD Anleitung z Spezifikationen z Fehlerbehebung 1
Vorwort Vielen Dank für Ihren Kauf unseres LCD-Fernsehgerätes. Dieses Fernsehgerät funktioniert als normaler Farbfernseher und als PC-Monitor. Um das Gerät von Anfang an optimal zu nutzen, lesen Sie bitte dieses Handbuch sorgfältig durch und bewahren Sie es zum späteren Nachschlagen auf. INSTALLATION ķ Stellen Sie das Gerät in einem Raum auf, in dem kein direktes Sonnenlicht auf den Bildschirm trifft. Völlige Dunkelheit oder Reflektionen auf dem Bildschirm können Ihre Sehkraft beanspruchen.
Warnung VORSICHT GEFAHR VON ELEKTRISCHEM SCHLAG NICHT ÖFFNEN VORSICHT: ZUR VERMEIDUNG VON STROMSCHLAG DARF DIE ABDECKUNG˄ODER RÜCKSEITE˅DES GERÄTES NICHT ENTFERNT WERDEN. ES GIBT KEINE TEILE IM INNERN DES GERÄTES, DIE VOM BENUTZER REPARIERT WERDEN KÖNNTEN. ÜBERLASSEN SIE ALLE REPARATUR- UND WARTUNGSARBEITEN NUR QUALIFIZIERTEM FACHPERSONAL. Das Symbol soll den Benutzer vor dem elektrischen Schlag warnen. Lassen Sie dieses Gerät ausschliesslich durch ein qualifiziertes Fachpersonal ausbauen.
Sicherheitshinweise Vorsicht In diesem Produkt herrscht Hochspannung. Nehmen Sie das Gehäuse des Gerätes nicht ab. Überlassen Sie Reparaturen qualifiziertem Wartungspersonal. Vorsicht Um die Gefahr eines Brandes oder eines elektrischen Schlages zu vermeiden, schützen Sie das Gerät vor Feuchtigkeit. Vorsicht Stecken oder drücken Sie keine Gegenstände in Gehäuseschlitze oder -öffnungen des Fernsehgerätes. Verschütten Sie keine Flüssigkeit auf das Fernsehgerät.
Sicherheitshinweise Vorsicht Lehnen Sie sich nicht auf oder gegen das Gerät oder den Aufsteller. Schieben Sie das Gerät nicht plötzlich von der Stelle. Kinder benötigen Ihre besondere Aufsicht. Vorsicht Stellen Sie das Fernsehgerät nicht auf unstabile Wagen, Träger, Regale oder Tische. Das Fernsehgerät kann Personen durch Herunterfallen verletzen oder selbst beschädigt werden. Vorsicht Ziehen Sie das Netzkabel ab, wenn Sie den Fernseher für einen längeren Zeitraum nicht benutzen.
Beschreibung der Haupteinheiten Funktion der Tasten auf dem Bedienfeld VOL+ : Lautstärke erhöhen VOL- : Lautstärke reduzieren CH+ : Programm aufwärts CH- : Programm abwärts MENU : Zum Aufrufen des Hauptmenüs TV/AV : Zur Auswahl des Eingangssignals POWER : Zum Einschalten des Gerätes im Standby-Modus oder zum Eintritt in den Standby-Modus. Terminalanschlüsse des Fernsehgerätes 1. USB-Eingangsterminal (Nur verwendet für Software-Aktualisierung) 2. HDMI-Eingangsterminal 3. VGA Eingangsterminal 4.
Remote control POWER: Zum Einschalten des Gerätes im Standby-Modus oder zum Eintritt in den Standby-Modus. MUTE: Stummschaltung DVD SETUP: Zum Eintritt in das DVD-Hauptmenü. Mit erneutem Drücken verlassen Sie das Hauptmenü.
CH+/CH-: Kanalwechsel abwärts/aufwärts VOL+/VOL-: Einstellen der Lautstärke INFO: Anzeigen der Informationen von aktuellem Programm im DTV-Modus (Nur verfügbar bei Modellen mit DTV-Funktion) AUDIO: Auswahl von DTV- oder DVD-Audio (Nur verfügbar bei Modellen mit DTV- oder DVD-Funktion) FAV: Anzeige der Favoritenliste (Nur verfügbar bei Modellen mit DTV-Funktion) TV/RADIO: Umschalten zwischen RADIO und DTV (nur Audio und kein Bild) EPG: Elektronischer Programmführer (Nur verfügbar bei Modellen mit DTV-Funktio
REVEAL: Anzeige von verbogenen Informationen auf Teletextseite. Mit erneutem Drücken wird die Information ausblenden.
OSD Grundeinstellung Installationsanleitung Wenn Sie das Fernsehgerät zum ersten Mal einschalten und es gibt kein Programm in dem Fernseherspeicher, erscheint das Menü “Installation Guide” auf dem Bildschirm. 1. Drücken Sie e/f, um die Menüsprache auszuwählen. 2. Drücken Sie c/d und wählen Sie “Auto Scan” , dann drücken Sie f oder “ENTER”-Taste , um zu bestätigen, oder drücken Sie “EXIT”, um die Auswahl zu beenden.
10. Drücken Sie c/d und wählen Sie “Green”, dann drücken Sie e/f, um einzustellen. 11. Drücken Sie c/d und wählen Sie “Blue”, dann drücken Sie e/f, um einzustellen. 12. Drücken Sie c/d und wählen Sie “Aspect Ratio”, dann drücken Sie e/f, um die gewünschte Größe auszuwählen. Hinweis: Wenn die aktuelle Quelle “PC” ist, verfügt “Aspect Ratio” nur über zwei Optionen, und zwar “16:9” und “4:3”. 13.
einzustellen. 6. Drücken Sie c/d und wählen Sie “Auto Sleep”, dann drücken Sie e/f, um diese Funktion “On” oder “Off” auszuwählen. 7. Drücken Sie c/d und wählen Sie “Time Zone”, dann drücken Sie e/f, um die Zeitzone auszuwählen. OPTION 1. Drücken Sie “MENU”-Taste, um das OSD-Menü aufzurufen. Dann drücken Sie e/f, um das “OPTION”- Menü auszuwählen. Durch Drücken von d oder “ENTER”-Taste gelangen Sie in das “OPTION”- Menü. 2.
2. Drücken Sie c/d und wählen Sie “Lock Channel”, dann drücken Sie e/f, um “On” oder “Off” auszuwählen. Wenn Sie “On” wählen, wird die Programmsperre aktiviert. 3. Drücken Sie c/d und wählen Sie “Change Password”, dann drücken Sie f oder “ENTER”-Taste, um das Passwort zu ändern. 4. Drücken Sie c/d und wählen Sie “Block Programme ”, dann drücken Sie f oder “ENTER”-Taste, um einzutreten. Drücken Sie c/d, um das zu sperrende Programm auszuwählen. Drücken Sie die “GREEN”-Taste, um das Programm zu sperren.
4. Drücken Sie c/d und wählen Sie “ATV Manual Scan”, dann drücken Sie f, um ATV manuelle Suche zu starten. Drücken Sie “MENU”-Taste, um zurück zu dem vorherigen Menü zu gelangen. Mit Drücken der “EXIT”-Taste verlassen Sie das Menü. Drücken Sie die “ROTE”-Taste, um das Programm zu speichern. 5. Drücken Sie c/d und wählen Sie “Programme Edit”, dann drücken Sie f oder “ENTER”-Taste, um einzutreten. a.
2. 3. 4. 5. 6. “PC Setup”- Menü. Drücken Sie c/d und wählen Sie “Auto Adjust”, dann drücken Sie f oder “ENTER”-Taste, um automatische Einstellung zu starten. Drücken Sie c/d und wählen Sie “Horizontal Pos.”, dann drücken Sie e/f, um einzustellen. Drücken Sie c/d und wählen Sie “Vertical Pos.”, dann drücken Sie e/f, um einzustellen. Drücken Sie c/d und wählen Sie “Size”, dann drücken Sie e/f, um einzustellen. Drücken Sie c/d und wählen Sie “Phase”, dann drücken Sie e/f, um einzustellen. DTV KANAL 1.
DTV Merkmale Favoritenliste Wenn die Quelle als DTV ausgewählt ist, kann der Benutzer durch Drücken der “FAV”-Taste in das “FAVOURITE LIST”-Menü gelangen. Das “Favourite LIST”-Fenster erscheint wie folgt: Programminformation Wenn die Quelle als DTV ausgewählt ist, können Sie die “INFO”-Taste drücken, um die Programminformation anzuzeigegn.
Elektronischer Programmführer˄EPG˅ Elektronischer Programmführer zeigt die Programminformationen der aktuellen und der darauf folgenden Sendung an. Mit Drücken der “EPG”-Taste erscheint sich das EPG-Fenster. Die Information zur Datum und Zeit wird auf dem rechten Rand des Fensters angezeigt. Auf dem linken Rauf werden alle Kanäle angezeigt. Die Programme des Kanals befinden sich auf dem rechten Rand. Das ausgewählte Programm wird angezeigt auf dem oberen Rand des Bildschirms.
DVD Anleitung GRUNDLEGENDE WIEDERGABE Vorbereitungen Drücken Sie die TV/AV-Taste auf dem Bedienfeld oder die SOURCE-Taste auf der Fernbedienung, Grundlegende Wiedergabe um DVD-Quelle zu wählen. 1. Drücken Sie EJECT, um das Discfach zu öffnen. Legen Sie eine Disc in das Discfach ein(Wenn im DVD-Modus keine Disc sich in dem Discfach im DVD-Modus befindet, wird die Meldung OPEN immer auf dem Bildschirm erscheinen). Das Discfach ist nur geeignet für einen Disc-Durchmesser.
WICHTIGE HINWEISE: DIE BESCHRIEBENEN FUNKTIONEN SIND NUR GÜLTIG FÜR DVD-DISCS. FALLS SIE DISCS VON ANDEREN FORMATE ABSPIELEN, KÖNNTEN DIE OPERATION SOWIE DIE ANZEIGE AUF DEM BILDSCHIRM UNTERSCHIEDLICH SEIN. UNTERTITEL MENÜ Drücken Sie “SUBTITLE”, dann erscheint auf dem Bildschirm “SUBTI-TLE 01/XX XXXXX “. Dabei bedeutet “01” die Ordnungszahl der Sprache; “XX” bedeutet die Gesamtzahl der Sprache; “XXXXX” bedeutet die Sprache eines Landes(Die Nummer der Sprache ist abhängig von Disc).
SPEZIELLE WIEDERGABEFUNKTIONEN Sie können Kodak picture CD und JPEG picture CD über das Gerät abspielen. Wiedergabe Legen Sie eine Kodak picture CD oder JPEG picture CD in das Discfach ein, die Disc wird automatisch geladen. Wenn die Disc erkannt werden kann, werden die Bilder nacheinander auf dem Bildschirm angezeigt(Diashow-Modus). Wenn ein Navigationmenü erscheint, verwenden Sie die Navigationtasten, um die Datei auszuwählen, dann drücken Sie ENTER-Taste.
SYSTEMEINSTELLUNGEN VON DVD Allgemeiner Einstellungsprozess Drücken Sie die Taste DVD-SETUP, dann wird die allgemeine Einstellungsseite der Reihe nach angezeigt. Drücken Sie oder , um den Menüpunkt auszuwählen, dann drücken Sie , um in das Untermenü zu gelangen. Drücken Sie oder , um den Menüpunkt auszuwählen, dann drücken Sie PLAY/PAUSE oder ENTER um zu bestätigen. Drücken Sie wiederholend DVD SETUP, um das Setup-Menü zu verlassen.
SYSTEMEINSTELLUNGEN VON DVD (FORTGESETZT) Allgmeine Einstellungsseite TV-Anzeige: Der Benutzer kann verschiedene Anzeigemodi wählen, wie z.B. 4:3 PS, 4:3 LB, 16:9 WIDE. OSD(On Screen Display) -Sprache: Der Benutzer kann die auf dem Bildschirm angezeigte Sprache auswählen. Bildschirmschoner: Wenn der Bildschirmschoner aktiviert ist, erscheint auf dem Bildschirm ein bewegtes Bild der DVD, wenn der DVD-Player länger als 3 Minuten nicht in Betrieb ist.
Vorzugseinstellungsseite Die Vorzugseinstellungsseite ist nur verfügbar, wenn sich keine Disc in dem DVD-player befindet. Diese Einstellungen werden konsistent eingesetzt für alle Discs, die in dem Gerät eingelegt und abgespielt sind. Fernsehtyp: Das Gerät unterstützt verschiedene Fernsehsysteme, einschliesslich Auto, NTSC, und PAL. Normalerweise bitte wählen Sie Auto Elternkontrolle: Die Elternkontrolle funktioniert gemeinsam mit verschiedenen Zensurklassen, die den DVDs zugeordnet sind.
Voreinstelung: Um alle Werkvoreinstellungen(außer Passwort und Elternkontrollestatus) zurückzusetzen, drücken Sie die ENTER-Taste. Hinweis: Abhängig von Disc-Tpyen könnten manche Funktionen nicht verfügbar sein. EINSTELLUNGSSEITE FÜR ANALOGAUDIO 1.Drücken Sie die Taste DVD-SETUP, dann erscheinen die Einstellungsseite für Analogaudio und die Vorzugseinstellungsseite der Reihe nach. 2. Drücken Sie c oder d , um den Menüpunkt auszuwählen, dann drücken Sie , um in das Untermenü zu gelangen. 3.
ABSPIELBARE DISC-FORMATE Die folgenden Disc-Formate sind abspielbar: DISKTYP KENNZEICHEN INHALT DURCHMESSER DVD VIDEO Audio + video (Bewegendes Bild) 12cm AUDIO CD Audio 12cm JPEG Video(Bild) 12cm KODAK CD Video(Bild) 12cm CD-R Audio oder video (Bewegendes Bild) 12cm CD-RW Audio or video (Bewegendes Bild) 12cm CD+G Video(Bild) 12cm MPEG4 Audio oder video (Bewegendes Bild) 12cm Die unterstützende Formate sind: DVD, VCD, CD-R, CD-RW, SVCD, DVCD, HDCD, JPEG, CD+G, MPEG-4, Kodak CD,
SCHUTZMASSNAHMEN VON DISCS UND MERKMALE VON DVD HANDHABUNG VON DISCS AUFBEWAHRUNG VON DISCS Berühren Sie die Wiedergabeseite der Disc nicht. Setzen Sie die Disc nicht direktem Sonnenlicht oder Wärmequellen aus. Kleben Sie kein Papier oder Klebeband auf die Disc . Bewahren Sie die Discs nicht in Orte, die Feuchtigkeit und Staub unterliegen, oder in der Nähe von einem Befeuchter, auf. Bewahren Sie die Discs vertikal in einer Schachtel auf.
SPEZIFIKATIONEN RGB INPUT Modus Auflösung Horizontale Frequenz (KHz) Vertikale Frequenz (HZ) DOS 720x400 31.5 70 VGA 640x480 31.5 60 SVGA 800x600 37.9 60 XGA 1024x768 48.4 60 WXGA 1360x768 47.7 60 WXGA+ 1440x900 55.9 60 *1360x768 ist nur verfügbar für 22” und 23” LCD-Fernsehgerät. *1440x900 ist nur verfügbar für 19” LCD-Fernsehgerät.. HDMI-EINGANG Modus Auflösung Horizontale Frequenz (KHz) Vertikale (HZ) VGA 640 x 480 31.47 59.94 480i 720 x480i 15.73 59.
KOMPONENTEN VIDEO-EINGANG (YPbPr) Modus Auflösung Horizontale Frequenz (KHz) Vertikale (HZ) 480i 720 x480i 15.73 59.94/60 576i 720 x 576i 15.63 50 480p 720 x480p 31.47 59.94/60 576p 720 x 576p 31.26 50 720p 1280 x 720p 37.50 44.96 50 59.94/60 1080i 1920 x 1080i 28.13 33.75 50 59.
Fehlerbehebung Falls Ihr Fernsehgerät eine Störung aufweist, überprüfen Sie die unten stehenden Hinweise, bevor Sie sich an einen Reparaturdienst wenden. PROBLEM Das Fernsehgerät eingeschaltet werden MASSNAHME kann nicht Kein Bild, kein Ton Verzerrtes Bild, Ton in Ordnung Audiogeräusche ƽStellen Sie sicher, dass das Stromkabel richtig an der Steckdose angeschlossen ist. ƽWahrscheinlich sind die Batterien der Fernbedienung leer. Ersetzen Sie die Batterien.
Sollten Sie irgendwann zu späterer Zeit dieses Produkt entsorgen wollen, beachten Sie bitte Folgendes: Elektroschrott sollte nicht mit dem Haushaltsmüll entsorgt werden. Bitte recyceln Sie ihn, sofern Ihnen entsprechende Möglichkeiten zur Verfügung stehen. Setzen Sie sich mit Ihren kommunalen Behörden oder Ihrem Einzelhändler in Verbindung und fragen Sie diese um Rat bezüglich der Wiederverwertung.
Inhoud z Instroducties z Waarschuwing z Opmerking z Beschrijving van het Hoofdtoestel z Afstandsbediening z OSD basisinstellingen z DTV Functies z USB Functies z DVD Handleiding z Specificaties z Probleemoplossing 1
Introductie Hartelijk dank voor uw aankoop van ons LCD TV product. Het dient al een normale kleurentelevisie en pc monitor. Om uw TV te genieten vanaf het allereerste begin, lees deze handleiding aandachtig door en bewaar het voor referentie in de toekomst. INSTALLATIE ķ Zet de TV in een kamer waar geen direct licht kan op het scherm vallen. Totale duistemis of een reflectie op het beeldscherm kan leiden tot vermoeide ogen. Zacht en indirecte verlichting wordt aanbevolen voor comfortable bekijken.
Waarschuwing LET OP RISCO VAN EEN ELEKTRISCHE SCHOK NIET OPEN LET OP: OM HET RISICO OP EEN ELEKTRISCHE SCHOK TE REDUCEREN. VERWIJDER HET DEKSEL(OF DE ACHTERKANT) NIET. BINNEN BEVINDEN ZICH GEEN ONDERDELEN DIE DOOR DE GEBRUIKER ONDERHOUDEN KUNNEN WORDEN. LAAT HET ONDERHOUD AAN ERKEND ONDERHOUDSPERSONEEL OVER.
Let op Let opʽ - Het product gebruikt hoge voltage tijdens het werken. Open niet de behuizing van het product. Reparaties moeten worden uitgevoerd door gekwalificeerd personeel. Let opʽ Om brand of een elektrische schok te voorkomen, het toestel niet in de vochtige ruimte zetten. Let opʽ Stek geen objecten in de opening van TV kast, laat geen objecten op TV vallen. Geen vloeistof naast de televisie ontvanger staan. Let opʽ Vermijd direct zonlicht en andere warmtebronnen aan het apparaat komen.
Let op Let opʽ Nooit op het apparaat staan of tegenstaan. Duw niet het apparaat of zijn ondersteuning object plotseling. Speciale aandacht geven aan de kinderen. Let op! Zet het apparaat niet op een onstabiele of schelf plaats, het leidt serieus ongeval en ernstige schade aan de televisie indien het valt. Let op! Wanneer het product wordt niet gebruikt voor een langere periode, de netsnoer uit het stopcontact verbreken.
Unit Beschrijving Functies van toetsen op het Controle paneel VOL+ : Volume omhoog. VOL- : Volume omlaag. CH+ : TV kanaal omhoog . CH- : TV kanaal omlaag. MENU : Druk op en selecteer de hoofdmenu. TV/AV : Selecteer het invoersignaal. POWER : Zen aan tijdens de standby-modus of ga naar standby-modus. TV Ingangsaansluiting 1. USB ingang(Allen voor software upgraden). 2. HDMI ingang. 3. VGA ingang. 4. PC AUDIO ingang. 5. SCART ingang. 6. Video ingang . 7. AUDIO ingang. 8.
Afstansbediening POWER: Druk op deze toets om TV in te schakelen of op standby zetten. MUTE: Druk op deze toets om het geluid uit te schakelen of weer inschakelen. DVD SETUP: Druk op deze toets om DVD menu te krijgen, druk opnieuw om te verlaten. (Gebruik voor modus met DVD functie alleen). TITLE: Druk op deze toets om terug naar het Titel menu te gaan. (Gebruik voor modus met DVD functie alleen). MENU(BLAUW): Druk om deze toets om terug naar hoofd menu te gaan of DVD hoofd menu te verlaten.
-/--: Zenderlijest. : Schakel tussen de huidige en vorige kanaal. CH+/CH-: Kanaal vooruit of achteruit. VOL+/VOL-: Past het volume aan. INFO: Toont sommige informatie van huidige programma in DTV modus. (Gebruik voor modus met DTV functie alleen). AUDIO: Druk op om DTV audio of DVD audio te selecteren. (Gebruik voor modus met DTV of DVD functie alleen). FAV: Schakel tussen gewone kanaal en “Favorieten Lijst”. (Gebruik voor modus met DTV functie alleen).
˖Druk op deze toets om vooruit te spoelen. (Gebruik voor modus met DVD functie alleen). REVEAL: Druk op deze toets om de verborgen tekst te tonen in Teletekst pagina. Druk opnieuw om het terug te verbergen. (Gebruik voor Europese regio alleen). ˖Spring naar vorige hoofdstuk. (Gebruik voor modus met DVD functie alleen). SUBPAGE: Voer SUBCODE functie uit in tekst terwijl ga naar tekst weergeven modus. (Gebruik voor Europese regio alleen). ˖Spring naar volgende hoofdstuk.
OSD basisinstelling Installatie Gids Indien het is de eerste keer u zet uw TV aan, er zijn geen programma’s in TV geheugen, “Installatie Gids” wordt weergegeven op het scherm. 1. Druk op “e/f” toets en selecteer locale taal. 2. Druk op “c/d” toets om “Auto Scan” te kiezen en druk op “f” o “ENTER” toets om naar “MENU” te springen, of druk op “EXIT” toets om te verlaten indien nodig. Opmerking: Het platform zoeken duurt lang, even geduld, a.u.b.
10. Druk op “c/d” toets en selecteer “Groen” en druk op “e/f” toets om het in te stellen. 11. Druk op “c/d” toets en selecteer “Blauw” en druk op “e/f” toets om het in te stellen. 12. Druk op “c/d” toets en selecteer “Aspect Ratio” en druk op “e/f” toets en selecteer uw gewenste afbeeld afmeting. Opmerking: Als de huidige bron “PC” is, “Aspect Ratio” item heeft slechts twee opties, “16:9” en “4:3”. 13.
druk op “f” of “ENTER” toets, u kunt het tijdstip instellen wanneer de TV inschakelt. (in standbij modus). Druk op “c/d” toets en selecteer “Sleep Time” en druk op “e/f” toets en selecteer slaaptijd . 6. Druk op “c/d” toets en selecteer “Auto Sleep” en druk op “e/f” toets en selecteer “Aan” of “Uit”. 7. Druk op “c/d” toets en selecteer “Time Zone” en druk op “e/f” toets en selecteer de lokale tijdzone. 5. OPTION 1. Druk op “MENU” toets en ga naar OSD menu.
LOCK 1. Druk op “MENU” en ga naar OSD menu. Dan druk op “e/f” toets en selecteer “LOCK” menu. Ga naar “LOCK” menu door op “d” toets te drukken. De standaard wachtwoord is “0000”. Het administratie wachtwoord is “8899”. 2. Druk op “c/d” toets en selecteer “Lock Channel”(Kanaal Vergrendelen) en druk op “e/f” toets en selecteer “Aan” of “Uit” . Met de instelling Aan kunt u Programma vergrendelen. 3.
3. Druk op “c/d” toets en selecteer “DTV Manual Scan” en druk op “f” of “ENTER” toets en DTV handmatig zoeken. Druk op “MENU” toets en ga terug naar vorig menu. Druk op “EXIT” toets en verlaten. 4. Druk op “c/d” toets en selecteer “ATV Manual Scan” en druk op “f” of “ENTER” toets om DTV handmatig te zoeken. Druk op “MENU” toets en ga terug naar vorig menu. Druk op “EXIT” toets om te verlaten. Druk op “ROOD” toets om de programma op te slaan. 5.
PC ˄Wanneer de signaalbron PC is˅ 1. Druk op “MENU” toets en ga naar het OSD menu. Dan druk op “e/f toets en selecteer het “PICTURE” menu. Druk op “c/d” toets en selecteer “PC Setup”. Ga naar “PC Setup” menu door op “f” of “ENTER” toets te drukken. 2. Druk op “c/d” toets en selecteer “Auto Adjust” menu en druk op “f” of “ENTER” toets om Auto Aanpassen functie te laten uitvoeren. 3. Druk op “c/d” toets en selecteer “Horizontale Pos.” en druk op “e/f” toets om in te stellen. 4.
6ˊDruk op “c/d” toets en selecteer “CI Information” en druk op “f” of “ENTER toets om naar deze item te gaan. Deze functie gebruikt slechts voor DTV bron. Opmerking: De foto is slechts een voorbeeld, aangezien de informatie weergave kan verschillen van de feitelijke CI kaarten.
DTV Functies Favorieten Lijst Wanneer de bron geselecteerd als DTV is, gebruikers kunnen naar FAVOFIETEN LIJST gaan door op “FAV” toets te drukken. De “Favorieten LIJST” venster wordt weergegeven als volgend: Programma Informatie Wanneer de bron geselecteerd als DTV is, u kunt “INFO” toets drukken en kanaal informatie wordt weergegeven.
Elektronisch Programma Gids˄EPG˅ Elektronisch Programma Gids biedt programma informatie die nu of in de toekomst worden uitgezonden. Het systeem toont EPG venster als u “EPG” toets drukt. DATUM en TIJD informatie wordt weergegeven aan de rechterkant van het venster. De linkerzijde toont alle kanalen. De rechterkant toont de programma’s in het kanaal. Het geselecteerde programma wordt ook weergegeven op de bovenkant van het scherm.
DVD handleiding BASIS FUNCTIE VAN HET TERUGSPELEN BELANGRIJKE OPMERKING ALL BESCHRIJVINGEN ZIJN VOOR DVD DISKS. INDIEN U DISK VAN ANDERE FORMAAT LAAT AF TE SPELEN, DE OPERATIE EN WEERGAVE OP HET SCHERM KAN Voorbereidingen Stop het terugspelen Druk op TV/AV toets op het voorpaneel of BRON toets en selecteer DVD bron. Basis functie van het terugspelen 1. Druk op EJECT om de lade te openen. Plaats een disk in de lade,.
ANDERS ZIJN. SUBTITLE MENU Druk op “SUBTITLE”, “SUBTITLE 01/XX XXXXX” wordt weergegeven op het scherm, “01” wijst het rangnummer van deze taal; “XXXXX” wijst de taal van het land, (het aantal hangt af van de taal op de disk). Met deze functie, maximaal tot 32 talen kunnen worden weergegeven op het scherm.. Druk op deze toets om het basis menu te laten tonen, selecteer het item u wilt.(Deze functie werkt voor DVD die multilaag systeem heeft).
SPECIAAL FUNCTIE VOOR HET TERUGSPELEN U kunt Kodak foto CD en JPEG foto CD op deze TV bekijken. Terugspelen Stek een Kodak picture CD of JPEG picture CD in de lade en de disk wordt automatisch geladen. Indien de disk kunt worden geïdentificeerd, de speler start de foto’s tonen één voor één (in diavoorstelling modus). Indien het navigatie menu wordt weergegeven, gebruik de navigatie toets en selecteer een bestand, dan druk op ENTER toets.
DVD SYSTEM INSTELLINGEN Algemene Instellingen Druk op DVD-SETUP toets, de algemene pagina instelling en de voorkeur pagina wordt weergegeven een vóór een. Druk op of toets om het item te selecteren, dan druk op toets om naar submenu te gaan. Druk op of toets om te kiezen, dan druk op PLAY/PAUSE of ENTER om te bevestigen. Druk op DVD SETUP toets meerdere keer om instelling menu te verlaten.
DVD SYSTEEM INSTELLINGEN(VERVOLGD) Algemene Pagina Instellingen TV Display: gebruikers kunnen kiezen tussen verschillende afmetingen van het weergaven, zoals 4:3 PS, 4:3 LB, 16:9 SCHERMVERHOUDING. On Screen Display (OSD) Taal: Gebruikers kunnen kiezen de Taal die wordt weergegeven op het scherm. Screen saver: als de schermbeveiliging aan is, dan zal er een bewegende afbeelding van DVD wordt weergegeven op het scherm voor meer dan 3 minuten wanneer de DVD speler inactief is.
Prefenence page De voorkeur pagina is alleen beschikbaar wanneer er geen schijf in de speler. Deze instelling is beschikbaar wanneer alle disks wordt geplaatst en afgespeld altijd. TV Type: Deze speler ondersteunt verschillende TV uitgang, met in begrip van Auto, NTSC, en PAL systemen. Meestal kunt u ingesteld op Auto. Parental: Ouders Controle functie werkt in combinatie met de verschillende DVD censuur.
Default: reset alle instellingen(behalve wachtwoord en kinderslot) en DVD speller terug in fabrikanten instellingen zetten. druk op ENTER toets om Reset functie uit te voeren. Opmerking; Sommige functies zijn niet beschikbaar, hangt van af de soort van de disk. ANALOOG AUDIO INSTELLING PAGINA 1. Druk op DVD-SETUP toets, Analoog Audio Instelling Pagina, Voorkeur Pagina wordt weergegeven één voor één. 2. Druk op c of d toets en selecteer het item, dan druk op toets en ga naar submenu. 3.
AFSPEELBARE DISKS De volgende disks kunnen worden afgespeeld: DISKS LABEL INHOUD DIMENSIE DVD VIDEO Audio + video (bewegend beeld) 12cm AUDIO CD Audio 12cm JPEG Video(beeld) 12cm KODAK CD Video(beeld) 12cm CD-R Audio of video (bewegend beeld) 12cm CD-RW Audio of video (bewegend beeld ) 12cm CD+G Video(beeld) 12cm MPEG4 Audio of video (bewegend beeld) 12cm Ondersteunde disks: DVD, VCD, CD-R, CD-RW, SVCD, DVCD, HDCD, JPEG, CD+G, MPEG-4 Kodak CD , W MA.
DIKS BESCHERMING EN DVD KENMERKEN DISK HANDELING . DISK OPSLAG Raak de afspeelbare zijde van de disk niet. Bewaren de disks niet bloot aan direct zonlicht of warmtebronnen. Plak geen papier of tape op de disk. Bewaren de disks niet in vochtige plek of plek volle met stoffen, zoals een badkamer of naast de luchtbevochtiger. Bewaar de disk verticaal in een zaak, zet geen object op disk of de zaak kunnen het kromtrekken leiden.
SPECIFICATIES RGB INPUT Modus Resolutie Horizontale Frequentie (KHz) Verticale Frequentie (HZ) DOS 720x400 31.5 70 VGA 640x480 31.5 60 SVGA 800x600 37.9 60 XGA 1024x768 48.4 60 WXGA 1360x768 47.7 60 WXGA+ 1440x900 55.9 60 *1360x768 gebruikt slechts voor 22” en 23” LCD TV . *1440x900 gebruikt slechts voor 19” LCD TV . HDMI INPUT Modus Resolutie Horizontale Frequentie (KHz) VGA 640 x 480 31.47 480i 720 x480i 15.73 576i 720 x 576i 15.63 50 480p 720 x480p 31.47 59.
COMPONENT VIDEO (YPbPr) INPUT Modus Resolutie Horizontale Frequentie (KHz) 480i 720 x480i 15.73 59.94/60 576i 720 x 576i 15.63 50 480p 720 x480p 31.47 59.94/60 576p 720 x 576p 31.26 50 720p 1280 x 720p 37.50 44.96 50 28.13 50 1080i 1920 x 1080i 59.94/60 33.75 29 Verticale Frequentie (HZ) 59.
Probleemoplossing Raadpleeg a.u.b. de volgende gids voordat u de Klantenservice belt waneer u problemen heeft met het apparaat. SYMPTOOM TV start niet OPLOSSING ƔControleer of het netsnoer goed aangesloten is. ƔBatterijen van de afstandsbediening zijn leeg , verwissel batterijen. ƔControleer de kabel tussen TV en antenne/ externe AV apparaat. Geen beeld, geen geluid ƔDruk op power toets op afstandsbediening.
Indien u zich in de toekomst van dit toestel wenst te ontdoen, let er dan op dat elektrisch afvalmateriaal niet met het huishoudelijk afval mag worden verwijderd. Breng het toestel naar een kringloopwinkel of anderevoorziening voor recycling. Neem contact op met uw plaatselijke autoriteit of winkelier indien u meer informatie wenst over recycling. (Richtlijn voor Afval van Elektrische en Elektronische Apparaten, AEEA).
Contenu z Introduction z Miser ne grade z Avertissements z Description de l’unité principale z Commande à distance z Réglage OSD standard z Fonctions DTV z Fonctions USB z Manuel DVD z Caractéristiques z Dépannage 1
Introduction Merci beaucoup d’avoir acheté notre produit, TV LCD. Elle peut servir de TV couleur classique et comme moniteur pour PC. Pour profiter de votre TV pleinement depuis le début, lisez ce manuel attentivement et conservez-le pour référence. INSTALLATION ķ Mettez la TV dans une pièce où la lumière n’atteint pas l’écran. La pénombre complète ou un reflet sur l’écran peuvent provoquer une fatigue des yeux. Une lumière douce et indirecte est recommandée pour un visionnage confortable.
Mise en garde ATTENTION RISQUE D’ÉLÉCTROCHOC NE PAS OUVRIR ATTENTION: POUR EVITER UN RISQUE D’ÉLÉCTROCHOC. NE RETIREZ PAS LE COUVERCLE (OU L’ARRIÈRE). IL N’Y A PAS DE PIÈCE RÉPARABLE PAR L’UTILISATEUR À L’INTÉRIEUR. CONSULTEZ UN PERSONNEL DE MAINTENANCE QUALIFIÉ POUR LA MAINTENANCE. Ce symbole est prévu pour avertir l’utilisateur du risque d’électrochoc, personne ne doit démonter cet équipement sauf un personnel de maintenance qualifié.
Attention Attention - Des hautes tensions sont utilisées pour le fonctionnement de ce produit. N’ouvrez pas le boîtier. Consultez un personnel de maintenance qualifié. Attention Pour empêcher un incendie ou un danger d’électrochoc, n’exposez pas l’unité principale à l’humidité. Attention Ne jetez ni poussez d’objets dans les emplacements ou les ouvertures du boîtier de la TV. Ne renversez jamais tout type de liquide sur le récepteur de télévision.
Attention Attention Ne vous tenez pas sur l’appareil, ne vous appuyez pas dessus, et ne poussez pas soudainement le produit ou son support. Vous devez particulièrement faire attention avec les enfants. Attention Ne placez pas l’unité principale sur une tablette à roulettes, une étagère ou une table instable. Cela peut entraîner de graves blessures à un individu, et endommager la télévision, si elle tombait.
Description de l’unité principale Fonctions des boutons du tableau de commandes VOL+ : Augmentation du Volume. VOL- : Diminution du Volume. CH+ : Chaîne TV suivante. CH- : Chaîne TV précédente. MENU : Appuyez pour sélectionner le menu principal. TV/AV : Sélectionnez le signal d’entrée. POWER : Mettre en marche quand il est en mode veille ou pour entrer en mode veille. Connexions du terminal TV 1. Terminal d’entrée USB (uniquement utilisé pour mettre à jour le logiciel). 2. Terminal d’entrée HDMI. 3.
Commande à distance POWER: Appuyez sur cette touche pour reprendre la lecture en mode pause, ou pour passer en pause en mode lecture. MUTE: Appuyez sur cette touché pour passer en mode silencieux ou pour réactiver le son. DVD SETUP: Appuyez sur cette touche pour accéder au menu principal du DVD ou pour le quitter.
ENTREE: Accédez à l’option sélectionnée ou confirmer l’action sélectionnée. MENU: Appuyez sur cette toucher pour accéder au menu principal donnant accès à de multiples réglages. EXIT: quitte le mode OSD (On-screen display). 0-9: Sélectionne et change de chaîne, de 0 à 9. -/--: La liste des canaux. : Retourne à la chaîne précédente. CH+/CH-: Passe à la chaîne suivante ou retourne à la chaîne précédente. VOL+/VOL-: Règle le volume.
TEXT: Appuyez sur cette toucher pour activer le Teletext. (Utilisé en région européenne uniquement) ˖Appuyez pour lancer la mlecture du disque ou passer en mode pause. ((Utilisé uniquement sur les modèles équipés de la fonction DVD) HOLD: Gèle un passage multipages à l’écran en mode Télétexte (Utilisé en Europe uniquement) . INDEX: Appuyez sur cette touché pour accéder à la page d’index en mode Télétexte. (Utilisé en Europe uniquement) ˖Appuyez sur cette touche pour faire reculer la bande.
SUBTITLE(BLEU) : Sélectionne la légende du DVD Utilisé uniquement sur les modèles équipés de la fonction DVD) ANGLEġSélectionne l’angle de vue. (Utilisé uniquement sur les modèles équipés de la fonction DVD) PROGRAMġSélectionne le programme du disque. (Utilisé uniquement sur les modèles équipés de la fonction DVD) INTROġAppuyez sur cette touche pour afficher le temps restant d’un DVD ou le temps écoulé.
Réglage OSD standard Manuel d’installation Lors du premier allumage votre télévision, la mémoire ne contient aucun programme et le menu “Aide à l’installation » s’affiche à l’écran. 1. Appuyez sur les touches “e/f” pour sélectionner la langue. 2. Appuyez sur les touches “c/d” pour sélectionner “Scan automatique” et sur “f” ou sur “ENTREE” pour accéder au “MENU”. Pour quitter le menu, utilisez la touche “EXIT”. Remarque: La recherche de la plateforme prendra quelques minutes, soyez patients.
sélectionner la taille de votre choix. Remarque: Lorsque la source sélectionnée est “PC”, la fonction “ Rapport largeur/hauteur” . L’élément propose deux options : “16:9” et “4:3”. 13. Appuyez sur la touche “c/d” pour sélectionner “Réduction sonore” puis sur “e/f” pour choisir l’une des options de réduction sonore . SON Vous pouvez sélectionner un type de son, selon vos préférences d’écoute. 1. Appuyez sur la touche “MENU” pour accéder au menu OSD. Appuyez ensuite sur “e/f” pour sélectionner le menu “SON”.
OPTIONS 1. Appuyez sur la touche “MENU” pour accéder au menu OSD. Appuyez ensuite sur la touche “e/f” pour sélectionner le menu “OPTIONS”. Accédez au menu “OPTIONS” en appuyant sur la touche “d” ou sur la touche “ENTREE”. 2. Appuyez sur la touche “c/d” pour sélectionner “Langue” puis appuyez sur les touches “e/f” pour sélectionner la langue OSD de votre choix . 3. Appuyez sur les touches “c/d” pour sélectionner “Langue audio” puis appuyez sur “f” ou sur “ENTREE” pour configurer la “Langue audio”.
4. Appuyez sur les touches “c/d” pour sélectionner “Bloquer le programme “puis sur “f” ou sur ENTREE. Appuyez sur “c/d” pour sélectionner l’élément à bloquer. Appuyez sur la touche “VERTE” pour verrouiller l’élément et sur “VERT” une nouvelle fois pour le déverrouiller. Appuyez sur la touche “MENU” pour retourner au menu précédent. Appuyez sur “EXIT” pour quitter le menu. 5. Appuyez sur les touches “c/d” pour sélectionner “Aide parentale” puis sur “e/f” pour sélectionner « Aide parentale ». CHAINE ATV 1.
4. Appuyez sur la touche “c/d” pour sélectionner “Scan ATV manuel” puis sur “f” ou sur “ENTREE” pour lancer la recherche manuelle DTV. Appuyez sur “MENU” pour revenir au menu précédent et appuyez sur “EXIT” pour quitter le menu. Appuyez sur la touche “ROUGE” pour sauvegarder le programme. 5. Appuyez sur les touches “c/d” pour sélectionner “Editer les programmes” puis sur “f” ou sur “ENTREE” pour confirmer. a.
PC ˄Lorsque la source de signal est PC˅ 1. Appuyez sur la touche “MENU” pour accéder au menu OSD. Appuyez ensuite sur les touches “e/f pour sélectionner le menu “IMAGE”. Appuyez sur “c/d” pour sélectionner “Configuration PC”. Accédez au menu “Configuration PC” en appuyant sur “f” ou sur ENTREE. 2. Appuyez sur les touches “c/d” pour sélectionner le menu “réglage automatique » et appuyez sur la touche “f ou sur “ENTREE” pour le réglage automatique. 3. Appuyez sur les touches “c/d” pour sélectionner “Pos.
Fonctions DTV Liste de favoris Lorsque la source sélectionnée est le DTV, les utilisateurs peuvent accéder à la LISTE DE FAVORIS en appuyant sur la touche “FAV”. la fenêtre « Liste des favoris » s’affiche comme sur l’image : Informations à propos du programme Lorsque la source sélectionnée est le DTV, vous pouvez appuyer sur la touche « INFO » pour afficher les informations relatives à la chaîne.
Guide de programme électronique˄GPE˅ Le guide de programme électronique apporte des informations détaillées à propos du programme que vous regardez ou que vous comptez regarder. Le système affiche la fenêtre GPE lorsque vous appuyez sur la touche « EPG ». La DATE et l’HEURE sont affichées à la droite de la fenêtre. Le côté gauche comporte une liste de toutes les chaînes. Le côté droit comporte la liste de tous les programmes de la chaîne. Le programme sélectionné est également affiché en haut de l’écran.
Manuel DVD LECTURE STANDARD Préparation Appuyez sur la touche TV/AV situé sur la façade du lecteur ou sur la touche SOURCE pour sélectionner la source DVD. Lecture standard 1. Appuyez sur EJECT pour ouvrir le plateau du lecteur, placez un disque sur le plateau. ( Si aucun disque n’est contenu dans le lecteur en mode DV, le message “OUVRIR” s’affichera à l’écran .) Il n’existe qu’une taille de disque. Placez correctement le disque sur le plateau.
NOTICE IMPORTANTE; TOUTES LES FONCTIONS DECRITES ICI CONCERNENT LES DISQUES DV. SI VOUS UTILISEZ D’AUTRES FORMATS DE DVD, L’UTILISATION ET L’AFFICHAGE A L’ECRAN PEUVENT ETRE DIFFERENTS.. SOUS-TITRES Appuyez sur la touche “ SOUS- TITRES “. L’écran affiche: “ SOUS-TITRE 01/XX XXXXX “, “01” représente le nombre ordinal de cette langue; “XX” indique le nombre total de cette langue; “XXXXX” indique la langue du pays (le nombre de langues dépend du disque). Cette fonction peut aller jusqu’à 32 langues.
FONCTION SPECIALE Vous pouvez afficher une image Kodak ou une image JPEG sur cet écran de télévision. Lecture Insérez un CD d’images Kodak ou d’images JPEG dans le lecteur. Si le disque est identifié, le lecteur affiche immédiatement les images, l’une après l’autre (mode Diaporama). Si un menu de navigation s’affiche, utilisez les touches de navigation pour sélectionner un fichier, puis cliquez sur ENTREE. Chaque image du CD s’affiche à la suite, en plein écran.
CONFIGURATION DU SYSTEME DVD Processus de configuration général Appuyez sur la touche DVD-SETUP, la page de configuration s’affiche, en parallèle avec la page de préférences. Appuyez sur ou sur pour sélectionner un élément, puis sur pour accéder au sous-menu. Appuyez sur ou sur pour sélectionner, puis sur PLAY/PAUSE ou sur ENTREE pour confirmer. Appuyez sur DVD SETUP de façon successive pour quitter les sous-menus.
CONFIGURATION DU SYSTEME DVD (SUITE) Page de configuration générale Affichage TV: l’utilisateur peut utiliser différents modèles d’affichage : 4:3 PS, 4:3 LB, 16:9 PLEIN ECRAN. Langue de l’interface On Screen Display (OSD): Les utilisateurs peuvent choisir la langue de l’interface OSD. Economiseur d’écran: si l’économiseur d’écran est activé, une image animée représentant le sigle DVD s’affichera à l’écran dès que le lecteur DVD sera resté inactif pendant plus de 3 minutes.
Page de préférences La page de préférences n’est utilisable que lorsque le lecteur DVD ne contient aucun disque. Ces réglages sont appliqués à chaque disque inséré ou lu dans/par le lecteur. Type de TV: Ce lecteur supporte différentes sorties TV, y compris les systèmes Auto, NTSC, et PAL. Le mode Auto est le plus conseillé. Contrôle parental: La fonction de contrôle parental fonctionne en conjonction avec les différentes catégories de censures associées aux DVD.
Par défaut: redéfinit tous les réglages (sauf le statut de verrouillage du contrôle parental) sur les paramètres d’usine. Appuyez sur ENTREE pour lancer la reconfiguration. Remarque: Certaines fonctions peuvent ne pas être disponibles, selon le type de disque. AUDIO ANALOGIQUECONFIGURATION 1.Appuyez sur la touche DVD-SETUP, pour faire alterner la page de configuration de l’audio analogique/ page de préférence. 2.
DISQUES QUE VOUS POUVEZ LIRE Vous pouvez lire les disques suivants : DISQUES ETiQUETTE CONTENUS DIMENSIONS VIDEO DVD Audio + vidéo (image mouvement) CD AUDIO Audio 12cm JPEG Vidéo (image) 12cm CD KODAK Vidéo (image) 12cm CD-R Audio ou vidéo (image mouvement) en 12cm CD-RW Audio ou vidéo (Image mouvement) en 12cm CD+G Vidéo (image) MPEG4 Audio ou vidéo (image mouvement) en 12cm 12cm en 12cm Disques supportés: DVD, VCD, CD-R, CD-RW, SVCD, DVCD, HDCD, JPEG, CD+G, MPEG-4 Kodak CD
PROTECTION DES DISQUES ET CARACTERISTIQUES DVD MANIPULATION DES DISQUES RANGEMENT DES DISQUES Ne touchez jamais la surface d’un disque. Ne rangez jamais les disques près d’une source de chaleur ou à l’exposition Ne placez aucun matériel étranger sur le disque. directe du soleil, Ne rangez pas les disques dans un endroit humide, telle qu’une salle de bains, ou à proximité d’un humidificateur. Rangez les disques dans un boîtier à la verticale. E contact avec d’autres objets pourrait rayer le disque.
CARACTERISTIQUES ENTRÉE RGB Mode Résolution Fréquence horizontale (KHz) Fréquence verticale (HZ) DOS 720x400 31.5 70 VGA 640x480 31.5 60 SVGA 800x600 37.9 60 XGA 1024x768 48.4 60 WXGA 1360x768 47.7 60 WXGA+ 1440x900 55.9 60 *La dimension 1360x768 n’est utilisée que pour les écrans TV LCD 22” et 23”. *La dimension 1440x900 n’est utilisée que pour les écrans TV LCD 19”. ENTRÉE HDMU Mode Résolution Fréquence horizontale (KHz) Fréquence verticale (HZ) VGA 640 x 480 31.47 59.
ENTRÉE VIDEO (YPbPr) Mode Résolution Fréquence horizontale (KHz) Fréquence verticale (HZ) 480i 720 x480i 15.73 59.94/60 576i 720 x 576i 15.63 50 480p 720 x480p 31.47 59.94/60 576p 720 x 576p 31.26 50 720p 1280 x 720p 37.50 44.96 50 28.13 50 1080i 1920 x 1080i 59.94/60 33.75 29 59.
Dépannage Avant de contacter le support technique, consultez le tableau ci-dessous, qui vous apportera peut-être une solution. PROBLEME La télévision ne s’allume pas SOLUTION ƔVérifiez que l’alimentation est branchée. ƔLes piles de la télécommande sont pet être vides, remplacez-les. ƔVérifiez le câble entre la TV et l’antenne/ le système AV externe. Pas d’image, pas de son ƔAppuyez sur la touché POWER de la télécommande.
Si vous souhaitez vous débarrasser ultérieurement du produit, veuillez noter que : les déchets électriques ne doivent pas être jetés avec les déchets domestiques. Veuillez les faire déposer dans les centres de recyclage existants. Contactez les autorités locales ou distributeurs pour obtenir de plus amples informations. (Directive de l équipement électronique et des déchets électriques).
Contenido z Introducción z Advertencia z Precaución z Descripción de la unidad principal z Mando a distancia z Ajuste básico OSD (en pantalla) z Funciones DTV z Funciones USB z Manual de DVD z Especificaciones z Resolución de problemas 1
Introducción Muchas gracias por adquirir nuestro producto de TV LCD. Funciona como un TV normal a color y un monitor de PC. Para disfrutar al máximo su TV desde el comienzo, lea este manual cuidadosamente y manténgalo a la mano para referencia futura. INSTALACIÓN ķ Ubique el TV en una habitación donde no llegue la luz directa del sol a la pantalla. La oscuridad total o una reflexión en la pantalla pueden causar fatiga visual. Se recomienda una luz suave e indirecta para una cómoda visualización.
Advertencia PRECAUCIÓN RIESGO DE CHOQUE ELÉCTRICO NO ABRIR PRECAUCIÓN: PARA EVITAR CHOQUES ELÉCTRICOS NO RETIRE LA CUBIERTA (O TAPA). LAS PIEZAS INTERNAS NO SON REPARABLES POR EL USUARIO. EL MANTENIMIENTO DEL EQUIPO DEBE SER REALIZADO POR PERSONAL CUALIFICADO. Este símbolo está diseñado para alertar el riesgo de choque eléctrico, este equipo sólo puede ser desarmado por personal de servicio cualificado.
Precaución Precaución - La operación de este producto utiliza altos voltajes. No abra la cubierta protectora del producto. Refiera el mantenimiento al personal de servicio cualificado. Precaución Para evitar incendios o peligros de choque eléctrico, no exponga la unidad principal a la humedad. Precaución No golpee la carcasa del televisor ni inserte objetos dentro de las ranuras o aperturas. Nunca vierta ninguna clase de líquido en el receptor de televisión.
Precaución Precaución Nunca se apoye, sujete o empuje repentinamente el producto o su base. Debe tener especial cuidado con los niños. Precaución No ubique la unidad principal sobre un soporte, estante, o mesa inestable. Si el equipo se cae, puede generar serias heridas a las personas, y daños al televisor. Precaución Cuando el producto no esté siendo utilizado por un largo período de tiempo, se recomienda desconectar el cable de energía del tomacorriente AC.
Descripción de la unidad principal Función del botón Panel de Control VOL+: Aumentar volumen. VOL-: Disminuir volumen. CH+: Subir canal de televisión. CH-: Bajar canal de televisión. MENU: Presione para seleccionar el menú principal. TV/AV: Seleccione la señal de entrada. POWER: Enciende cuando está en modo inactivo o ingresa al modo inactivo. Conexiones del terminal de TV 1. Terminal de entrada USB (Se usa solamente para actualizar el software). 2. Terminal de entrada HDMI. 3. Terminal de entrada VGA. 4.
Mando a distancia POWER (ALIMENTACIÓN): Pulse este botón para encender el TV cuando está en el modo de espera o para ingresar al modo de espera. MUTE (SILENCIAR): Pulse este botón para silenciar o restaurar el sonido. DVD SETUP (CONFIGURACIÓN DVD): Pulse este botón para ingresar al menú principal del DVD y púlselo nuevamente para salir del menú principal. (Se usa solamente con los modelos que cuentan con la función de DVD). TITLE (TÍTULO): Pulse este botón para regresar al menú de títulos.
ENTER (INTRODUCIR): Ingresar la opción seleccionada o realizar la operación seleccionada. MENU (MENÚ): Pulse este botón para ingresar al menú principal para los diferentes ajustes opcionales. EXIT (SALIR): Salir de OSD (Visualización en pantalla). 0-9: Seleccionar y cambiar a un canal usando 0-9. -/--: Lista de canles. : Cambiar hacia atrás y hacia adelante entre los canales actuales y los anteriores. CH+/CH-: Cambiar el canal hacia arriba y hacia abajo. VOL+/VOL-: Ajustar el volumen.
TEXT (TEXTO): Pulse para ingresar al modo de Teletexto. (Se usa solamente en la región de Europa) ˖Pulse para iniciar la reproducción del disco y para pausar la reproducción. (Se usa solamente con los modelos que cuentan con la función de DVD). HOLD (MANTENER): Congelar un pasaje de varias páginas en la pantalla en el modo de Teletexto. (Se usa solamente en la región de Europa). INDEX (ÍNDICE): Pulse este botón para ir a la página de índice en Teletexto.
ZOOM: Seleccionar la imagen de zoom. (Se usa solamente con los modelos que cuentan con la función de DVD). GOTO (IR A): Saltar al capítulo o título apropiado. (Se usa solamente con los modelos que cuentan con la función de DVD). SUBTITLE (BLUE) (SUBTÍTULOS (AZUL)): Seleccionar los subtítulos del disco. (Se usa solamente con los modelos que cuentan con la función de DVD). ANGLE (ÁNGULO): Seleccionar el ángulo. (Se usa solamente con los modelos que cuentan con la función de DVD).
Ajuste básico OSD (en pantalla) Guía de instalación Si esta es la primera vez que enciende el TV y no existen programas en la memoria del TV, aparecerá en la pantalla el menú “Installation Guide” (Guía de instalación). 1. Pulse el botón “e/f” para seleccionar el idioma local. 2. Pulse el botón “c/d” para seleccionar “Auto Scan” (Exploración automática) y pulse el botón “f” o el botón “ENTER” o el botón “MENU” para omitir, o pulse el botón “EXIT” para salir si es necesario.
solamente tiene dos opciones para “16:9” y “4:3”. 13. Pulse el botón “c/d” para seleccionar “Noise Reduction” (Reducción de ruido) y pulse el botón “e/f” para seleccionar entre abrir o cerrar la función de reducción de ruido. SONIDO Puede seleccionar el tipo de sonido, el que mejor corresponda a sus preferencias. 1. Pulse el botón “MENU” para ingresar al menú OSD. Enseguida, pulse el botón “e/f” para seleccionar el menú “SOUND” (SONIDO).
“e/f” para seleccionar la función “On" (Activar) ó “Off” (Desactivar). 7. Pulse el botón “c/d” para seleccionar “Time Zone” (Zona horaria) y pulse el botón “e/f” para seleccionar la zona horaria local. OPCIONES 1. Pulse el botón “MENU” para ingresar al menú OSD. Enseguida, pulse el botón “e/f” para seleccionar el menú “OPTION” (OPCIONES). Ingrese al menú “OPTION” (OPCIONES) pulsando el botón “d” o el botón “ENTER”. 2.
contraseña. 4. Pulse el botón “c/d” para seleccionar “Block Programme” (Bloquear programa) y pulse el botón “f” o el botón “ENTER” para ingresar. Pulse el botón “c/d” para seleccionar el elemento que desea bloquear. Pulse el botón “GREEN” (VERDE) para bloquear el elemento y pulse nuevamente el botón “GREEN” (VERDE) para desbloquear. Pulse el botón “MENU” para regresar al menú anterior. Pulse el botón “EXIT” para salir del menú. 5.
4. Pulse el botón “c/d” para seleccionar “ATV Manual Scan” (Exploración manual ATV) y pulse el botón “f” o el botón “ENTER” para realizar la búsqueda manual de DTV. Pulse el botón “MENU” para regresar al menú anterior. Pulse el botón “EXIT” para salir del menú. Pulse “RED” (ROJO) para guardar el programa. 5. Pulse el botón “c/d” para seleccionar “Programme Edit” (Editar programa) y pulse el botón “f” o el botón “ENTER” para ingresar. a.
3. 4. 5. 6. o el botón “ENTER” para realizar el ajuste automático. Pulse el botón “c/d” para seleccionar “Horizontal Pos.” (Posición Horizontal). y pulse el botón “e/f” para ajustar. Pulse el botón “c/d” para seleccionar “Vertical Pos.” (Posición Vertical). y pulse el botón “e/f” para ajustar. Pulse el botón “c/d” para seleccionar “Size” (Tamaño) y pulse el botón “e/f” para ajustar. Pulse el botón “c/d” para seleccionar “Phase” (Fase) y pulse el botón “e/f” para ajustar. CANAL DTV 1.
Funciones DTV Lista de favoritos Cuando se seleccione la fuente como DTV, los usuarios pueden ingresar a FAVOURITE LIST (LISTA DE FAVORITOS) pulsando el botón "FAV". La ventana “FAVOURITE LIST” se ilustra como sigue: Información de programa Al seleccionar la fuente como DTV, puede pulsar el botón “INFO” para mostrar la información del canal.
Guía de programa electrónica˄EPG˅ La guía de programa electrónica proporciona la información del programa que será emitido en ese momento o en el futuro. El sistema mostrará la ventana EPG pulsando el botón “EPG”. Se visualiza la información de DATE (FECHA) y TIME (HORA) a la derecha de la ventana. El lado izquierdo muestra todos los canales. El lado derecho muestra los programas en el canal. El programa seleccionado también se muestra en la parte superior de la pantalla.
Manual de DVD REPRODUCCIÓN BÁSICA Preparación Pulse el botón TV/AV en el panel delantero o el botón SOURCE (FUENTE) para seleccionar la fuente del DVD. Reproducción básica 1. Pulse EJECT (EXPULSAR) para abrir la bandeja del disco. Coloque un disco sobre la bandeja, (Si no hay ningún disco colocado sobre la bandeja de disco en el modo DVD, se visualizará OPEN (ABRIR) en la pantalla todo el momento). Solo existe un tamaño de disco. Coloque el disco en la guía correcta sobre la bandea de disco.
NOTA IMPORTANTE: TODAS LAS FUNCIONES QUE SE DESCRIBEN SON PARA LOS DISCOS DE DVD. SI REPRODUCE OTRO FORAMTO DE DISCO, LA OPERACIÓN Y LA INFORMACIÓN MOSTRADA EN LA PANTALLA PODRÍA SER DIFERENTE. SUBTÍTULOS MENÚ Pulse “SUBTITLE”, la pantalla mostrará “SUBTI-TLE 01/XX XXXXX”, “01” indica el número ordinal de este idioma; “XX” indica el número total de idiomas; “XXXXX” indica el idioma del país, (el número de idioma depende del disco). Esta función puede seleccionar hasta 32 idiomas visualizados en pantalla.
EPRODUCCIÓN DE FUNCIONES ESPECIALES Puede ver el CD de imágenes Kodak y el CD de imágenes JPEG en este TV. Reproducción Inserte una CD de imágenes Kodak o un CD de imágenes JPEG en la bandeja y el disco será cargado automáticamente. Si se puede identificar el tipo de disco, el reproductor empezará a mostrar las imágenes un por una (modo de pase de diapositivas). Si se visualiza el menú de navegación use los botones de navegación para seleccionar un archivo, después pulse el botón ENTER.
CONFIGURACIÓN DEL SISTEMA DE DVD Proceso de configuración general Pulse el botón DVD-SETUP, se visualizará la página de configuración general y la página de preferencia, pulse o para seleccionar, el elemento, después pulse para ingresar al menú secundario. Pulse o para seleccionar, después pulse PLAY/PAUSE o ENTER para confirmar. Pulse DVD SETUP varias veces para salir de los menús de configuración.
CONFIGURACIÓN DEL SISTEMA DE DVD (CONTINUACIÓN) Página de configuración general Visualización del TV: El usuario puede seleccionar diferentes modelos de anchura de visualización como las de 4:3 PS, 4:3 LB, 16:9 WIDE (ANCHA). Idioma de visualización en pantalla (OSD): Los usuarios pueden seleccionar el idioma de visualización en pantalla.
Página de preferencia La página de preferencia solamente está disponible cuando no hay un disco en el reproductor. Estos ajustes se aplican consistentemente a todos los discos que se insertan y se reproducen. Tipo de TV: Este reproductor Es compatible con diferentes salidas de TV, incluyendo los sistemas Auto, NTSC y PAL. Usualmente ajústelo en Auto. Parental: el control parental funciona junto con los diferentes tipos de censura asignados a los DVDs.
Default (Predeterminado): Restaura todos los ajustes (excepto la contraseña y el estado de bloqueo parental) para este reproductor de DVD a los ajustes originales de los fabricantes, pulse ENTER para realizar la restauración. Nota: Algunas funciones podrían no estar disponibles dependiendo del tipo de disco. ANALOG AUDIO SETUP PAGE (PÁGINA DE CONFIGURACIÓN DE AUDIO ANALÓGICO) 1.
DISCOS REPRODUCIBLES Se pueden reproducir los siguientes discos: DISCOS ETIQUETA CONTENIDO DIMENSIONES DVD VIDEO Audio + vídeo (imagen movimiento) AUDIO CD Audio 12 cm JPEG Vídeo (imagen) 12 cm KODAK CD Vídeo (imagen) 12 cm CD-R Audio o vídeo (imagen movimiento) en 12 cm CD-RW Audio o vídeo (imagen movimiento) en 12 cm CD+G Vídeo (imagen) MPEG4 Audio o vídeo (imagen movimiento) en 12 cm 12 cm en 12 cm Discos compatibles DVD, VCD, CD-R, CD-RW, SVCD, DVCD, HDCD, JPEG, CD+G, MPEG
PROTECCIÓN DE DISCOS Y CARACTERÍSTICAS DEL DVD AL MANIPULAR LOS DISCOS AL GUARDAR LOS DISCOS No toque el lado de reproducción del disco. . No guarde los discos en un lugar que esté sujeto a la luz solar directa o No pegue papeles o cintas al disco. cerca de una fuente de calor. No guarde los discos en un lugar que esté expuesto a la humedad y al polvo como por ejemplo en baños o cerca de un humidificador. Guarde los discos verticalmente en un estuche.
ESPECIFICACIONES ENTRADA RGB Modo Resolución Frecuencia Horizontal (KHz) Frecuencia Vertical (HZ) DOS 720 x 400 31,5 70 VGA 640 x 480 31,5 60 SVGA 800 x 600 37,9 60 XGA 1024 x 768 48,4 60 WXGA 1360 x 768 47,7 60 WXGA+ 1440 x 900 55,9 60 *1360 x 768 solamente se usa para TV de LCD de 22” y 23”. *1440 x 900 solamente se usa para TV de LCD de 19”.
ENTRADA DE VÍDEO COMPONENTE (YPbPr) Modo Resolución Frecuencia Horizontal (KHz) Frecuencia Vertical (HZ) 480i 720 x 480i 15,73 59,94/60 576i 720 x 576i 15,63 50 480p 720 x 480p 31,47 59,94/60 576p 720 x 576p 31,26 50 720p 1280 x 720p 37,50 44,96 50 28,13 50 1080i 1920 x 1080i 59,94/60 33,75 29 59,94/60
Resolución de problemas Antes de ponerse en contacto con personal de servicio, verifique la siguiente tabla para posibles soluciones. PROBLEMA El TV no enciende No hay imagen, no hay sonido Imagen de baja calidad con buen sonido Ruido de audio SOLUCIÓN Ɣ Asegúrese de que esté conectado el cable de alimentación. Ɣ Las baterías del mando a distancia podrían estar agotadas; cambie las baterías. Ɣ Verifique el cable entre el TV y la antena/dispositivo de AV externo.
Si en el futuro necesita deshacerse de este producto, tenga en cuenta lo siguiente: no debe deshacerse de los residuos de productos eléctricos como si fueran residuos domésticos. Por favor, recicle en los sitios en los que esto sea posible. Acuda a las autoridades locales o al vendedor en busca de asesoramiento sobre reciclaje. (Directiva sobre residuos eléctricos y equipos electrónicos).