Pub. 988-0147-382 www.lei-extras.
Copyright © 2003 LEI Extras, Inc., a division of Lowrance Electronics, Inc. All rights reserved. MapCreate is a trademark of Lowrance Electronics, Inc. Points of Interest Data in this unit are by infoUSA, copyright 2001-2003, All Rights Reserved. infoUSA is a trademark of infoUSA, Inc. eXitSource Database, copyright 2001-2003 Zenrin Co. Ltd. Exit Authority and eXitSource are trademarks of Zenrin Co. Ltd.
Table of Contents Sec. 1: Introduction................................................................... 1 How Mapcreate Works ................................................................. 3 File Formats & Functions ............................................................ 4 Map Border File ........................................................................ 4 Custom Map File....................................................................... 4 GPS Data File ..................................
Center Master Map................................................................. 35 Zoom ........................................................................................ 35 Creating Rectangle Map Borders............................................... 36 Creating Corridor Map Borders ................................................. 37 Saving a Map Border File........................................................... 39 Creating a Custom Map File ...................................................
Section 1: Introduction How this manual can get you into the field, fast! Thanks for buying MapCreate 6.2! We know you're anxious to install the program and make some maps, but we have one more favor to ask. Before you grab that CD, please give us a moment to explain how our manual can help you get the best performance from our software. Our goal is to get you on the road or out to the woods and water fast, with a minimum of fuss. We won't try to turn you into a computer expert.
That covers a lot of ground, but, we designed this book so that you don't have to read the whole thing from front to back for the information you want. You can skip around, and we've made it easy to look up any tips you may need from time to time. Here's how: The manual has three main sections. This first section tells you the basics you need to know to make MapCreate wake up and get to work. Section two (on page 13) will help you get the program correctly installed on your computer.
How MapCreate Works You'll be making maps faster if you understand the hoops MapCreate must jump through to cram a high detail map into your GPS unit. First of all, those CDs you just purchased contain a whole bunch of raw computerized cartography data. There are several hundred files of digital mapping information containing lake shorelines, navigation aids, roads, rivers and all the other information that goes into our high-detail maps.
File Formats & Functions Well, now you know what makes MapCreate tick. You may be ready to skip forward to where we explain how our text formatting makes the manual easy to skim. If that's the case, move on to "How to Use This Manual" on page 10. But, if you want to pick up an extra tip or two, look over this segment describing the file formats MapCreate works with. Map Border File This file defines the boundary of the raw cartography data that is extracted and converted to a GPS custom map.
create a fresh Custom Map File. You can delete the old one, or just save the new custom map over the old one. GPS Data File This file format contains all the GPS navigation information (waypoints, event marker icons, routes and trails) used by your GPS unit and MapCreate. The file extension is *.usr (for User file) and the file is saved either to your hard drive or directly to your MMC or SDC.
Atlas File This is the "raw" file format for layer after layer of cartographic and hydrographic data on our CDs. You never have to work with these files directly. MapCreate pulls data from these files to display the Master Map you see in the main window on your computer. The program combines the information from a Map Border File with the Atlas Files to make Custom Map Files for your GPS unit.
This solid-state, flash memory device is about the size of a postage stamp. (SDC [Secure Digital] cards are also compatible with any Lowrance or Eagle product that uses MMCs.) The MMCs shipped with Lowrance and Eagle GPS units are 16 MB size. If you're using a 16 MB MMC, your Custom Map File must be less than 16 MB in order to fit on the card. (This space issue is the same as floppy disks; you can't really fit a 1.44 MB file onto a 1.
The amount of development in an area is something you can't control. For example, one square mile of city streets will make a larger file than one square mile of wilderness with a few hiking trails. The amount of territory you include in a map is a major factor. The more square miles or acres you include, the bigger the file size.
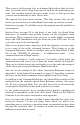
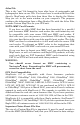
Mapping Detail: There's more here than meets the eye. The Custom Map Files you make with MapCreate contain more mapping detail than what is visible on your computer screen. Your MapCreate 6compatible GPS unit takes full advantage of this extra information. Find Highway Exit Services For example, move your mouse pointer over a highway exit symbol on the computer map, and all you'll see is a pop-up tool-tip box listing the name of the exit.
Cursor over POI symbol Pop-up box At left, an iFINDER GPS screen showing a POI pop-up name box. At right, you can call up a page of information on the POI, and the GPS unit can lead you to the POI's location. Find an Address You won't see addresses on your computer map, either. But when the MapCreate information is loaded into your GPS, you can search for a street address or a street intersection.
In the printed Quick Reference and the online Command Reference, the actual command clicks and keystrokes appear as sans serif, boldface type. So, if you're in a real hurry (or just need a reminder), you can usually skim the instructions and pick out where to click by finding the boldface commands. The paragraphs below explain how to interpret the text formatting for those commands and other instructions.
For example, if the manual says "choose CREATE WAYPOINT," it means to run the Create Waypoint command. You can choose commands by clicking the mouse pointer on the menus or toolbar buttons, or by pressing the appropriate hot key or shortcut key on the keyboard. Commands are sometimes described as menu sequences, to help you find the command faster.
Section 2: Installing MapCreate 6.2 System Requirements MapCreate 6 requires the following minimum system resources: • IBM compatible PC. • Pentium 133 MHz or faster processor. • 32 MB RAM • 50 MB hard disc space. • 256 color display. • Microsoft Windows 98 or later. • CD-ROM drive. MapCreate will run on a system with the above specifications, but the program will work slowly. A faster processor and more RAM will significantly improve program operation.
program will not operate correctly if you choose to modify an existing installation. To uninstall MapCreate, use the standard Windows ADD/REMOVE PROGRAMS function. (For more information on Windows uninstall, open your Windows Help file and search for the phrase "Removing Programs.") For Typical or Compact installations of version 6: The high detail map data is organized into two overlapping regions. The western continental United States and Hawaii are on the USA-West (disc 1) CD; the eastern continental U.
3. Type D:\setup.exe (where D: is the drive letter for your CD-ROM) Type the setup command directory path and file name. 4. Click OK to begin installation. NOTE: If you are using Windows 2000 or Windows XP Professional, you may receive an error message if you are not logged on with administrator privileges. If this occurs, you can complete the MapCreate installation by first logging on as an administrator, then proceeding with step 1 on page 14. 5. Follow the on-screen instructions: A.
C. Read the License Agreement. D. Choose a destination folder for the program. You can accept the default or you can choose another location. E. Select the type of setup.
F. If you picked Custom install, select the components to install. G. Select a program folder. You may accept the default or choose another folder. H. With all your preferences determined, InstallShield will begin copying files. A progress window is shown.
I. If you choose custom setup to install all files to your hard drive, you will be prompted to insert the second CD. On some computers the message may ask for "Disk 3." Just ignore the statement, insert the USA-East CD (disc 2) and click OK to continue the setup. 6. When the installation program is finished, the progress windows disappear. You can then start MapCreate by double-clicking the program icon in the MapCreate 6 program group.
commercial CD cleaner or ethyl alcohol to remove fingerprints and dirt. Do not leave your discs in direct sunlight or in a hot, humid location. Starting MapCreate (Easy Mode and Advanced Mode) MapCreate 6.2 includes both an easy mode called MapSelect and an advanced mode called MapCreate. Both modes are useful at different times depending on your needs and computer skill level. When you install MapCreate 6.2, a MapCreate link appears in the programs list on your Windows Start Menu.
To add a direct shortcut to your desktop: Right-click and drag the desired icon to your desktop, then release the mouse button. When you do so, a selection list will pop up asking you what you wish to do. Choose CREATE SHORTCUT(S) HERE. A copy of the icon will now appear on your desktop, and double-clicking it will launch the program. To add a direct shortcut to your Start Menu: Follow the steps above to create a shortcut on your desktop.
Section 3: Working With MapCreate Easy Mode Quick Start Reference If you're really in a hurry, this summary will tell you how to work MapCreate's easy mode, MapSelect. (If you haven't installed the program yet, see those instructions on page 13. Before you start, make sure your MMC card reader is installed and working, and you know the card reader's drive letter.) How to select and save a pre-defined custom map 1. Insert an MMC or SD card in your card reader.
Advanced Mode Quick Start Reference If you have some computer experience and want to do more with your mapping software, this 10-step summary will get you started with MapCreate's advanced mode. For detailed explanations, read through the lessons in this section. Before you start, make sure your MMC card reader is installed and working, and you know the reader's drive letter. How to make and save a rectangle map 1. Start MapCreate by clicking the Windows START button and choosing MAPCREATE 6 from the menu.
Starting MapCreate If you installed the Typical or Compact version of MapCreate, make sure the CD-ROM for the area you intend to use is in the CD-ROM drive. NOTES: • For MapCreate 5 owners: If you have both MapCreate 5 and MapCreate 6 installed on your computer and run the programs from the CD, be sure you have the correct version of the CD in your drive when working with the two programs.
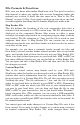
Or, you can start the program by double-clicking the AppSelect icon in the MapCreate program group window. You'll see a screen that looks like this below, asking you to choose which mode you want to use. Choose MapSelect to quickly and easily save custom maps of pre-defined areas to your MMC. Choose MapCreate to make more advanced custom maps of exactly the areas and sizes you desire, or to manipulate other GPS data such as routes, waypoints, trails and event marker icons. MapCreate 6.
MapSelect opening screen. MapSelect is designed for simplicity, and requires little in the way of directions. The maps are pre-drawn, and you just point, click and save. For MapSelect operation instructions, see the Easy Mode Quick Start Reference on page 21 or refer to the separate MapSelect Instruction Sheet (read me first) packaged with this software. The MapCreate Screen If you choose to use MapCreate, the opening splash screen appears while the program is loading.
MapCreate 6 opening screen. MapCreate has several other windows that are used to control mapping data. If they were all opened or turned on, the program interface would look like this (labels have been added for illustration): MapCreate 6 GPS text list windows. You can drag the borders of these windows to resize them to suit your viewing preferences.
under the Window menu. When you close the program, MapCreate remembers the windows and map you were using. The next time you start MapCreate, the program opens the previous map and windows, just as you left them. Closing MapCreate To close or exit MapCreate click FILE|EXIT or click the X CLOSE button at the top right corner of the screen. MapCreate Screen Components If you're pretty familiar with how Windows programs work, you may want to skip ahead to the segment on Creating Map Borders on page 36.
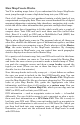
Event Marker Icon (boat ramp symbol) Route Line Route Waypoint Waypoint Pan Button Border Handle Box Map Border Zoom Buttons Zoom Range (miles) Master Map window shows a rectangle map border around Lake Eufaula, along with a route, waypoints and event marker icons. The Zoom Range is 50, which indicates that it's 50 miles across the map. Tips: • You can use the Print Master Map command to print what's displayed in the window.
Selected Symbol Tip Box Pop-up Tool Tip box. When the cross-hair pointer hovers over the visible wreck symbol, a red border surrounds the symbol and the tip box appears. This wrecked vessel is the "Three Brothers." Main Menu MapCreate's main menu is similar to that of other Windows programs. It consists of the File, Edit, Insert, Tools, View, Window and Help menus. You can click with a mouse or use the hot keys to access the menus and their submenus.
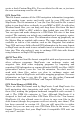
MapCreate 6.2 main menu and toolbar. The numbering below corresponds to the numbers in the figure above, and describes the toolbar buttons: 1. Center Master Map: centers the map on the point you click 2. New GPS Data File: opens a new map with no GPS data 3. New Map Border File: opens a new map with no map borders 4. Open GPS Data File: opens an existing GPS Data File 5. Open Map Border File: opens an existing Map Border File 6. Save GPS Data File: saves a GPS Data File 7.
Custom Map File is created. Turning off unneeded information categories can help reduce file size if you are trying to fit a very large map onto an MMC with small amounts of memory. For example, if you're simply taking a cross-country highway trip across several states, you can turn off categories such as rural roads and/or minor city streets. This should give you the navigation information you need at a smaller file size.
Waypoint List Window Icon List Window This window shows the event marker icons on the Master Map in a text list format. The symbol, symbol label, latitude and longitude are listed. Except for the symbol label, these elements can be edited either on the Master Map or in the list window. To edit, right-click the icon. To open this window click VIEW|ICON LIST. Icon List Window Route List Window This window shows the routes on the Master Map in a text list format.
Route List Window Route Waypoint List Window (This is not shown when the program starts for the first time; a route must be created first. With the Route List window open, double-click on the route name to open the Route Waypoint List window.) This window shows the waypoints that make up a route on the Master Map, in a text list format. The symbol, name, leg length and position (in latitude and longitude) are listed.
Trail List Window This window uses a text list format to show trails (imported from your GPS) that are displayed on the Master Map. The name, number of points in the trail, origin (starting point's latitude and longitude) and trail number are listed. To open this window click VIEW|TRAIL LIST. The trail name can be edited in the window. To change the name: 1. Click on the name to highlight it. 2. Pause a moment, then click the name again. (This is not a regular double-click.) 3.
Center Master Map You can instantly move any location on the map to the window's center with the Center Master Map command. To center the map, click the CENTER MASTER MAP cross-hair button at the left end of the toolbar. The mouse pointer turns into a cross-hair. Now click on the part of the Master Map you want centered in the map window. This command's cross-hair pointer is sometimes used with other functions. It's used to finish some commands, and it's another way to zoom (described below.
The other most common method uses the Zoom-In and Zoom-Out buttons, which are located at the bottom right corner of the Master Map. Zooming in lets you see less territory, but more detail. Zooming out lets you see more territory, but less detail. Zoom Out, Zoom In buttons, with Zoom Range Window. 1. Click the Z-IN button (zoom in) to enlarge the centered area of the map. 2. Click the Z-OUT button (zoom out) to shrink the map toward the center.
Handle Box Mouse Pointer Map Border Click and drag to draw a Map Border around Corpus Christi Bay area. 4. When the green border surrounds the desired area, release the mouse button. 5. To stop the command, click the CENTER MASTER MAP button. If you are satisfied with this map and want to finish processing it for use in your GPS unit, skip forward to the lesson on "Saving a Map Border File" on page 39.
2. If needed, click the Zoom In or Zoom Out buttons so you can see the entire area that you want to draw a map border around. 3. Click the CREATE MAP BORDERS button, and your mouse pointer becomes a pencil. 4. Move the mouse pointer to where you want your corridor map to begin. 5. Click and release the left mouse button to set the first anchor point. (The anchor point is represented by a handle box, which can also be grabbed later to relocate the border if you wish.) 6.
7. Now move the mouse pointer off at an angle, in the new direction needed to follow the irregular terrain. You'll see that the active corridor border box now rotates around the last anchor point you set. This lets you move off in any direction, with the new segment of the corridor attached to the previous segments. Click to set your third anchor point. 8. Continue to click and add additional segments to your corridor until you reach your destination or have enclosed the desired area. 9.
Save Map Border File dialog box. 2. Type a name in the File Name text box and click SAVE. That's all there is to it. The file was placed in the "data" sub-folder located within the MapCreate folder on your hard drive. You can now start another map border (click NEW MAP BORDER FILE button) or you can close MapCreate and return another day. To open this border file later on, just click the OPEN MAP BORDER FILE button and select the file name from the list. Open Map Border File dialog box.
Lowrance or Eagle GPS unit. Here's how: (Refer as needed to the Toolbar figure on page 30.) 1. Open a Map Border File by clicking the OPEN MAP BORDER FILE button. 2. Click the CREATE CUSTOM MAP button. A progress dialog box will appear while MapCreate extracts the necessary information and builds the Custom Map File. Building Map Progress dialog box. 3. When the custom map has been built, a file information box appears showing the file size. Click OK to save the Custom Map File.
NOTE: After a map has been "built," the Custom Map File size also appears in the status bar at the lower left corner of the MapCreate screen. The status bar also tells you whether or not a custom map file has been built and saved. Map not built message, left, and map file size message, right. 4. The Save As dialog box appears. Save Custom Map File dialog box. 5. Type a name in the FILE NAME text box, select your card reader's drive letter in the SAVE IN text box, and click SAVE.
to hit the road, but if you'd like to add a little GPS navigation information to your unit, read the following lessons. Creating a Waypoint Waypoints are the building blocks of GPS navigation. A waypoint is simply an electronic "address," based on the latitude and longitude of a position on the earth. MapCreate lets you set a waypoint and mark it with a symbol, name or number. This appears on the Master Map and eventually on the custom map displayed on your GPS unit's screen.
Create a waypoint: First, find the location on the Master Map. The longer arrow shows the location of a public hunting area parking lot. Move the pointer arrow tip over the location (left) and click to create the waypoint. The waypoint appears (right) with the default waypoint symbol and name, both of which can be changed. These figures were taken from a zoom range of 4.05 miles.
Waypoint and Edit Waypoint in the online Command Reference section. If this is all the GPS information you need for now, skip ahead to the lesson "Saving a GPS Data File" on page 50. But, if you want to add icons or a route, check out the next two lessons. Creating an Icon Icons are graphic symbols used to mark some location, point of interest or event. These features are also called event markers, or event marker icons. Event marker icons don't store as much information as waypoints.
Create an icon: First, find the location on the Master Map. The bottom arrow shows the location of a public boat ramp on this river. Move the pointer arrow tip over the location (left) and click to create the icon. The icon appears (right) with the default waypoint symbol but no name. To change this symbol to the boat ramp symbol, see Edit Icon in the online Command Reference. 5. Relocate your mouse pointer and click to create additional icons as needed. 6.
If you don't want to plan a route this trip, skip ahead to the lesson "Saving a GPS Data File" on page 50. But don't forget, planning a route is one of MapCreate's coolest capabilities. If you're ready for some real navigating with routes, read on. Creating a Route A route is a series of waypoints, linked together in an ordered sequence, that's used to mark a course of travel. You can visualize a route as beads on a string, or, think of it as the mile marker signs posted at intervals along U.S.
Tip: As you move along your intended course, you may need to pan the Master Map and periodically zoom in and out to see where to place route waypoints, and where you are going next. The pan and zoom buttons will always work, even when the Create Route command is active. This way, you don't have to turn off Create Route just to move the map. 3. Click the CREATE ROUTE button, and your mouse pointer becomes an arrow with a route symbol, two waypoints connected by a magenta route line. 4.
along your intended route and click to create additional route waypoints as needed. Basically, you will set a new waypoint every time you need to change direction. 6. To close the Create Route command, right-click or press Esc. Finished route with six waypoints. Notice the straight line-of-sight line connecting the waypoints that make up the route. The route segment from one waypoint to another is called a leg; this route has five legs.
• In a hurry? You can erase a route by deleting each waypoint, one after the other. Click the CENTER MASTER MAP button, then move the cross-hair pointer over a route waypoint and right-click. In the popup menu, click the DELETE WAYPOINT command. MapCreate erases the waypoint and the magenta line linking the waypoint to the route. Now that you've created all the GPS information you want, you need to prepare it for use in your GPS unit. We'll do that in the next lesson, "Saving a GPS Data File.
MapCreate and return another day. To open this GPS Data File later on, just click the OPEN GPS DATA FILE button and select the file name (and it's location) from the list. Open GPS Data File dialog box. Now you're ready to load that GPS Data File into your GPS unit. Refer to your GPS unit's manual for instructions on inserting the MMC and loading your GPS Data File into its memory.
2. Open the Route List Window: click VIEW|ROUTE LIST. 3. Right-click on the route name. In the pop-up menu, click the CREATE BORDERS AROUND ROUTE command. The Create Borders Around Route pop-up menu appears when you right-click a route name in the Route List Window. In this example, we are creating a corridor map border for a route from Dallas to Corpus Christi, Texas. Route name is "Dallas-Corpus." MapCreate draws a corridor map border following the route.
You can save this as a Map Border File and then create a Custom Map File. (Click the SAVE MAP BORDERS button…then click the CREATE CUSTOM MAP button.) Tip: You can control the width of any corridor map. Click VIEW|MAP DISPLAY OPTIONS, and the Map Display Options dialog box appears. Map Display Options menu. Click on the MAP BORDERS tab. Near the bottom of the box, drag the Corridor Width slider bar back and forth along the scale to increase or decrease the width of your corridor.
Creating a Route From a Trail A trail is a line drawn on the map by your GPS unit as you travel. It's a record of the path you've taken, showing where you've been. This feature is also called a plot trail. In the field, the trail will extend from your present position back to where you began recording the trail. Your GPS unit records thousands of position points to show every twist and turn you've taken on your journey. MapCreate can use a GPS plot trail to create a route for use on a repeat trip.
This example shows a portion of Trail 2, recorded during a business trip from Afton, Oklahoma to Kansas City, Missouri. The trail appears as a green line on the Master Map. It follows Interstate 44 to Carthage, Missouri, then Highway 71 north toward Kansas City. For easier viewing, roads, highways and other features have been turned off. 2. Open the Trail List Window: click VIEW|TRAIL LIST. 3. Open the Route List Window: click VIEW|ROUTE LIST. 4. Right-click on the trail name.
MapCreate converts the green trail line into a magenta route line with red waypoints. It does this by transforming thousands of position points in the trail to 25 route waypoints. See the illustration below, showing the trail and route before and after the command is performed. Trail segment through Joplin before conversion to a route (left) and the route created automatically from the trail (right). In the right image, the green trail and the magenta route are both visible.
Appendix 1: MapCreate Command List Complete documentation on all MapCreate commands is available in the program's online Help File. To access Help and its Command Reference section, press F1. An example entry from the Command Reference (for the Help Command) appears at the end of this command list.
Help Topics Command Menu: HELP Submenu: n/a Menu Command: HELP TOPICS Menu Command Sequence: HELP|HELP TOPICS Hot Key Sequence: Alt+H|H Shortcut Key(s): F1 Toolbar button: n/a The Help Topics command opens the on-line Help system in your default web browser. Our help information is in HTML format, but it runs from the CD or your hard drive, not from the Internet.
3. In the FIND WHAT: box, type the term, phrase or command you are looking for, adjust any options such as up or down, then click FIND NEXT. Search a Help document for the term "map border." Netscape 6 browser: 1. Click somewhere on the help page you intend to search. This makes sure your browser will search the correct page. 2. Click SEARCH|FIND IN THIS PAGE or use the shortcut keys Ctrl+F to begin your search. Use Netscape's Find command to search Help documents. 3.
Notes 60
Appendix 2: Map Category List This list contains the different categories of mapping information available in MapCreate 6. These categories and their subcategories can be turned off or on. Only those categories turned on (displayed in the Master Map) will be included in Custom Map Files for your GPS unit. See Appendix 3 for symbols used to represent these items. POI stands for Point of Interest.
National Forests National Park Service Park Symbols Railroads Roads Major City Major City Names Minor City Minor City Names Rural Rural Names State/Province Boundaries Names Water Canal/Stream Names Canals/Streams Lake/River Names Lake/Rivers Ocean/Sea Names Ocean/Seas Other/Names Wrecks & Obstructions RV Parks Resorts POI-Marine Boat Dealers Equipment Marinas Other Services Rental/Charter Repair POI-Restaurants Asian Banquet Rooms Barbecue Coffee Shops Delis Fast Food Chains Ice Cream Italian Mexican Misc
Appendix 3: MapCreate 6 Symbol Key MapCreate 6 contains hundreds of mapping symbols used to represent items ranging from geographic features to commercial Points of Interest (POI). The following list displays these symbols and the name of the item the symbol represents. Interstate Highway Highway Exit with Scenic Area U.S.
Shopping Center White or Unidentified Lighted Buoy (Navaid) Summit Green Unlighted Buoy (Navaid) Tower Red Unlighted Buoy (Navaid) Trail Name White or Unidentified Unlighted Buoy (Navaid) City, Community, or Subdivision Name Light (Navaid) Land Feature Name Nautical Chart Note Water Feature Name Platform (Navaid) Miscellaneous Landmark Name Radiobeacon (Navaid) Square Green Daybeacon (Navaid) Awash or Visible Obstruction Awash Rock Square White or Unidentified Daybeacon (Navaid) Covered Rock Red Triang
Amusement Place, Billiards or Casino (POI) Ice Cream Parlor (POI) Pizza (POI) College or University (POI) Fishing-Related (POI) Hall or Auditorium (POI) Lodging (POI) Hospital (POI) Camp or Campground (POI) Medical Service (POI) RV Park or RV Service (POI) Miscellaneous Attraction (POI) Marina (POI) Museum or Historical Place (POI) Boating Dealer or Service (POI) Post Office Boat Equipment & Supplies (POI) Tourist Attraction or Tour (POI) Gas Station (POI) Zoo (POI) Auto Parts or Road Service(POI) Movie T
Hardware Store (POI) Stadium, Arena or Athletic Field (POI) Sporting Goods or Sportswear (POI) Airport (POI) Golf Course (POI) 66
Appendix 4: Considerations When Planning Highway Routes Tips on Making Better Routes for Highway Navigation How you make a highway route depends on your type of travel and whether you prefer to use the GPS unit's compass rose screen, the map screen or both for navigation. These factors determine how many route waypoints to use, and where you place them. A simple, straight-legged route by water or by air is easy to make, as is a route following a square grid of city streets.
The amazing capabilities of GPS navigation can tempt first-time users to build highly detailed highway routes. These "high res" routes are fun to use, but they have some drawbacks. They require placing a route waypoint at practically every curve in the road. This takes a relatively large number of waypoints for the distance traveled. A large set of waypoints close together can give your Custom Map a cluttered look. If the route is very long, it takes more time for you to make it in MapCreate.
For example, you could be traveling toward a destination to the south, but following a highway curve around a mountain. As you take the curve to your right, your car will actually be pointing west as you follow the pavement. However, the compass rose is accurately pointing to that next southern waypoint, now 90 degrees off to your left. If you were depending only on the compass rose at that moment, it might look like you were off course.
Notes 70
LEI DATABASES LICENSE AGREEMENT THIS IS A LEGAL AGREEMENT BETWEEN THE END-USER WHO FIRST PURCHASES THIS PRODUCT AS A CONSUMER ITEM FOR PERSONAL, FAMILY, OR HOUSEHOLD USE ("YOU") AND LEI EXTRAS, A DIVISION OF LOWRANCE ELECTRONICS, INC., THE MANUFACTURER OF THIS PRODUCT ("WE", "OUR", OR "US"). USING THE PRODUCT ACCOMPANIED BY THIS LICENSE AGREEMENT CONSTITUTES ACCEPTANCE OF THESE TERMS AND CONDITIONS. IF YOU DO NOT ACCEPT ALL TERMS AND CONDITIONS, PROMPTLY RETURN THE PRODUCT WITHIN 30 DAYS OF PURCHASE.
DATABASES LIMITED WARRANTY "We", "our", or "us" refers to LEI Extras, a division of Lowrance Electronics, Inc., the manufacturer of this product. "You" or "your" refers to the first person who purchases the product as a consumer item for personal, family, or household use. The Databases Limited Warranty applies to the one or more databases that your product may contain. We refer to each of these as a "Database" or together as the "Databases.
LEI SOFTWARE LICENSE AGREEMENT AND ONE-YEAR MEDIA WARRANTY NOTICE TO USER: THIS IS A CONTRACT. BY INSTALLING THIS SOFTWARE, YOU ACCEPT ALL THE TERMS AND CONDITIONS OF THIS AGREEMENT. This LEI Extras* ("LEI") End User License Agreement accompanies the software contained on the CD-ROMs ("Software").
How to Obtain Service… …in the USA: We back your investment in quality products with quick, expert service. If you're in the United States and you have technical, return or repair questions, please contact the Factory Customer Service Department. Before any product can be returned, you must call customer service to determine if a return is necessary. Many times, customer service can resolve your problem over the phone without sending your product to the factory.
Accessory Ordering Information for all countries LEI Extras, Inc. is the accessory source for sonar and GPS products manufactured by Lowrance Electronics and Eagle Electronics. To order MapCreate and GPS accessories such as computer cables, MMC cards or MMC card readers, please contact: 1) Your local marine dealer or consumer electronics store. Most quality dealers that handle marine electronic equipment or other consumer electronics should be able to assist you with these items.
Visit our web site: www.lei-extras.com For Lowrance and Eagle Products Lowrance Pub. 988-0147-382 Printed in USA 011703 © Copyright 2003 All Rights Reserved LEI Extras, Inc.