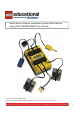
Quick Start Guide to computer control and robotics using LEGO® MINDSTORMS™ for Schools www.LEGO.com/education/MINDSTORMS LEGO, the LEGO logo and MINDSTORMS are trademarks of the LEGO Group. ©2004 The LEGO Group.
This guide is intended for all first time users of LEGO® MINDSTORMS™ for Schools and the ROBOLAB software (versions 2.0 or higher). It is a brief guide that will help you to install the software and try out some of the basic programming principles. It is intended as a brief introduction. You will need the ROBLAB User Guide to become fully conversant with the concept. The guide is based on functions within ROBOLAB 2.0.
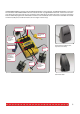
LEGO® MINDSTORMS™ for Schools uses the ROBOLAB software to write programs. The ROBOLAB software runs on both PCs and MACs. LEGO MINDSTORMS for Schools includes an RCX—a programmable LEGO brick. The RCX is a microcomputer with three output ports A, B and C for connecting motors and lamps, and three input ports 1, 2 and 3 for connecting sensors. ROBOLAB programs are downloaded to the RCX via an Infrared (IR) Tower. The IR Tower is available with a serial connection (COM port) or a USB connection (for 2.
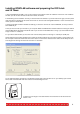
Installing ROBOLAB software and preparing the RCX brick and IR Tower 1. Insert the ROBOLAB CD-ROM in your CD drive and start the program. Follow the installation instructions. The installation will take up to 20 minutes. DO NOT connect the IR Tower until told to. 2. While waiting for the installation to finish you should insert 6 AA batteries in your RCX. Remove the grey cover and place them according to indicators at the bottom of the RCX.
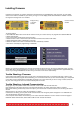
Installing Firmware Firmware is the software you need to download to the RCX before using ROBOLAB to write programs. You can always check if the firmware is installed on your RCX by turning it on. If the display shows 00.00 firmware is installed. If the first four digits are missing there is no firmware. Display showing no firmware installed RCX with firmware installed To install firmware: 1. Start ROBOLAB. Select Start at the rear left hand corner of your screen. Scroll up to programs and select ROBOLAB. 2.
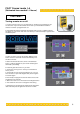
PILOT Course Levels 1–4 (Estimated time needed 1–2 hours) Pilot Level 1 Turning a motor on or off 1. Connect a motor to port A on your RCX and turn the RCX on by pressing the red On-Off button. If you connect a wheel to the motor you will be able to see which direction the motor is programmed to run. 2. Start ROBOLAB, select Programmer and double-click on Pilot 1. A default program will appear on your screen. The motor icon offers you a left (clockwise) or right (counter clockwise) option. 3.
Test Your Skills—Stop the motor on time 1. Build a car driven by one motor. See building instructions on page 25. Follow steps 1 to 4. 2. Program the car to move forward for one second 3. Place a measuring tape on the floor and test how far the car travels in one second. Repeat the test three times to calculate an average distance. 4. Place a LEGO figure or other object on the floor next to the measuring tape at a distance equivalent to that covered in one second. 5.
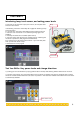
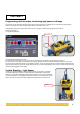
Pilot Level 2 Introducing lamp, touch sensor, and setting power levels At this level you can work with output ports A and C, set the power level and use a touch sensor. Lamp 1. See building instructions. Follow step 4a on page 28—attaching a lamp and touch sensor. 2. If you are still in Pilot level 1 select Back and then select Pilot level 2. 3. The motor icon must be set to run clockwise (pointing right) at full speed (5) 4. The lamp should be set to the lowest power level (1) 5.
Pilot Level 3 Programming with two steps, introducing light sensor and loops At this level you can work with all three outputs and use the light sensor. Furthermore you now have two programming steps. You will need to use the red stop sign to block a port that is not in use. 1. See building instructions. Follow instructions for 4b on page 29—attaching a light sensor and a lamp. 2. Select Pilot level 3. 3. Program the following: Light sensor 4. Download the program to the RCX. 5.
Test Your Skills—Program a car to respond to light readings 1. Write a program in Pilot level 3 that makes the car move forward until the light sensor meets a darker reflection (such as the edge of the table). Then tell the car to move backward until you stop it by pressing a touch sensor. We recommend that you program the car to move slowly. Set the motor power level to 2 or 3. 2. You could also program the lamp to be on when moving forward and off when moving backwards. 3.
Pilot Level 4 Programming with multiple steps At this level you can add extra steps to the process to make the program more complex. When you open Pilot level 4 you will find a sample program with two steps. To avoid confusion when making your first program you should delete step 2. Select the red arrow as shown below, then select ‘-’ and delete. To create extra steps select the ‘+’ button. To scroll through the steps select the red arrows. Test Your Skills—Program a car to drive in a rectangle 1.
NOTE: After finishing Step 2 you should download and test the program to determine how long it takes for the model to turn 90 degrees. Note that the speed will vary depending on the age of your batteries. Different surface types also affect turning speeds; select a smooth surface for best performance. Here is a possible solution for steps 1 and 2. Congratulations! You have now completed the first part of your Quick Start Guide to programming in LEGO MINDSTORMS for Schools.
INVENTOR Course Levels 1–4 (Estimated time needed 2–3 hours) You are now entering a new world of programming, where the principles learned at Pilot level are relevant, but where many new features will be introduced. Programming at this level is far more challenging and complex. We hope that this introduction will give you the confidence to get started. Programming takes place by dragging icons from a number of function panels and dropping them into the programming window.
3. Click your mouse on the programming window – it will either show you a black arrow, a white hand, a cable reel or a text editing function. You can change the function of the mouse by pressing the Tab button on your keyboard. Tools Palette NOTE: You can also access these functions by selecting ‘Window’ in the top menu and scrolling down to ‘Show Tools Palette’. 4. Select the black arrow function and mark the icon after the green traffic light.
Inventor Level 2 Introducing modifiers, flip direction, jump & land and random time functions. At the top menu select Tools or Project (depending on version) and scroll down to Change Inventor Level. Choose Inventor level 2. Your programming options now expand to include 3 new sub-menus called Wait For, Structures and Modifiers. To return to the main functions palette select the white vertical arrow in the sub-menu.
Use your two motored vehicle as for Inventor level 1. 1. Delete all icons between the start and stop lights. Start by dragging the red traffic light icon further to the right so that you have enough space on the screen to build your program. 2. Copy the program string shown below. Note that the motor icon should not be predetermined to a specific port, and that the flip direction icon is situated below the motor icons in the functions palette.
4. Select the Jump icon and the red traffic light icon by dragging the mouse across them. Move them to the right, now there is space for the Play Sound icon. Insert it after deleting the wire between the Random Time and the Jump Icon. (If you use ROBOLAB 2.5 right click the wire and select Insert) 5. Now insert 3 and 2 seconds as the maximum time (default is 5 seconds) using a numeric constant, which is located in the Modifiers palette.
Inventor Level 3 Introducing music, task split, loop and fork merge options At the top menu select Tools or Project (depending on version) and scroll down to Change Inventor Level. Select Inventor level 3. Again the Functions palette expands. One new sub-menu called Music is now available and the Structures sub-menu is expanded with three new features; Fork Merge, Loop and Task Split. You can also choose random power level for outputs in the Modifiers sub-menu.
At the upper string motors A and C turn clockwise, wait for two seconds, flip direction, wait for another two seconds and then jump back to the yellow arrow and repeat the task. The lower string continues to play six notes. The program must be stopped by pressing the Run button. The vehicle will drive forward and backward while playing a melody. Introducing touch sensor fork and merge and a specified number of loops 1. Use your two motored vehicle as in Inventor level 1.
Inventor Level 4 Introducing Containers At the top menu select Tools or Project (depending on version) and scroll down to Change Inventor Level. Choose Inventor level 4. This level gives you access to all the ROBOLAB programming icons and lets you make very advanced and complex programs. You can explore the possibilities by using the Context Help menu or see the Using ROBOLAB guide, which you can purchase along with the software. Three new sub-menus called Reset, Containers, and RCX communications appear.
First the program must make sure that the container is empty—this is just a precaution against readings that may still exist in the RCX from previous activities. The Add to Container adds a value of one to the Container Fork. The Container Fork is set to count the light being turned on five times. So long as the value is below five, the lower string is chosen. The lower string turns on the lamp, waits for one second, turns off the lamp and waits for one second again.
Ideas for practising your skills • Create a robotic puppy dog with an appealing look and programmed behaviours that include movements and sounds • Roaches do not like light. Build and program a bug that turns and runs away when light shines on it.
Investigator A general introduction This section is for information only and does not include training schedules. Investigator extends the use of the RCX and ROBOLAB to include the creation of experiments that use programming, data logging, computation tools, and documentation. The programming tools in Investigator are the same as those found in Pilot and Inventor Levels with additional commands for data logging. Students program their RCX to collect information.
Capturing Data The upload area allows you to upload data from the RCX to the computer and view it on a graph. Data sets are uploaded from the RCX to ROBOLAB in the upload window. All data sets are plotted on their own page in the upload area. If data from more than one sensor is acquired when the RCX program is run, upload opens a new page for each data set. A window tells you how many data sets were uploaded.
1 3x 1x 2 1x 1x 2x 1x 25
3 1x 2x 1x 2x 128 mm 2x 1x 1x 26
4 2x 2x 1x 1x 27
4a 1x 1x 128 mm 520 mm 1x 1x 28
4b 2x 1x 1x 128 mm 1x 1x 1x 1 2 3 29