
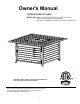
Installation Guide

8
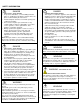
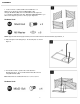
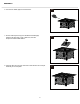
4. Disassemble the washers and screws located in the four corners
of the Burner Assembly (B), lower the Burner Assembly (B)
down into the Table Top (D). Align the holes in the four corners of the
Burner Assembly (B) with the holes in the Table Top (D) and assemble
the Burner Assembly (B) to the Table Top (D) using the four screws
and washers.
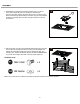
5. Attach the Table Top (D) to the assembled side panels. Align the holes
in the Table Top (D) w
ith the holes at the top of the assembled side
Panels and insert M8x16 Bolts (FF) through M8 Washer (GG) and
through holes. Tighten with Wrench B (HH). DO NOT OVERTIGHTEN
as you will need to adjust the holes to ensure proper alignment.
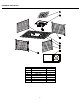
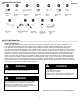
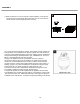
Hardware Used:
Note: The Control Box on the Burner Assembly should face towards the Door Panel with Door.
ASSEMBLY
4
B
5