OWNER'S MANUAL INTEGRATED CAR CASSETTE + CD PLAYER WITH DSP CONTROL SUPER POWER OUTPUT SLIDE-DOWN FACE DETACHABLE PANEL FM-AM FM-MPX RADIO RECEIVER WITH REMOTE CONTROL MODEL: LCDCS92 Page.
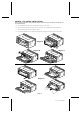
BEFORE YOU BEGIN INSTALLATION Before you begin to install the car radio, please follow the below procedure in step by step. Otherwise, the CD Player can not be operated properly. A) Put the detachable panel back to the car radio as shown in Diagram A ( point 1 and 2 ). B) Press the slide down eject button ( Diagram A point 3 ) until the panel is in horizontal position as shown in Diagram B. C) Take out the warning label as shown in Diagram B ( point 4 ).
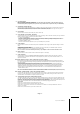
LOCATION OF CONTROLS OPERATING INSTRUCTIONS 1. POWER ON/OFF CONTROL Press this button to turn the power "ON" or "OFF". 2. BAND SELECTOR Each time this button is pressed, the radio band is changed. The indication "FM1", "FM2", "FM3", "MW1" or "MW2" will appear on the display panel according to your selection. 3. LOCAL/DISTANT SELECTOR Press this button to prevent strong local stations from overlapping weaker stations. For normal operation, press this button again for distance. 4.
11. CD EJECT BUTTON Press this eject button will eject the compact disc. Note: If you want to release the compact disc, press the release slide down button (# 24) first until the panel is in horizontal slide position (Diagram B). Then, press the CD eject button and the compact disc will eject automatically. 12. DETACHABLE RELEASE BUTTON Press this button to release the detachable panel. To detach the front panel, press the button so that the left side of the panel is released.
23. MODE CONTROL Press this button to select either in CD, TAPE or Radio mode. 24. SLIDE DOWN EJECT BUTTON (Diagram D) Press this button to let the panel slide down from vertical position to horizontal position. The CD slot is shown. To put the panel back to origional position, use your fingers to push up the panel upwards until the panel is locked in vertical position. 25.
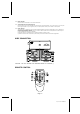
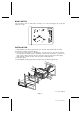
BAND SWITCH Use small screw driver to select either in Europe or in USA band stepping by moving the switch left or right. INSTALLATION 1. Install brackets and screws removed from your old radio (not provided with this radio). 2. Slide radio and frame into dash opening. 3. Trim ring has precut grooves on the back of it. The size of the trim ring can be reduced (made smaller) for different types of installations.