
User Manual - RCVR


Compact Portable Receiver
Rio Rancho, NM
15
7) Set Receiver Audio Output Level
The audio output can be adjusted from -50 dBu (mic
level) to +5 dBu (line level) in 1 dB steps. It is best to
use an output level high enough to drive the connected
device to an optimal level without the need for addition-
al gain. If the receiver is set to full output and the level
is still not sufficient to drive the connected device to an
optimal level, then some gain will need to be applied
by the connected device.
A built-in tone generator makes matching the output
level to the connected device easy and accurate.
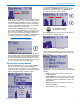
1) Navigate to Audio Level in the LR receiver menu
and press MENU/SEL to enter the setup screen.
Use the arrow keys to reduce the level to minimum
(-50 dBu).
2) Turn on the 1k tone (MENU/SEL + UP arrow) in
the Audio Level setup screen.
3) On the connected device, set the input to “line
level” if available. Turn the input gain control (e.g.
record level) all the way down.
4) Gradually increase the output level on the receiver
while observing the input level meter on the con-
nected device. Increase the level until the input
level meter indicates 3 or 4 dB below maximum.
This “optimal level” will protect against overloading
the input with a very loud peak in the audio.
5) If this optimal level cannot be achieved, even with
the receiver output turned all the way up, increase
the input gain control on the connected device
gradually until this level is achieved.
Once this level match has been set, leave these set-
tings alone and make adjustments from one event to
another with the input gain control on the transmitter.
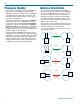
Tuning Groups
For quick, convenient access to predetermined groups
of frequencies, four user customizable groups, U,V, W
and X, are available, and can each hold up to 32 chan-
nels.
Activitating a Tuning Group
1) Navigate to Group on the menu and press MENU/
SEL to enter the setup screen.
2) Use the UP and DOWN arrows to scroll through
the options, None (Default), U, V, W or X. Choose
the desired tuning group and press MENU/SEL to
return to the menu.
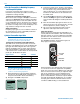
3) Navigate to Frequency on the menu and press
MENU/SEL to enter the setup screen. Once a tun-
ing group is active, the group’s name is displayed
in the Frequency setup screen.
The
selected
frequency
number is
displayed
next to
the Group
name
4) Hold down MENU/SEL and press the UP and
DOWN arrows to select the desired frequency
number (32 are available). If the desired number
is blinking, press the power button to enable it.
Press the power button again to disable it.
NOTE: The tuning group selector blinks any
time the tuning group item does not match the
current settings of the receiver. If blinking, the
frequency has not been saved.
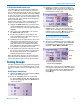
5) Once you’ve enabled the frequency number with
the power button (not blinking), press MENU/SEL
to highlight the desired method of adjusting the
frequency - Block, MHz or Hex Code.
Press MENU/SEL repeatedly to
browse through the settings. The
selected setting is highlighted.
Hex Code
Block
MHz
With the item selected, use the UP/DOWN arrows
to change the setting. When the value is changed,
the frequency number will start blinking.Press the
power button to store the setting (characters
stop blinking).