
Quick Start Guide

www.lectrosonics.com 5
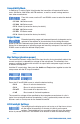
The LCD displays a boot sequence which consists of four screens ending with the
audio screen similar to this example:
• Companyname:Lectro
• Frequencyblk/Firmware
Ver.:b21r1.1
• Powerlevel:Pr100
• Compatibilitymode:CP400
• Audio(Inputgain):Aud22
Power Down
Simultaneously press and hold the AUDIO and FREQ buttons while
observing that the word “OFF” appears in the LCD along with a counter.
The screen will display a countdown from 3 to 1 and the unit will then turn off.
Note: If the AUDIO and FREQ buttons are released before the LCD goes blank at the end
of the countdown, the unit will not turn off. Instead, it will stay energized and the display will
return to the previous screen.
Standby Mode
Quickly press both AUDIO and FREQ buttons to enter the “standby”
mode. In this mode the RF output is turned off so adjustments can be
made without interfering with other systems operating in the same
location. The LCD displays rf OFF to remind you that the unit is not transmitting.
Use the AUDIO and FREQ buttons to access the various setup screens. When the
adjustments are complete, press both the AUDIO and FREQ buttons briefly to save the
settings and turn the unit off.
Compatibility, Output Power, Bias Voltage (phantom power)
and LCD Backlight
Four different setup screens are accessed in a setup mode that is accessed with a
special button sequence.
•CompatibilityMode
•OutputPower
•BiasVoltage(phantompower)
•LCDBacklightSettings
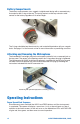
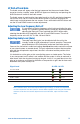
Hold the UP arrow button and simultaneously press the AUDIO and FREQ buttons. The
compatibility setup screen will appear. Each successive press of the AUDIO button will
step through the other three setup scree
ns.
Note: The unit is automatically set to “standby” in this setup mode, however, the rF OFF
reminder will not be displayed.
Then press the AUDIO and
FREQ buttons at the same
time
Hold the UP arrow
button