
User's Manual


WM, WM/E01, WM/E02, WM/X
LECTROSONICS, INC.
8
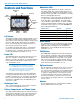
Operating Instructions
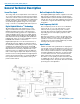
Power Up and Boot Sequence
Simultaneously press and hold the AUDIO and FREQ
buttons until the startup count is completed. The
screen will display a count from 1 to 3 as the unit boots
up, then it switches to the Audio screen. As the unit
turns on, the Modulation LEDs and PWR LED all glow
red, then green, and then revert to normal operation.
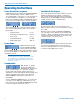
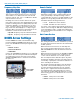
The LCD displays a boot sequence which consists of
four screens ending with the audio screen similar to
this example:
• Company name: Lectro
• Frequency block/Firmware Ver.: b22r2.4
• Power level: Pr 100
• Compatibility mode: CP IFB
• Audio (Input gain): Aud 22
Power Down
Simultaneously press and
hold the AUDIO and FREQ
buttons while observing that
the word “OFF” appears in the LCD along with a counter.
The screen will display a countdown from 3 to 1 and the
unit will then turn off.
Note: If the AUDIO and FREQ buttons are
released before the LCD goes blank at the end of
the countdown, the unit will not turn off. Instead,
it will stay energized and the display will return to
the previous screen.
Standby Mode
With the unit off, quickly
press both AUDIO and
FREQ buttons, and release
before counter reaches “0” to enter the “standby”
mode. In this mode the RF output is turned off so
adjustments can be made without interfering with other
systems operating in the same location. The LCD
displays rf OFF to remind you that the unit is not
transmitting.
Use the AUDIO and FREQ buttons to access the vari-
ous setup screens. When the adjustments are com-
plete, press both the AUDIO and FREQ buttons briefly
to save the settings and turn the unit off.
Lock/Unlock the Keypad
The control panel buttons can be locked out to avoid
inadvertent changes in the settings or turning the
unit off unintentionally. Simultaneously pressing and
holding both the UP and DOWN arrow buttons during
normal operation starts a countdown timer.
The timer starts at three and counts down to zero.
When the timer reaches zero, the transmitter’s controls
are locked.
With the controls locked, the AUDIO and FREQ but-
tons can still be used to display current settings. Any
attempt to change a setting by pressing either the Up
or Down arrow button will result in an on-screen Loc
reminder that the controls are locked.
Once the transmitter is locked, it cannot be unlocked
or powered off using the buttons. The only ways to
unlock a locked transmitter are to remove the battery
or unlock it via the RM remote control.