
User's Manual
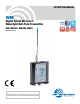


Watertight Transmitter
Rio Rancho, NM
9
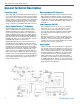
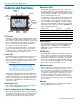
Menus and Settings
There are four locations for setup options and settings
accessed with the control panel:
• UP Arrow Menu and Settings
• DOWN Arrow Menu and Settings
• AUDIO button settings
• FREQ button settings
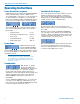
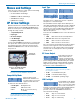
UP Arrow Settings
With the unit turned off, hold the UP arrow button and
simultaneously press the AUDIO and FREQ buttons.
Each successive press of the AUDIO button will step
through the setup screens.
• Compatibility Mode
• Input Type
• RF Power Output
• LCD Backlight
• Frequency Step Size
Use the UP and DOWN arrow buttons to scroll through
the options. The selected options will automatically be
stored when the power is turned off. Press both the
AUDIO and FREQ buttons to exit the menu and turn
the power off.
Then press the AUDIO and FREQ
buttons at the same time
Hold the UP
arrow button
Note: The unit is automatically set to “standby” in
this setup mode; with rF OFF not displayed.
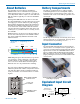
Compatibility Mode
These modes provide
DSP-based emulations for
use with earlier Lectrosonics
equipment and with some
models from other manufacturers.
• CP NU Hybr: Nu Hybrid mode
• CP IFb: IFB Series mode
• CP 3: Mode 3 (contact the factory
for details)
NOTE: If your Lectrosonics receiver does not
have Nu Hybrid mode, set the receiver to Euro
Digital Hybrid Wireless® (EU Dig. Hybrid).
Input Type
The input can be configured for electret or dynamic
microphones or a line level input.
The transmitter features unique Servo Bias input cir-
cuitry that automatically adjusts the current to maintain
a selected bias voltage for electret microphone. This
effectively overcomes a traditional problem with varia-
tions in output levels and power supply currents of
different microphones.
Press the UP and DOWN arrows to select the desired
input type:
• LInE Bias turned off; line level impedance
• PH oFF Bias turned off for dynamic mics
• PH 2 Bias at 2 volts for electret mics
• PH 4 Bias at 4 volts for electret mics
The correct bias is specified by the microphone manu-
facturer. 4 volts is typical for most electret lavaliere
microphones. 2 volts is preferred by some mic manu-
facturers such as Countryman for the very small B6
and E6 models.
RF Power Output
This setting provides an
option for the trade-off
between operating range
and battery life. The lowest
power setting provides maximum battery life, and the
highest power setting provides maximum operating
range and can also help to suppress some types of
interference from broadband RF noise.
NOTE: See the specifications for typical
operating times for each power level. (10 mW is
the only option for E02.)
• Pr 50 for maximum battery life
• Pr 100 is an intermediate setting
• Pr 250 for maximum operating range
LCD Backlight
The backlight on the display
can be set to stay on all the
time or to turn off after either
30 seconds or 5 minutes of
inactivity on the panel switches. The backlight will turn
on and the timer will start over when a button is
pressed. Use the UP and DOWN arrow buttons to
select the desired setting.
• bl 5 Stay on for five minutes
• bl 30 Stay on for 30 seconds
• bl on Stay on continuously