
User's Manual


WM, WM/E01, WM/E02, WM/X
LECTROSONICS, INC.
10
Frequency Step Size
This menu item allows frequencies to be selected in
either 25 kHz or 100 kHz increments. If the desired
frequency ends in .025, .050 or .075 MHz, the 25 kHz
step size must be selected.
Normally, the receiver is used to find a clear operat-
ing frequency. All Lectrosonics Digital Hybrid receivers
provide a scanning function to quickly find prospective
frequencies with little or no RF interference. In other
cases, a frequency may be specified by officials at a
large event such as the Olympics or a major league
ball game. Once the frequency is determined, set the
transmitter to match the associated receiver.
• Stp 100 Frequency steps in 100kHz increments
• Stp 25 Frequency steps in 25 kHz increments
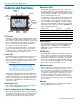
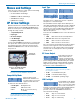
DOWN Arrow Settings
Hold the DOWN arrow button and simultaneously
press the AUDIO and FREQ buttons. Each successive
press of the AUDIO button will step through the setup
screens.
• Remote Control
• Auto Power Restore
• Audio Mute
Use the UP and DOWN arrow buttons to scroll through
the options. The selected options will automatically be
stored when the power is turned off. Press both the
AUDIO and FREQ buttons to exit the menu and turn
the power off.
Then press the AUDIO and FREQ
buttons at the same time
Hold the DOWN
arrow button
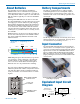
Remote Control
Transmitter settings can be configured using special
tones generated by a smartphone using a remote
control application such as Lectro RM (available on the
AppStore or Google Play). Enable this feature on the
transmitter with the following menu items:
• rc on Enables the remote function
• rc oFF Disables the remote function
If a remote control signal is detected but the function is
turned off, the message rc oFF will be displayed briefly
on the transmitter’s LCD to confirm that a valid signal
was received, but that the transmitter is not configured
to respond to it.
Auto Power Restore
This setting determines how the transmitter is powered
up again after the batteries have become exhausted in
normal operation.
When this function is turned on, the unit will power
up to normal operation with a brief press of the AU-
DIO and FREQ buttons after the batteries have been
replaced.
When this function is turned off, the AUDIO and FREQ
buttons need to be held in for the completion of the
count to turn the unit back on for normal operation.
This is a unique behavior that takes place only when
the batteries fail during operation. If the unit is turned
off manually, a quick press of the buttons will turn it on
in the “standby” mode instead.
The firmware is written this way because the battery
caps make contact with the battery before the cap
is seated, and the fact that there are two separate
battery caps to tighten. This allows both batteries to
be installed and the caps tightened before power is
restored. It also makes turning the unit back on easier
when wearing gloves since the buttons do not need to
be held in.
• PbAc 1 Turns power restore ON
• PbAc 0 Turns power restore OFF