
User's Manual


Digital Hybrid Wireless
®
Modular Receiver System
Rio Rancho, NM, USA
21
Connecting to a Network
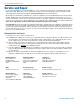
A basic network is composed of several devices:
• Router or server
• Ethernet switch
• Client devices
An example of a simple network is a modem used in a
home for internet access via a telephone or cable TV
connection. There are actually three different devices
built into the box that is typically called the “modem.”
• Modem - connects to the ISP (Internet Service
Provider) via telephone or cable TV service
• Router - creates the network; identifies and orga-
nizes the connected devices and allows participa-
tion in the network
• Ethernet switch - synchronizes the network
traffic between multiple devices; usually 4 cabled
connections and one WiFi wireless connection in
a typical home modem
A network connection from a computer to the Venue
2 receiver can be made via a network using Wireless
Designer
TM
software.
Ethernet Switch
Router/Server
Venue 2 Receiver
Other Devices
Each device in the network is identified with an IP ad-
dress registered with the router or server. Assignment
of the IP address is the first step in connecting the
Venue 2 to a network.
IP Address Assignment
An IP address for the Venue 2 receiver can be as-
signed by a network administrator, or obtained from the
server or router automatically using DHCP enable in the
receiver.
Enable DHCP with the LCD interface:
Press the rotary encoder and navigate to the Top Menu
then to NETWORK SETUP. Press the encoder and
highlight SELECT PARAMETER. Navigate to the DHCP
Enable item. Highlight EDIT and rotate the encoder
to select YES on the display. Press the BACK button
several times to return to the main window.
Enable DHCP with With Wireless Designer and a
USB connection:
Connect the computer to the Venue 2 receiver via
the USB port. Launch Wireless Designer. Turn on
the Venue 2 receiver, or turn it off and back on if it’s
already turned on. Wait for the receiver to fully boot
up (the main window appears).
In Wireless Designer, click on Connect (Live) in the
upper left corner of the screen, then on Connect via
USB... A dialog box opens and the receiver will ap-
pear with its serial number. Click on the receiver and
then on OK to open the control panel.
Click on Settings, then Network, then click in the
checkbox next to DHCP Enable to make sure a check
mark appears.
Disconnect Wireless Designer from the receiver. Click
on Connect (Live)... in the top left of the control
panel, then click on Disconnect From and then on
the receiver name that appears.
Connect to a Network
NOTE: Make sure an IP address has been
assigned to the receiver before trying to connect
to a network.
Connect the network cable to the ethernet port on the
receiver, then cycle the receiver power off and back
on. The IP address will be assigned to the receiver by
the router/server when the receiver boots up.
Look at the IP address in the LCD screen where you
enabled DHCP, or you can re-connect to the receiver
via USB and view the IP address on the software
control panel screen where you enabled DHCP in the
check box. Jot down the IP address.
Open Wireless Designer and click on Connect via
Network... Enter the IP address and click on Search.
When the receiver appears in the dialog box, click on
OK to enter the control panel.