
User's Manual
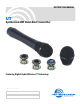


Synthesized UHF Hand-Held Transmitter
Rio Rancho, NM
7
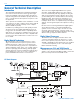
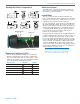
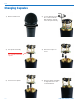
Opening the Battery Compartment
Modulation LEDs
-20 -10
Audio Level
Coarse Fine
Frequency Switches
Modulation (audio level) LEDs
The two bicolor Modulation LEDs (located under the
Battery Compartment Cover) provide a visual indica-
tion of the audio signal level to the microphone. These
LEDs can glow either red or green to indicate modula-
tion levels as shown in the following chart.
Signal Level -20 LED -10 LED
Less than -20 dB Off Off
-20 dB to -10 dB
Green Off
-10 dB to +0 dB
Green Green
+0 dB to +10 dB Red Green
Greater than +10 db Red Red
Audio Level Control
The Audio Level control (under the Battery Compart-
ment Cover) is a thumbwheel used to adjust the audio
input gain for proper modulation.
Locked Mode
The UT can be placed in a locked mode where the
Power switch and the Frequency Switches are disabled.
This protects the unit from accidental power-off or mis-
adjustment after it has been prepared for use.
To enter locked mode, toggle the Power switch Off then
On again rapidly three times. The sequence must start
with the Power Switch in the On position. Set the Power
Switch to On, then initiate the Locked Mode sequence,
i.e., Off-On-Off-On-Off-On). Each toggle must take no
longer than two seconds and there cannot be more
than ten seconds between toggles.
During the first two toggles, the Power LED will behave
normally, blinking slowly red while the switch is in the off
position to warn that the power will go off, then return-
ing to normal battery status indication when the switch
is set to On again. After the third toggle, the Power LED
will go out briefly, then blink the code that indicates the
current Compatibility Mode, just as it does when the
unit is first powered on. The Power LED going out briefly
followed by this blinking code serves as a confirmation
that the switches are now locked.
NOTE: The Locked Mode can only be cleared
by removing the battery. Removing the battery
bypasses the normal power-off delay circuit, so it
may cause loud noise at the receiver output.