
User's Manual


Synthesized UHF Hand-Held Transmitter
Rio Rancho, NM
15
Operating Notes
The Audio Level control should not be used to control
the volume of the overall sound system or recorder
levels. This gain adjustment is used to match the trans-
mitter gain with the user’s voice level and microphone
position.
If the audio level is too high — both Modulation
LEDs glow red frequently. This condition will reduce
the dynamic range of the audio signal.
If the audio level is too low — neither Modulation
LED will glow, or only the -20 LED will glow green.
This condition may cause hiss and noise in the
audio.
Different voices will usually require different settings
of the Audio Level control, so check the Audio Level
settings as each new person uses the UT. If several dif-
ferent people will be using the same UT and there is not
time to make the adjustment for each individual, adjust
it for the loudest voice.
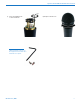
Adjusting the Transmitter Frequency
If you are experiencing interference from another signal
on your operating frequency, you may need to change
the operating frequency of your system. This is done
through two Frequency Switches located under the Bat-
tery Compartment Cover.
The left switch is for coarse frequency adjustment, and
it increments the operating frequency in 1.6 MHz steps.
The right switch is for fine frequency adjustment and it
increments the operating frequency in 100 kHz steps.
All Lectrosonics Digital Hybrid receivers (and a number
of earlier receivers) offer front panel LCDs that indicate
the correct transmitter switch settings, and provide
built-in scanning functions to help locate clear channels.
Use the scanning functions on these receivers to find a
clear channel, then switch both the receiver and trans-
mitter to the newly found frequency.
The R400A and Venue Series receivers feature a
convenient SmartTune™ function that automatically
scans to locate a clear operating channel and sets the
receiver to that frequency.
If your receiver does not have an automatic tuning or
built in scanning function, leave the transmitter turned
off and manually tune the receiver across its band to a
frequency where little or no RF activity is displayed.
After finding a clear channel, set the transmitter to the
new frequency, turn it on and make sure the RF signal
is strongly indicated at the receiver. Be sure the switch
settings on the receiver and transmitter are set exactly
the same. If, for example, the 100K switch is one click
above or below the desired frequency, the receiver will
indicate RF, but no audio (or severely distorted audio)
will be produced.
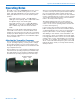
Frequency Switches
Coarse Fine