
User Manual


SPDR
LECTROSONICS, INC.
10
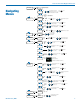
Main Menu and Sub Menus
Timecode
TC Jam (jam timecode)
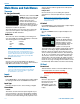
TC Jam
JAM NOW
When TC Jam is selected, JAM
NOW will flash on the LCD and
the unit is ready to be synced
with the timecode source.
Connect the timecode source
and the sync will take place
automatically. When the sync is
successful, a message will be
displayed to confirm the operation.
Timecode defaults to zero at power up if no timecode
source is used to jam the unit. A timing reference is
logged into the BWF metadata.
Frame Rate
The frame rate affects embedding of the timing refer-
ence in the BWF file metadata and display of timecode.
The following options are available:
• 30 • 23.976
• 29.97 • 30DF
• 25 • 29.97DF
• 24
NOTE: While it is possible to change the frame
rate, the most common use will be to check the
frame rate which was received during the most
recent timecode jam. In rare situations, it might be
useful to alter the frame rate here, but be aware
that audio tracks many not line up correctly with
mismatched frame rates.
Use Clock
Choose to use the clock provided in the SPDR as
opposed to a timecode source. Set the clock in the Set-
tings Menu, Date & Time on next page.
NOTE: The SPDR time clock and calendar (RTCC)
cannot be relied on as an accurate time code
source. Use Clock should only be used in projects
where there is no need for the time to agree with
an external time code source.
Inputs
Input Level
Press MENU/SEL to select which input to adjust. Adjust
the input gain with the UP and DOWN arrow buttons.
Input Type
Based on the input source, choose Analog or Digital.
Stereo Mode
Linked:
The limiters on both channels operate together to pre-
serve the balance of the stereo image. Both red LEDs
will come on at the same time, along with the “L” block
on the LCD, even when limiting is only required on one
channel, but the audio bar graph meters will operate
independently.
Independent:
Use this mode if you are recording two separate
sounds/voices, and each input will have a separate
limiter.
NOTE: Input Level and LF Rolloff screens have
one control in Linked Mode and two controls in
Independent Mode.
LF Rolloff
Press MENU/SEL to select which input to adjust. Adjust
with the UP and DOWN arrow buttons.
HP Volume
Use UP and DOWN arrows to adjust headphone vol-
ume.
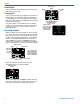
Scene & Take
Scene&Take
Scene: 6
Take: 3
Each time a recording is
started, the SPDR automati-
cally increments take. Scene
and Take numbers can be
manually updated. Takes can
run up to 999 and scene
number can run up to 99.
The progressive scene and take automatically cataloge
each time a recording is begun; S01T001.WAV. The
initial ‘S’ is meant to suggest “Scene” but also serves
as the overwrite prevention character, decrementing to
‘R’, ‘Q’, etc. as needed to avoid a naming conflict. The
“01” after the ‘S’ is the scene number. ‘T’ means take,
and the “001” is the take number. An eighth character is
used only for the second and subsequent (4 GB) seg-
ments for very large recordings. Scene numbers are en-
tered manually. Take numbers increment automatically.
SD Card
Format Card
This item deletes all files on the microSDHC memory
card and prepares the card for recording.
WARNING: Previous files are not securely
deleted from the card during the formatting
process.
Files/Play
Choose to play the files
Files/Play
111657A .WAV
111649A .WAV
030951A .WAV
071140A .WAV
based on their name. Use
the arrows to scroll,
MENU/SEL to select the
file and the DOWN arrow
to play.