
Instruction Manual


SMWB/E07-941 Series
LECTROSONICS, INC.
6
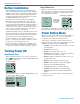
Battery Installation
The transmitter is powered by two AA batteries. Be-
cause rechargeable batteries run down quite abruptly,
using the Power LED to verify battery status will not be
reliable. However, it is possible to track battery status
using the battery timer function available in Lectroson-
ics Digital Hybrid Wireless receivers.
The battery door opens by simply unscrewing the
knurled knob part way until the door will rotate. The
door is also easily removed by unscrewing the knob
completely, which is helpful when cleaning the battery
contacts. The battery contacts can be cleaned with
alcohol and a cotton swab, or a clean pencil eraser. Be
sure not to leave any remnants of the cotton swab or
eraser crumbs inside the compartment.
A small pinpoint dab of silver conductive grease on the
thumbscrew threads can improve battery performance
and operation. Do this if you experience a drop in bat-
tery life or an increase in operating temperature.
If you are unable to locate a supplier of this type of
grease - a local electronics shop for example - contact
the factory for a small maintenance vial.
Insert the batteries according to the markings on the
back of the housing. If the batteries are inserted incor-
rectly, the door may close but the unit will not operate.
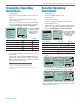
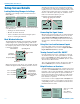
Turning Power ON
Short Button Press
When the unit is turned off, a short press of the power
button will turn the unit on in the Standby Mode with
the RF output turned off.
A
494.500
-40
-20
0
E
b 19
RF indicator blinks
To turn the RF output on from the Standby Mode, press
the Power button/Rf On? option.
Resume
Pwr Off
Rf On?
AutoOn?
Rf On?
No
Ye s
Long Button Press
When the unit is turned off, a long press of the power
button will start a countdown to turn the unit on with the
RF output turned on. Continue to hold the button until
the countdown is complete.
Hold
for
Rf On
...3
A
503.800
-40
-20
0
E
b 19
RF indicator not blinking
Hold power
button until
the counter
reaches 3
If the button is released before the countdown is com-
pleted, the unit will switch back to RF output turned off.
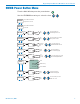
Power Button Menu
When the unit is already turned on, the Power Button is
used to turn the unit off, or to access a setup menu.
A long press of the button turns the power off.
A short press of the button opens a menu for the fol-
lowing setup options. Select the option with the UP and
DOWN arrow buttons then press MENU/SEL.
• Resume returns the unit to the previous screen and
operating mode
• Pwr Off turns the unit off
• Rf On? turns the RF output on or off
• AutoOn? selects whether or not the unti will turn on
automatically after a battery change
• Remote enables or disables the audio remote con-
trol (dweedle tones)
• Bat Type selects the type of battery in use
• Backlit sets the duration of the LCD backlight
• Clock sets the Year/Month/Day/Time
• Locked disables the control panel buttons
• LED Off enables/disables control panel LEDs
• About displays the model number and firmware
revision
A long press of the button starts a countdown from 3 to
1 to turn the unit off.