
User's Manual

SMV Series
LECTROSONICS, INC.
10
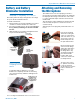
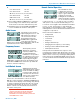
Set Up in 100 kHz Mode
The Frequency Screen
displays the operating
frequency in MHz or as a
two-digit hexadecimal
number that corresponds to
the equivalent Lectrosonics
Frequency Switch Setting.
The example of the two-digit
display shown here indicates CH (channel) and 2C as
the frequency. Repeatedly pressing the FREQ button
toggles between the two displays. Press and hold the
FREQ button and use the Up and Down arrows to
select the frequency.
Set Up in 25 kHz Mode
The hexidecimal display in the 25 kHz mode will appear
with a decimal suffix to indicate the 25 kHz steps.
471.800 MHz
472.025 MHz
472.650 MHz
473.175 MHz
Adjusting the Low Frequency Roll-off
Repeatedly press the AUDIO button until the LF roll-
off adjustment screen appears. Then press and hold
the AUDIO button while selecting the desired roll-off
frequency with the UP and DOWN arrows.
The roll-off frequency can be set to 35, 50, 70, 100, 120
and 150 Hz.
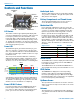
Adjusting Audio Level (Gain)
The control panel Modulation LEDs indicate the audio
level and limiter activity. Once set, the transmitter’s
audio level setting should not be used to control the
volume of your sound system or recorder levels. This
gain adjustment matches the transmitter gain with the
microphone’s output level, the user’s voice level and the
position of the microphone. The audio input level (gain)
is adjusted with the unit in the Standby Mode or while
powered up while observing the LEDs.
It is desirable to to set the gain so that some limiting
occurs on louder peaks. The limiter is very transparent
and its effect is not audible until the system is close to
overload. In other words, don’t be shy about turning up
the gain.
Configuring for Power Restore
Power Restore Screens
When using external power
source through a battery
eliminator, Power Restore will
return your transmitter to
settings it had before it was
powered off. This eliminates
the need to power on through
the unit itself.
1) Press and hold the Down Arrow Button then power
on the transmitter by pressing the
Audio and Freq buttons simultaneously.
2) The LCD will display the status, either “rc ON” or “rc
OFF.” Press “AUDIO” or “FREQ” key to scroll to the
“PbAc setup screen
• PbAc 1 for power restore ON
• PbAc 0 for power restore OFF
3) When power restore is set to ON, the unit will turn
on whenever power is present at the battery termi-
nals until the power is manually turned off with the
control panel switches.
NOTE: The firmware “remembers” the power
status when a battery fails, so the transmitter will
be turned on automatically when the battery is
replaced and the previous settings will be enabled.
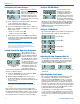
Power Up and Boot Sequence
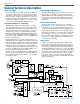
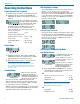
Setting Transmitter Operating Frequency
Frequency displayed
in MHz
Frequency displayed as
two-digit hexadecimal
number
The frequency can be
displayed either in MHz or
as a two-digit hexadecimal
number and can be set in
the Standby Mode or when
the transmitter is powered
up. The hexadecimal
numbering system is unique
to Lectrosonics where two
alphanumeric characters
correspond to the left and
right switch settings on
earlier analog transmitters that had mechanical rotary
switches to adjust frequency.
1) Press the FREQ button to select either the MHZ
screen or the hexadecimal screen.
2) While holding the FREQ button, use the Up or
Down arrow buttons to move the operating fre-
quency up or down in 100 kHz increments from the
current setting.
Note: The operating frequency displayed on the
LCD wraps as it reaches the upper or lower end of
its range.
Most Lectrosonics receivers with an LCD interface
indicate the operating frequency both in MHz and as a
two digit hexadecimal number. In many cases, it is more
convenient to use the two character hexadecimal num-
bers rather than the six character frequency in MHz.