
User's Manual

UHF Wireless Diversity Receiver
Rio Rancho, NM
13
mic preamp and some of the hiss from lavaliere mi-
crophones. The noise reduction benefit is dramatic
in this position, yet the degree of transparency
maintained is exceptional.
FULL - Enough noise reduction is applied to
remove most of the hiss from nearly any signal
source of reasonable quality, assuming levels are
set properly at the transmitter.
Rotate the MENU control to select the noise reduction
mode. Exit this setup screen by pressing the PREV
MENU button.
Back
Rotate the MENU control to select BACK, then push the
MENU control to return to the TopMenu window.
LockSet
LockSet is used to lock the R400A settings. When
locked, the use of the MENU functions is limited to
“view only” and attempts to change selections will result
in a screen displaying the word “LOCKED! (To Unlock,
Use LockSet Menu)” The Scan and SmartTune™
functions are disabled when the unit is in the LOCKED
state.
To LOCK the R400A - Press the MENU control to enter
the TopMenu, then rotate the MENU control to select
LockSet. Press the MENU control to open the LockSet
window, rotate the MENU control to select LOCK, then
push either the MENU control or the PREV MENU but-
ton to exit to TopMenu.
To UNLOCK - Repeat the steps above and select NOT
LOCKED.
SmartTune
™
SmartTune™ automates the discovery of a clear
operating frequency. It does this by scanning all the
available operating frequencies within the system’s fre-
quency block range (in 100 kHz increments) and then
selecting the frequency with the least amount of RF
interference. When SmartTune
™
is complete, it returns
to the Main Window displaying the operating frequency
and transmitter switch settings for the clear channel
discovered during scanning.
Scan
Navigate to the SCAN option from the menu, then press
the MENU control to activate the scan function. The
receiver begins scanning the receiver’s frequency block.
The receiver will continue to scan, accumulating the
highest peaks with each subsequent scan, until stopped
by the user. Data gathered during the scanning pro-
cess is retained until Scan mode is exited.
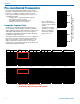
To stop scanning (but not exit Scan mode), press
the MENU control once. The display switches to the
Coarse View window. In this mode, each vertical band
of the display represents four frequencies (400 kHz).
Rotate the MENU control to scroll the cursor across
the tuning range. As the cursor scrolls across the
frequency band, Frequency Select Switch settings for
the associated transmitter are shown in the upper right
corner of the screen.
Double pressing the MENU control switches the display
to Fine View which displays an expanded portion of the
spectrum around a fixed, vertical cursor. In Fine View,
each vertical band represents one frequency (100 kHz).
As with the Coarse View, cursor movement across the
frequency band results in the displaying of the associ-
ated transmitter Frequency Select Switch settings in the
upper right corner of the screen.
In Fine View, the fixed vertical center bar in the center
of the view serves as the cursor. Beneath the scan
area is a scroll bar to remind you that this is a partial
picture of the spectrum. Use the MENU control to scroll
through the entire spectrum. Rotate counterclockwise
to view lower frequencies, or clockwise to show higher
frequencies.
Scroll through the screen and find a frequency where
no RF signals are present (or in the worst case, only
very weak RF signals). With the cursor on this fre-
quency, press the PREV MENU button to exit from scan
mode.
When exiting the scan mode, you are given the option
to select either the frequency the unit was on before
entering the scan mode, or the frequency just selected
in the scan mode. The display shows “Use new freq?”
to prompt you to make a frequency selection and also
shows the new frequency. Rotate the MENU control to
view the options. Select YES to set the receiver to the
frequency chosen in scan mode. Select NO to return
to the frequency that was set before entering the scan
mode. Select SCAN to resume scanning.
Note: Ensure the transmitter’s Frequency Select
Switch settings are the same settings as shown
on the display and your system will be ready for
operation.