
User's Manual


QUADRA
LECTROSONICS, INC.
18
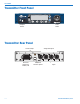
Rack Mount Hardware
The M4T is delivered with a partial set of rack mount
hardware,includingbolts,arackear,connectingang-
es,antennacableandfront-panelhandles.Withtwo
M4T units, there is enough hardware supplied in the
delivery to connect the two units together, front-mount
the antennas, and prepare the units as a complete as-
sembly ready for mounting in a rack enclosure.
If you need to rack-mount a single M4T transmitter,
you will need to purchase the optional RMPM4T-1
rack kit. The kit provides a blank half-rack panel, a rear
mounting brace and the additional hardware required
for this setup.
Dual Rack-Mount
Instructions
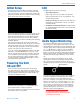
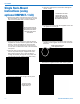
1. Remove the plastic end-caps from the front of the
M4T and pry out the metal inserts on each side of
the transmitters with a small screwdriver.
Plastic guards snap out
from corners. Pry out the
aluminum inserts on the
side panel with a small
screwdriver.
2. Attach the antenna cables to the rack ears with
the supplied nuts and lock washers. Tighten with
a small wrench - do not over-tighten the nuts but
make sure they are snug enough not to work
loose.
3. Insert the rack ear and attach the handle to the
front of the panel using the supplied hex-head
bolts and hex wrench. The screws should go
through the handle, through the front panel, and
into the rack ear nuts. Tighten these bolts firmly.
4. Remove the hex head bolts from the rear of both
units right where they contact each other. Attach
thetwounitsusingthetwometalanges,thenon-
threaded one for the rear and the threaded one for
the front. Secure them with the supplied hex head
bolts. Tighten these bolts firmly.
NOTE: The threads in the front adapter plate are
a self-locking type. Tighten the screws until the
headisushwiththefrontpanel.