INSTRUCTION MANUAL LT Synthesized UHF Belt-Pack Transmitter Featuring Digital Hybrid Wireless® Technology US Patent 7,225,135 Quick Start Steps 1) Install good batteries and turn power on (see pages 7 and 8). 2) Set the compatibility mode to match the receiver (see page 10). 3) Connect the signal source and adjust input gain for optimum modulation level (see pages 10 and 11). 4) Set Step Size and frequency to match receiver (see page 11).
LT 2 LECTROSONICS, INC.
Digital Hybrid Wireless Belt-Pack Transmitter Table of Contents Introduction.............................................................................4 About Digital Hybrid Wireless® .................................................................................4 Frequency Agility...................................................................4 Wide-Band Deviation ............................................................4 Servo Bias Input and Wiring ..............................................
LT Introduction The design of the LT transmitter delivers the advanced technology and features of Digital Hybrid Wireless® in a Lectrosonics belt-pack transmitter at a modest cost. Digital Hybrid Wireless® combines a 24-bit digital audio chain with an analog FM radio link to eliminate a compandor and its artifacts, yet preserve the extended operating range and noise rejection of the finest analog wireless systems.
Digital Hybrid Wireless Belt-Pack Transmitter DSP-controlled Input Limiter Pilot Tone Squelch The transmitter employs a digitally-controlled analog audio limiter prior to the analog-to-digital converter. The limiter has a range greater than 30 dB for excellent overload protection. A dual release envelope makes the limiter acoustically transparent while maintaining low distortion.
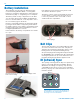
LT Battery Installation The transmitter is powered by two AA batteries. We recommend using alkaline, lithium, or rechargeable batteries for longest life. Standard zinc-carbon batteries marked “heavy-duty” or “long-lasting” are not adequate. The battery status circuitry compensates for the difference in voltage drop between alkaline and lithium batteries across their usable life, so it’s important to select the correct battery type in the menu.
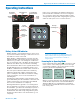
Digital Hybrid Wireless Belt-Pack Transmitter Operating Instructions Modulation Indicators Antenna Port Power/Function LED -10 PWR/FUNC AUDIO -20 Programmable Function Switch Full access to all settings is provided through the keypad and LCD. The transmitter can also be configured as a “one button” device by locking the ability to make changes with the keypad, and configuring the top panel switch as either power on/off or a mute function.
LT Powering On in Standby Mode Adjusting LCD Backlight A brief press of the Power Button , releasing it before the counter has reached 3, will turn the unit on with the RF output turned off. In this Standby Mode the menus can be browsed to make settings and adjustments without the risk of interfering with other wireless systems nearby. RF indicator blinks Hold for Rf On ...
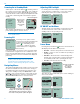
Digital Hybrid Wireless Belt-Pack Transmitter Locking/Unlocking Changes to Settings Main Window Indicators Changes to the settings can be locked. StepSize Phase Locked Backlit Gain Locked? 25 No Yes The Main Window displays the block number, Standby or Operating mode, operating frequency, audio level, battery status and programmable switch function. When the frequency step size is set at 100 kHz, the LCD will look like the following.
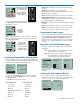
LT PWR/FUNC 100 Series works with Lectrosonics UCR100 analog receivers. 200 Series works with Lectrosonics earlier UCR201/205/210D/211 and UCR195 analog receivers with dual band compandors. Mode 3* works with certain non-Lectrosonics models. -20 Top Panel LED will blink blue when the audio is muted AUDIO Main Window will blink the word MUTE when the audio is muted -10 b 19 51 MUTE 494.
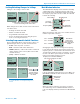
Digital Hybrid Wireless Belt-Pack Transmitter Adjusting the Input Gain Selecting Step Size The two bicolor Modulation LEDs on the control panel and keypad provide a visual indication of the audio signal level entering the transmitter. The LEDs will glow either red or green to indicate modulation levels as shown in the following table.
LT A fraction will appear next to the hex code in the setup screen and in the main window when the frequency ends in .025, .050 or .075 MHz. Freq. b 19 51 1 4 b 19 51 41 MUTE 494.525 Fraction appears next to hex code in 25 kHz mode 494.525 -40 -20 0 Selecting Frequency Using Two Buttons Hold the MENU/SEL button in, then use the arrow buttons for alternate increments. 100 kHz Mode Freq. b 19 10 MHz steps 51 494.500 and 1 block steps 1.
Digital Hybrid Wireless Belt-Pack Transmitter Enabling Remote Control Transmitter settings can be configured using special tones generated by Lectrosonics RM or RM2 remote control units, or by a smartphone using a remote control application such as Lectro RM (available on the AppStore or Google Play). Enable this feature on the transmitter with the following menu items.
LT 5-Pin Input Jack Wiring The wiring diagrams included in this section represent the basic wiring necessary for the most common types of microphones and other audio inputs. Some microphones may require extra jumpers or a slight variation on the diagrams shown. Audio input jack wiring: PIN 1 Shield (ground) for positive biased electret lavaliere microphones. Shield (ground) for dynamic microphones and line level inputs.
Digital Hybrid Wireless Belt-Pack Transmitter Microphone Cable Termination for Non-Lectrosonics Microphones TA5F Connector Assembly Mic Cord Stripping Instructions 1 4 5 2 3 VIEW FROM SOLDER SIDE OF PINS 0.15" 0.3" Crimping to Shield and Insulation Strip and position the cable so that the clamp can be crimped to contact both the mic cable shield and the insulation. The shield contact reduces noise with some microphones and the insulation clamp increases ruggedness.
LT Input Jack Wiring for Different Sources In addition to the microphone and line level wiring illustrated below, Lectrosonics makes a number of cables and adapters for other situations such as connecting musical instruments (guitars, bass guitars, etc.) to the transmitter. Visit www.lectrosonics.com and click on Accessories, or download the master catalog. A lot of information regarding microphone wiring is also available in the FAQ section of the web site at: www.lectrosonics.
Digital Hybrid Wireless Belt-Pack Transmitter Microphone RF Bypassing Line Level Signals When used on a wireless transmitter, the microphone element is in the proximity of the RF coming from the transmitter. The nature of electret microphones makes them sensitive to RF, which can cause problems with microphone/transmitter compatibility.
LT Accessories BCSLEBN Spring-loaded belt clip LTLRBATELIM Battery eliminator; allows transmitter to be operated from external power; 6 to 36 VDC M152/5P Lavaliere microphone; omnidirectional MI33PRA Instrument cable; passive type for use with very high output pickups; right angle 1/4” plug MI33PST Instrument cable; passive type for us with very high output pickups; straight 1/4” plug MI39ARA Instrument cable; active type for use with most instrument pickups; right angle 1/4” plug MI39AST Inst
Digital Hybrid Wireless Belt-Pack Transmitter Troubleshooting It is important that you follow these steps in the sequence listed. Symptom: Possible Cause: Transmitter Battery LED off when Power Switch “ON” 1. Batteries are inserted incorrectly. 2. Batteries are low or dead. No Transmitter Modulation LEDs when Signal Should be Present 1. 2. 3. 4. 5. 6. Receiver Indicates RF But No Audio 1. Audio source or cable connected to transmitter is defective. Try using an alternate source or cable. 2.
LT Specifications and Features Operating Frequencies: Block A1: 470.100 - 537.575 Block B1: 537.600 - 614.375 Block C1: 614.400 - 691.175 Block D1: 691.200 - 767.975 (export only) Frequency Selection Steps: Selectable; 100 kHz or 25 kHz RF Power output: 50 or 100 mW Pilot tone: 25 to 32 kHz; 5 kHz deviation (Digital Hybrid mode) Frequency Stability: ± 0.002% Deviation: ± 75 kHz max.
Digital Hybrid Wireless Belt-Pack Transmitter Rio Rancho, NM 21
LT Service and Repair If your system malfunctions, you should attempt to correct or isolate the trouble before concluding that the equipment needs repair. Make sure you have followed the setup procedure and operating instructions. Check the interconnecting cables and then go through the Troubleshooting section in this manual. We strongly recommend that you do not try to repair the equipment yourself and do not have the local repair shop attempt anything other than the simplest repair.
Digital Hybrid Wireless Belt-Pack Transmitter Rio Rancho, NM 23
LIMITED ONE YEAR WARRANTY The equipment is warranted for one year from date of purchase against defects in materials or workmanship provided it was purchased from an authorized dealer. This warranty does not cover equipment which has been abused or damaged by careless handling or shipping. This warranty does not apply to used or demonstrator equipment. Should any defect develop, Lectrosonics, Inc. will, at our option, repair or replace any defective parts without charge for either parts or labor.