
User's Manual


LR
LECTROSONICS, INC.
16
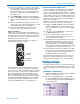
3) Navigate to Frequency on the menu and press
MENU/SEL to enter the setup screen. Once a tun-
ing group is active, the group’s name is displayed
in the Frequency setup screen.
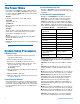
The
selected
frequency
number is
displayed
next to
the Group
name
4) Hold down MENU/SEL and press the UP and
DOWN arrows to select the desired frequency
number (32 are available). If the desired number
is blinking, press the power button to enable it.
Press the power button again to disable it.
NOTE: The tuning group selector blinks any
time the tuning group item does not match the
current settings of the receiver. If blinking, the
frequency has not been saved.
5) Once you’ve enabled the frequency number with
the power button (not blinking), press MENU/SEL
to highlight the desired method of adjusting the
frequency - Block, MHz or Hex Code.
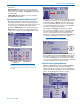
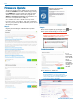
Press MENU/SEL repeatedly to
browse through the settings. The
selected setting is highlighted.
Hex Code
Block
MHz
With the item selected, use the UP/DOWN arrows
to change the setting. When the value is changed,
the frequency number will start blinking.Press the
power button to store the setting (characters
stop blinking).
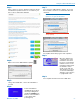
Antenna Orientation
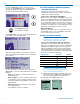
The antennas are most sensitive perpendicular to
the axis of the whip. The pattern is a toroidal (donut)
shape surrounding the antenna. A cross section of
the pattern is depicted in the illustrations below.
The best orientation is to keep the antenna whips
elevated and oriented vertically to provide a circu-
lar pattern around the transmitter and receiver. The
whips can point up or down.
The receiver can be mounted horizontally and swiv-
eling antennas can be adjusted to keep the whips in
a vertical orientation, as shown in Fig. 2.
It is also good practice to keep the antennas away
from metallic surfaces.
Tx
STRONG
SIGNAL
WEAK
SIGNAL
Rx
Rx
Tx
WEAKEST
SIGNAL
Rx
Tx
Tx
STRONG
SIGNAL
Rx
Fig. 1
Fig. 2
Fig. 3
Fig. 4