
User's Manual


LR
LECTROSONICS, INC.
12
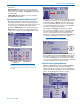
The Power Menu
Pressing the power button opens a menu with sev-
eral options. Use the UP and DOWN arrows to select
the option and press MENU/SEL to select the function
or open a setup screen.
Resume
Returns to the previous screen and settings.
Power Off
Turns the power off.
LockUnlock
Opens a setup screen with options to Lock or Unlock
the buttons.
AutoOn?
Allows the unit to automatically turn back on after a
power failure or when fresh batteries are installed
(works in the operating mode only).
About
Displays the splash screen shown at bootup, which
includes the firmware version.
Block 606
Enables Block 606 legacy mode for use with Block 606
receivers
NOTE: This feature is only avaialable on Bands
B1 or C1.
System Setup Procedures
Summary of Steps
1) Install receiver batteries and select the battery
type in the setup screen.
2) Select frequency step size in the receiver.
3) Select the compatibility mode in the receiver.
4) Find a clear operating frequency with one of two
different methods (use one or the other).
a) Using Smart Tune
TM
b) Manually
5) Set up transmitter to matching frequency and com-
patibility mode.
6) Adjust transmitter input gain.
7) Adjust receiver audio output level to match record-
er, camera, mixer, etc.
1) Install Receiver Batteries
Install the batteries according to the diagram marked
on the back of the housing and select the battery type
in the menu. Check the BATT LED on the control panel
to verify adequate power is present - the LED should
glow green.
2) Select Frequency Step Size
Navigate to Step Size in the LCD menu and select
100 kHz or 25 kHz as needed to match the associated
transmitter.
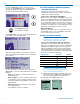
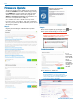
3) Select Receiver Compatibility Mode
Navigate to Compat.Mode on the menu and press
MENU/SEL to enter the setup screen. The optional
modes will appear one at a time. Use the UP and
DOWN arrow buttons to scroll through the list. When
the desired mode appears in the screen, press MENU/
SEL or BACK to select the mode and return to the pre-
vious menu. Press BACK to return to the Main Window.
Transmitter Models LCD menu item
Nu Digital Hybrid
Wireless®
NU Dig. Hybrid
100 Series 100 Series
200 Series 200 Series
Mode 3* Mode 3
NA Digital Hybrid
Wireless
®
NA Dig. Hybrid
IFB Series IFB
Mode 6* Mode 6
Mode 7* Mode 7
300 Series 300 Series
Euro Digital Hybrid
Wireless®
EU Dig. Hybrid
Japan Digital Hybrid
Wireless®
JA Dig. Hybrid
NU Dig. Hybrid works with Lectrosonics Digital Hybrid
transmitters using ETSI compliant Nu Digital Hybrid
compatibility mode.
100 Series works with Lectrosonics UM100 transmit-
ters.
200 Series works with legacy Lectrosonics models
such as all UM200, UH200 and UT200 Series trans-
mitters.
Mode 3 is a special compatibility mode for use with an-
other brand of wireless. Contact the factory for details.
NA Dig. Hybrid is the best mode to use when both
transmitter and receiver are North American Digital
Hybrid Wireless models (not Euro/E01 variants).
IFB works with Lectrosonics models such legacy
analog models bearing “IFB” in the model number, or
Digital Hybrid Wireless models that offer the IFB com-
patibility mode.
Mode 6 is a special compatibility mode for use with an-
other brand of wireless. Contact the factory for details.
Mode 7 is a special compatibility mode for use with an-
other brand of wireless. Contact the factory for details.
300 Series works with legacy Lectrosonics transmit-
ters that were sold in Europe, such as the UM300B