
Manual
ATTENUATION SETTINGS
AND SPEAKER SYSTEM ADJUSTMENTS
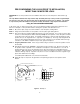
The steps and procedures in this section should be followed only after all wiring and audio connections have been
completed, and the system components have been installed. It is also necessary to complete the worksheet for speaker
attenuation and the pre-configuration instructions for the LCA16 before attempting the adjustments in this section.
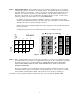
MAIN LEVEL ADJUSTMENT ON THE LCA16
The pre-configuration instructions on pages 6 through 9 simply provide a "starting point" for further adjustment. The
settings suggested in that section are based upon typical experience gathered from the field. The actual settings for a
particular system may vary from these settings once the final set up is completed.
Ideally, the LCA16 should provide just enough attenuation to prevent feedback while allowing maximum speaker system
coverage. Attenuation beyond what is necessary for feedback control can make the operation of the LCA16 audible as
the speaker system attenuates in response to microphone activity. In many installations, the operation of the sound
system is almost transparent. In other words, the talkers do not actually hear themselves over the speaker system as
they talk, yet adequate reinforcement is provided so that more distant listeners can hear them clearly.
The first step in the final set up is to complete the attenuation settings for a single speaker zone, and then use these
settings as a guide for subsequent adjustments. The final adjustment of this first speaker zone will provide a setting for
the LCA16 MAIN LEVEL control. Once the MAIN LEVEL control is set for the first speaker zone, it should be left alone
for adjustment of the rest of the speaker zones.
Select a zone in the central part of the room and activate a microphone within it. Gradually increase the MAIN LEVEL
on the LCA16 until an adequate volume is achieved. If feedback occurs before adequate gain can be achieved,
increase the attenuation level of the speakers near the open microphone and then continue to increase the sound
system level. If additional attenuation is required, it often requires a change in the DIP switch settings indicated by the
original worksheet (more speakers may need to be attenuated). Activate each microphone in this zone (if there is more
than one) and check for adequate gain. Re-adjust the attentuation levels as needed.
If adequate gain cannot be achieved, even with excessive speaker attenuation, the basic sound system design may
be at fault. In this case, it may be time to re-evaluate the mouth to microphone distances and/or the basic microphone
and speaker system layout in the room.
If there is more than enough gain, reduce the amount of attenuation of the speakers near the open microphone.
Remember that the most transparent operation will be achieved with the least amount of attenuation. Use only enough
attenuation to control feedback.
Once adequate gain is achieved on the first zone, leave the MAIN LEVEL control on the LCA16 alone for adjusting the
remaining channels.
SETTING ATTENUATION LEVELS ON REMAINING CHANNELS
With the LCA16 MAIN LEVEL control set for the first zone (see above), repeat the above procedure for each of the
remaining speaker zones. Be sure to check all microphones in each speaker zone as you proceed.
AUTOMATIC MIXER THRESHOLD ADJUSTMENT
If the sound system (loudspeakers) open unused microphone channels during the adjustment process, increase the turn-
on threshold setting on the automatic mixer just enough to keep the unused channels from turning on. This control is
labeled THRESHOLD on the Lectrosonics AC1 controller.
12