
User's Manual

IFBR1a, IFBR1a/E01, IFBR1a/E02
LECTROSONICS, INC.
6
Normal Operation
Scan Mode (Default Function)
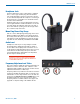
1. Set the Frequency of the receiver to match the
frequency of the transmitter by using the two HEX
rotary switches located on the side of the receiver.
The 1.6M switch is for “coarse” adjustment (1.6
MHz per click) and the 100k switch is for “fine”
adjustment (0.1 MHz per click). Setting both to zero
(0,0) is the low frequency end of the block and set-
ting both to F (F,F) is the highest frequency end of
the block.
NOTE: Block 944 covers a special frequency
range starting at 0,0 for 944.100 MHz through 4,E
for 951.900 MHz for this limited band.
2. Plug an earphone or headset into the 3.5mm jack.
Be sure the unit has a good battery.
3. Rotate the knob clockwise to switch the power ON
(Do NOT hold the knob in while switching power
ON). The LED will illuminate. Rotate the knob to
set the desired audio level.
4. If channel frequency pre-sets have been stored in
the memory, change channels by pressing the knob
briefly and release. The LED will blink the next
channel number (frequency) and the receiver will
resume operation on that channel. If no channel
frequencies have been stored when pressing the
knob to change channels, the LED will flash from
green to red to yellow to green, indicating no stored
channels and the unit will resume operation on
the channel set by the switches.
5. Whenever the power is switched ON, the unit de-
faults to the frequency set by the switches.
Add a New Frequency to
The Next Open Channel
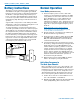
Before operating a receiver, one or more IFB T1 or T4
transmitters must be placed in XMIT mode, with each
transmitter set to the desired frequency and connected
to a proper antenna, audio source, and power source.
The transmitter frequency block must be the same as
the receiver frequency block as marked on each unit.
1. Position the receiver at a location within 20 to 100
feet of the transmitter or transmitters.
2. With the power ON, depress the knob until the LED
starts rapidly blinking, then release the knob.
Battery Instructions
The battery you use in the R1a receiver should be a 9
Volt alkaline or LiPolymer rechargeable type. Lithium
batteries can also be used for extended operating time.
An alkaline or LiPolymer battery will provide up to 8
hours of operation and a lithium battery will provide up
to 20 hours of operation. Carbon zinc batteries, even if
marked “heavy duty” will only provide about 2 hours of
operation.
A green LED corresponds to a fresh battery. The LED
will change to yellow for low battery warning then to red
to indicate the need for a fresh battery.
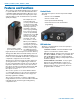
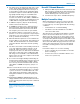
To replace the battery, open the bottom battery door
cover with your thumb, rotate the door until it is perpen-
dicular with the case and allow the battery to fall out of
the compartment into your hand. It is difficult to install
the battery backwards. Observe the large and small
holes in the battery contact pad before inserting a new
battery. Insert the contact end of the battery first, mak-
ing sure the contacts are aligned with the holes in the
contact pad, and then swing the door closed. You will
feel it snap into place when it is fully closed.
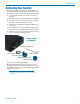
To open the battery
compartment door, push the
door up and away from the case
with your thumb, then swing
open.
1
2