
User's Manual


Digital Hybrid
™
Plug-On Transmitter
Rio Rancho, NM
11
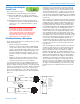
Locking or Unlocking the
Control Panel
The Lock mode protects the
transmitter from accidental changes to its settings.
1) Ensure the HM setup is complete (operating fre-
quency, audio level, Compatibility Mode, sensitivity
to remote control).
2) Simultaneously press both the Up and Down ar-
row buttons to start the Lock timer. When the timer
reaches zero, “Loc” is displayed and the controls
are locked.
Important: Once the transmitter is locked, it cannot
be unlocked or powered off using the buttons.
The only ways to unlock a locked transmitter
are to remove the battery or unlock it via the
remote control. The remote control will work only
if the transmitter was previously configured to
respond to the remote control. The unit will
always power up in “unlocked” mode.
Attaching/Removing a Microphone
Three phantom voltages are selectable from the control
panel. The voltages are:
• 5Voltsforlavalieremicrophones,
• 15Voltsforsomeprofessionalmicsrequiringhigh
current and for many common stage mics that will
operate over a wide phantom Voltage range of 12 to
48 Volts. With the proper adapter, this position can
also be used with T power microphones. See our
web site for details on finding or making the proper
adapter.
• 48Voltsformicrophonesthatdoinfactrequirea
supply greater than 18 Volts. (See below for a dis-
cussion of why 42 and not a “true” 48 Volts.)
For longest battery life use the minimum phantom volt-
age necessary for the microphone. Many stage micro-
phones regulate the 48 Volts down to 10 Volts internally
anyway, so you might as well use the 15 Volt setting and
save some battery power. If you are not using a micro-
phone for the input device, or are using a microphone
that does not require phantom power, turn the phantom
power off.
Control Panel Locked
Phantom power should only be used with a fully float-
ing, balanced device such as most microphones with
a 3-pin XLR connector. If you use the phantom power
with an unbalanced device or if pins 2 or 3 are DC con-
nected to ground, then you will draw maximum current
from the power supply. The HM is fully protected against
such shorts but the batteries will be drained at twice the
normal rate.
The transmitter can supply 4 mA at 42 Volts, 8 mA at 15
Volts, and 8 mA at 5 Volts. The 42 Volts setting actually
supplies the same voltage to a 48 Volt microphone as
the DIN standard arrangement due to a dynamic bias-
ing scheme that does not have as much voltage drop
as the DIN standard. The 48 Volt DIN standard arrange-
ment protects against shorts and high fault current
with high resistance in the power supply feeds to pins
2 and 3. This protects the supply if the supply current
is accidentally shorted to ground and also keeps the
microphone from being attenuated by the power supply.
The HM improves on those functions and is able to use
less power from the battery by using constant current
sources and current limiters. With this dynamic ar-
rangement the HM can also supply more than twice the
current of competing 48 Volt plug on units and provide
four times the current for some very high end 15 Volt
microphones.
The 5 Volt setting is provided for lavaliere microphones
made by us and others. Do not power lavalieres from
the 15 or 48 Volt setting as the microphone will most
likely be destroyed. Lectrosonics makes an adapter,
MCA5X, that will adapt our standard TA5F 5 pin micro-
phones to the HM. This adapter also provides protection
against excessive phantom voltage. If voltages higher
than 5 Volts are applied to the adapter, a Zener diode
will shunt excess voltage to ground. The microphone
won’t work until the voltage is correctly reduced to 5
Volts. If you have an older lavaliere mic that was wired
directly to an XLR for use with the earlier UH200’s, we
strongly recommend building our protection circuit into
the XLR to prevent accidental destruction of the lava-
liere.
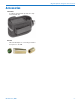
TO ATTACH
TO REMOVE
Hold the
transmitter
case with the
microphone
pointed
upward.
Rotate the
collar in the
direction
shown.
Pull on mic to ensure it is locked.
Press firmly, listen for click.
Depress collar fully.
Click!