
User's Manual


Wideband Digital Hybrid
®
Plug-On Transmitter
Rio Rancho, NM
9
LCD Backlight Settings
The LCD backlight can be set to turn off after either 5
minutes or 30 seconds or stay on continuously. Hold
the UP arrow in while powering up the unit to enter
the setup screen. Press the AUDIO button repeatedly
to step through the setup items to reach the backlight
settings screen. Use the UP or DOWN arrow button to
select the desired setting.
Selecting Step Size mode
The frequency increments can be set at either 25 kHz
or 100 kHz. Hold the UP arrow in while powering up the
unit to enter the setup screen. Press the AUDIO button
repeatedly to step through the setup items to reach the
Step Size Mode screen. Use the UP or DOWN arrow
button to select the desired setting.
Setting Transmitter Operating Frequency
1) If the LCD is displaying something other than the
Frequency Screen, press the FREQ button on the
Control Panel to enter this screen.
Note: The default display is in MHz. Pressing
the FREQ button again displays the operating
frequency as a two-digit hexadecimal number that
corresponds to legacy Lectrosonics products that
used two 16-position switches to set the frequency.
2) While holding the FREQ button, use the UP or
DOWN arrow buttons to move the operating fre-
quency up or down.
Note: The operating frequency displayed on the
LCD wraps as it reaches the upper or lower end of
its range. Thus, if you intend to move the operating
frequency from the lower end of the range to the
upper end, it may be faster to do this by using
the DOWN arrow until the frequency wraps to the
upper end.
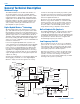
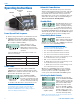
Set Up in 100kHz Mode
Frequency displayed as
two-digit hexadecimal
number
Frequency displayed
in MHz
The operating frequency can
be displayed either in MHz
or as a two-digit hexadeci-
mal number. The example of
the two-digit display shown
here indicates CH (channel)
and 2C as the frequency.
The frequency can be set
with the unit in standby
mode or when powered up
for normal operation.
Set Up in 25kHz Mode
The hexadecimal display in the 25 kHz mode will
appear with a decimal suffix to indicate the 25 kHz
steps.
644.400 MHz
644.425 MHz
644.450 MHz
644.475 MHz
Lock/Unlock Screen
Simultaneously pressing and holding both the UP and
DOWN arrow buttons during normal operation starts
the Lock timer. The timer starts at three and counts
down to zero. When the timer reaches zero, the key-
pad controls are locked.
The LCD will display the locked condition as long as
the arrow buttons are held, then revert back to the
previous screen when either button is released.
With the controls locked, the AUDIO and FREQ but-
tons can still be used to display current settings. Any
attempt to change a setting by pressing either the UP
or DOWN arrow button will result in an on-screen Loc
reminder that the controls are locked. Remove the
batteries to unlock the control panel.
Important: Once the transmitter is locked,
it cannot be unlocked or powered off using
the buttons. The only way to unlock a locked
transmitter is to remove the batteries.