
User's Manual


HHa
LECTROSONICS, INC.
8
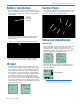
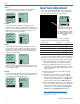
Battery Condition
An icon on the Main Window indicates the remaining
power of the transmitter batteries. This battery gauge
is most accurate with the typical voltage drop across
the life of alkaline and dry cell lithium batteries.
5
623.400
-40
-20
0
A
Battery Gauge
Rechargeable batteries give little or no warning when
nearing depletion. If you use rechargeable batteries in
the HH, we recommend trying fully charged batteries
first, noting the length of time that the batteries will run
the unit, and in the future using somewhat less than
that time to determine when the battery needs to be
replaced. The Venue and other receivers from Lectro-
sonics offer a timer function to assist in this process.
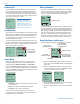
Navigating Menus and Screens
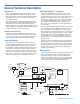
The Main Window displays the following information:
5
623.400
-40
-20
0
A
TB
Hex Code for
Operating frequency
Icon indicates
whether RF output
is turned on or off
Battery condition
Operating
frequency in MHz
Audio level
Function of the
rear panel switch
(talkback button)
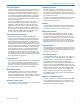
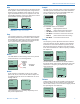
1) Press the MENU/SEL button to enter the setup
menu. Use the UP/DOWN buttons to highlight the
menu item.
2) Press the MENU/SEL button to enter the setup
screen for that item. Use the UP/DOWN buttons
to select the desired value or mode.
Gain
Freq.
Button
Rolloff
-40
-20
0
Gain
25
3) Press the MENU/SEL button to save this setting
and return to the previous screen.
4) Press the BACK button to return to the Main Win-
dow.
Powering Off
Press and hold the Power Button (or the side button
if it is configured for turning the power on and off) for
several seconds and observe the countdown on the
LCD. The countdown on the LCD will progress from 3
to 1 and the power will then be turned off. This can be
done from any menu or screen.
Powering
O . . .
1
NOTE: If the Power Button
is released before the
countdown is completed, the
unit will remain turned on
and the LCD will return to the
same screen or menu that
was displayed previously.
Standby Mode
A brief push of the Power Button turns the unit on and
places it into a “standby” mode (not transmitting). This
allows the transmitter to be set up without the risk of
creating interference for other wireless systems that
are operating in the vicinity.
A notice will appear briefly confirming that the RF out-
put of the transmitter is turned off, followed by the Main
Window. The antenna symbol will blink as a reminder
that the RF output is turned off.
5
623.400
-40
-20
0
A
MUTE
Symbol blinks
when RF output
is turned OFF
Rf
Off
Power Menu
When the transmitter is turned on, a brief push of
the Power Button will reveal a menu allowing you to
choose between Resume, Rf On?, and Pwr Off?.
Use the UP/DOWN buttons to select one of the menu
items, then press the MENU/SEL button to confirm this
action. The Rf On? selection will enter another screen
prompting a Yes or No answer.
Resume
Rf On?
Pwr Off?
• Resume: Continue operating in the same condi-
tion as before.
• Rf On?: Begin transmitting the RF signal.
• Pwr Off?: Turns off the transmitter.
The unit can also be turned off from any menu or
screen on the LCD by holding the power button in for
the duration of the countdown.