
Instruction Manual


HHa
LECTROSONICS, INC.
10
, HHa-941, HHa/E01, HHa/E02, HHa/E06, HHa/E07-941, HHa/X
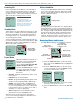
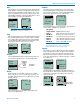
Input Gain Adjustment
The two bicolor Modulation LEDs (located at the bot-
tom of the control panel) provide a visual indication of
the audio signal level entering the transmitter.
7
601.000
-40
-20
0
A
b 23
The audio level is shown by
LEDs and in the LCD screen.
The gain should be set so that
the -20 LED just turns red on
the loudest peak (the onset of
limiting).
The LEDs will glow either red or green to indicate
modulation levels as shown in the following table.
Signal Level -20 LED -10 LED
Less than -20 dB Off Off
-20 dB to -10 dB Green Off
-10 dB to +0 dB Green Green
+0 dB to +10 dB Red Green
Greater than +10 dB Red Red
It is best to go through the following procedure with the
transmitter in the “standby” mode so that no audio will
enter the sound system, which could cause feedback.
1) With fresh batteries in the transmitter, power the
unit on into “standby” (no transmission) mode.
2) Press the MENU/SEL button once to enter the
setup menu. Use the UP/DOWN buttons to select
Gain. Press the MENU/SEL button again to enter
the setup screen.
3) Hold the microphone the way it will be used in
actual operation.
4) Speak or sing at the same voice level that will
actually be used during the program, while ob-
serving the modulation LEDs. Use the UP/DOWN
buttons to adjust the gain until the –20 dB LED
starts to flicker red and the –10 dB glows green.
5) Once the audio gain has been set, the signal can
be sent through the sound system for overall level
adjustments, monitor settings, etc. To do this, the
unit must be set to transmit (see Powering On
and Off, and the Standby Mode on page 7).
NOTE: Full modulation is achieved when the
-20 LED first turns red. 30 dB of clean limiting is
available above this point.
TxPower
Output power can be set to 100 mW (50 mW/E01)
to extend operating range (which can also suppress
noise and dropouts to some extent) or set to 50 mW
(25 mW/E01) to slightly extend the operating life of the
batteries.
Compat
StepSiz
TxPower
Phase
TxPower
50 mW
100 mW
Phase
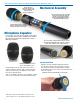
The phase (polarity) of the audio can be inverted to
match other microphone capsules as needed.
TxPower
Phase
Rf On?
Default
Phase
Pos
Neg
Rf On?
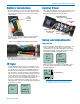
The transmitter output can be switched on or off with
this menu item. This is useful, for example, when the
transmitter is in the “standby” mode during setup, al-
lowing it to be turned on for normal operation without
having to cycle the power.
StepSiz
TxPower
Phase
Rf On?
Rf On?
No
Ye s
This menu item can also be used to change the trans-
mitter to the “standby” mode with the RF output turned
off for additional setup.
Default
The default setting simple returns the transmitter back
to the factory settings and any of the menu items can
be readjusted from that default point.
Default
settings
No
Ye s
TxPower
Phase
Rf On?
Default