
User's Manual


DPR-A
LECTROSONICS, INC.
6
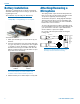
Battery Installation
The battery compartment door is made of machined
aluminum and is hinged to the housing to prevent it be-
ing damaged or lost.
The transmitter is powered by two AA batteries.
Note: Standard zinc-carbon batteries marked
“heavy-duty” or “long-lasting” are not adequate.
To install new batteries:
1. Slide open the Battery Cover and remove any old
batteries.
2. Insert the new batteries into the housing. One bat-
tery goes in positive (+) end first, the other negative
(-) end first. Look into the battery compartment to
determine which end goes in which side. The side
with the circular insulator is the side which accepts
the positive end of the battery.
positive (+)
terminal
negative (–)
terminal
Note: It is possible to install the batteries backward
and close the battery door, but the batteries will
not make contact and the unit will not power up.
3. Slide the Battery Cover until it snaps securely shut.
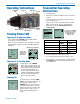
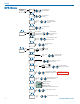
Attaching/Removing a
Microphone
The spring loaded coupler under the XLR jack main-
tains a secure fit to the microphone jack with continu-
ous pressure applied by an internal spring.
To attach the microphone, simply align the XLR pins
and press the microphone onto the transmitter until
the coupler retracts and latches. A click sound will be
heard as the connector latches.
To remove the microphone, hold the transmitter body
in one hand with the microphone pointing upward. Use
your other hand to rotate the coupler until the latch
releases and the coupler rises slightly.
Do not pull on the microphone while releasing the
locking collar.
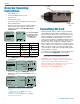
TO AT TACH
TO REMOVE
Hold the
transmitter
case with the
microphone
pointed
upward.
Rotate the
collar in the
direction
shown.
Pull on mic to ensure it is locked.
Press firmly, listen for click.
Depress collar fully.
Click!
NOTE: Do not hold or apply any pressure to the
microphone body while trying to remove it, as
this may prevent the latch from releasing.