
User's Manual
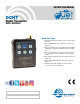


Digital Transmitter
Rio Rancho, NM
5
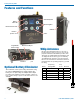
Battery Status LED Indicator
The Power/Function LED on the top panel will mirror
the keypad LED unless the programmable switch is set
to Mute, and the switch is turned on.
Alkaline, lithium or rechargeable batteries can be used
to power the transmitter. The type of batteries in use are
selectable in a menu on the LCD.
When alkaline or lithium batteries are being used, the
LED labeled BATT on the keypad glows green when the
batteries are good. The color changes to red at a mid-
point of the runtime. When the LED begins to blink red,
there will be only a few minutes of operation remaining.
The exact point at which the LEDs turn red will vary
with battery brand and condition, temperature and
power consumption. The LEDs are intended to simply
catch your attention, not to be an exact indicator of
remaining time.
A weak battery will sometimes cause the Power LED to
glow green immediately after the transmitter is turned
on, but it will soon discharge to the point where it will
turn red or the unit will turn off completely.
Rechargeable batteries give little or no warning when
they are depleted. If you wish to use these batteries
in the transmitter, the most accurate way to determine
runtime status is by testing the time provided by a par-
ticular battery brand and type, then using the BatTime
function to determine remaining runtime.
NOTE: Refer to the Main Menu and Setup section
for BatTime details.
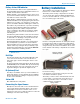
Belt Clips
The wire belt clip may be removed by pulling the ends
out of the holes in the sides of the case. Be sure to
have a firm grip to avoid scratching the surface of the
housing.
An optional spring-loaded, hinged belt clip (model num-
ber BCSLEBN) is also available. This clip is attached by
removing the plastic hole cap on the back of the hous-
ing and mounting the clip with the supplied screw.
IR (infrared) Port
The IR port is available on the top of the transmitter for
quick setup using a receiver with this function available.
IR Sync will transfer the settings for frequency from the
receiver to the transmitter.
Status LED
Blue LED indicates ready status.
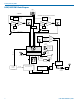
Connecting the Signal Source
Microphones, line level audio sources and instruments
can be used with the transmitter. Refer to the section
entitled Input Connections for details on the correct
wiring for line level sources and microphones to take full
advantage of the Servo Bias circuitry.
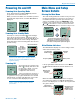
Battery Installation
The transmitter is powered by two AA batteries. Lithium
batteries are recommended for longest life.
The battery status circuitry compensates for the differ-
ence in voltage drop between alkaline and lithium bat-
teries across their usable life, so it’s important to select
the correct battery type in the menu.
Because rechargeable batteries run down quite abrupt-
ly, using the Power LED to verify battery status will not
be reliable. However, it is possible to track battery status
using the battery timer function available in the receiver.
Push outward on the battery compartment door and lift
it to open.
Slide door outward,
then lift up to open
Insert the batteries according to the markings on the
back of the housing.
If the batteries are inserted incorrectly, the door will
close but the unit will not operate.
The battery contacts can be cleaned with alcohol and
a cotton swab, or a clean pencil eraser. Be sure not
to leave any remnants of the cotton swab or eraser
crumbs inside the compartment.
Spring contacts