
Daim Ntawv Qhia Tus Neeg Siv


www.lectrosonics.com 9
5) Turn the recorder or sound sys-
tem gain down before setting
the transmitter to the normal
operating mode and enabling
the audio output.
6) If the audio output level of the
receiver is too high or low,
use only the controls on the
receiver to make adjustments.
Always leave the transmitter
gain adjustment set according
to these instructions, and do
not change it to adjust the au-
dio output level of the receiver.
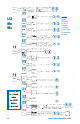
Selecting Input Type
AES digital or analog audio input is
selected with the InType menu item.
With the AES selected, there are no
additional settings needed for the
input. Analog input configuration is
set with the InpCfg1 and InpCfg2
menu items.
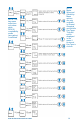
Input...
InType
InpCfg1
InpCfg2
InType
Analog
AES
Selecting Input Configuration
When the input type is set to Ana-
log, InpCfg1 and InpCfg2 menus
are used to configure the audio
input for the respective channels.
Use the
and arrow buttons to
select the input type.
Input...
InType
InpCfg1
InpCfg2
InpCfg1
Line In
InpCfg2
Oth Lav
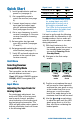
The Custom option opens a setup
screen that provides a variety of
settings. Press SEL to select the
custom setup item, then press the
and arrow buttons to adjust
the setting.
InpCfg2
Custom
MicLoZ
0V Neg
Channel select
Input impedance
Bias voltage
Audio polarity
Available settings:
Input impedance (Z): LOW, MID,
HIGH
Bias voltage: 0V, 2V, 4V
Audio polarity: + (pos.), – (neg.)
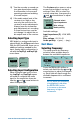
Xmit Menu
Selecting Frequency
The setup screen for frequency
selection offers multiple ways to
browse the available frequencies.
Press the MENU/SEL button to
select each field. Use the
and
arrow buttons to adjust the frequen-
cy. Each field will step through the
available frequencies in a different
increment.
NOTE: When the frequency
is highlighted, hold down
the MENU/SEL button
to increase or decrease
frequency in higher
increments.