
User's Manual
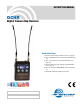


DCHR
LECTROSONICS, INC.
6
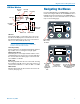
System Setup Procedure
Step 1) Install Batteries and Turn Power On
Install the batteries according to the diagram marked
on the back of the housing. The battery door makes a
connection between the two batteries. It is suggested
that you use lithium or high capacity NiMH recharge-
able batteries.
Step 2) Set Compatibility Mode
Set compatibility mode according to the transmitter
type, and make sure the transmitter compatibility mode
is the same in the case where the transmitter offers dif-
ferent modes.
Step 3) Set or Sync Frequency to match Trans-
mitter
In the transmitter, use “GET FREQ” or “GET ALL” in
the menu to transfer frequency or other information via
the IR ports. Hold the DCHR receiver IR port close to
the front panel IR port on the transmitter and press GO
on the transmitter.
Step 4) Set Encryption Key Type and Sync with
Transmitter
Choose Encryption Key Type. If necessary, create key
and use “SEND KEY” in the menu to transfer an en-
cryption key via the IR ports. Hold the DCHR receiver
IR port close to the front panel IR port on the transmit-
ter and press GO on the transmitter.
Step 6) Choose Audio Output Function
Choose analog or digital (AES3) output as desired.
Step 7) Verify RF and Audio Signals are Present
Send an audio signal to the transmitter and the receiv-
er audio meters should respond. Plug in headphones
or earphones. (Be sure to start with the receiver vol-
ume settings at a low level!)
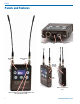
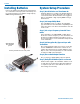
Installing Batteries
Power is provided by two AA batteries. The batteries
are connected in series by a plate in the battery door.
It is suggested that you use lithium or high capacity
NiMH rechargeable batteries.
Slide the battery
door outward to
open it
Polarity is marked on the rear panel.
Polarity markings