
User's Manual
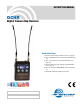


DCHR
LECTROSONICS, INC.
10
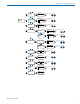
Menu Item Descriptions
RF Setup Menu
SmartTune
SmartTune™ automates the discovery of a clear
operating frequency. It does this by scanning all the
available operating frequencies within the system’s
frequency range (in 100 kHz increments) and then
selecting the frequency with the least amount of RF in-
terference. When SmartTune
™
is complete, it presents
the IR Sync function for transferring the new setting
to the transmitter. Pressing “Back” returns to the Main
Window displaying the selected operating frequency.
RF Frequency
Allows manual selection of the operating frequency in
MHz and kHz, tunable in 25 kHz steps.
You may also select a Frequency Group, which will
limit the available frequency choices to those con-
tained in the selected group (see Freq. Group Edit, be-
low). Select Frequency Group NONE for normal tuning.
Frequency Scan
Use the scan function to identify a usable frequency.
Allow the scan to continue until the entire band has
been scanned.
Once a full cycle has been completed, press MENU/
SELECT again to pause the scan.
Use the UP and DOWN arrows to roughly tune the
receiver by moving the cursor to an open spot. Press
MENU/SELECT to zoom in for fine tuning.
When a usable frequency has been selected, press
the BACK button for the option to keep your newly se-
lected frequency or to revert to where it was set before
the scan.
Clear Scan
Erases scan results from memory.
Freq. Group Edit
User-defined Frequency Groups are edited here.
Groups u, v, w and x may contain up to 32 user-se-
lected frequencies. Use the UP and DOWN arrow but-
tons to select one of the four groups. Press the MENU/
SELECT button to move the cursor to the frequency
list for the group. Now, pressing the UP and DOWN
arrow buttons moves the cursor in the list. To delete a
selected frequency from the list, press MENU/SELECT
+ DOWN. To add a frequency to the list, press MENU/
SELECT + UP. This opens the Frequency Selection
screen. Use the UP and DOWN arrow buttons to select
the desired frequency (in MHz and kHz). Press MENU/
SELECT to advance from MHz to kHz. Press MENU/
SELECT again to add the frequency. This opens a
confirmation screen, where you can choose to add the
frequency to the Group or cancel the operation.
In addition to the group NONE, this screen also allows
selection of one of four user-defined pre-selected fre-
quency groups (Groups u through x):
• Each press of the UP or DOWN button will step to
the next stored frequency in the group.
Audio Setup Menu
Audio Level
Set audio output level with the level control. The TONE
option is used to generate a 1 kHz test tone at the
audio output.
Compat Modes
Multiple compatibility modes are available to match
various transmitter types.
The following modes are available:
• D2: Encrypted digital wireless channel
• DUET: Standard (unencrypted) Duet channel
• DCHX: Encrypted digital camera hop channel,
also compatible with M2T-X encrypted
Duet channel
Output Type
The DCHR has a single audio output jack with two
output type options:
• Analog: 2 balanced line level audio outputs, one
for each audio channel sent by the DCHT. Uses
4 of the 5 pins in the connector, 2 pins for each
analog audio channel plus ground.
• AES3: The AES3 digital signal contains both
audio channels in a single signal. It uses 2 of the 5
pins in the connector plus ground.
Audio Polarity
Select normal or inverted polarity.
Sync/Encryption Menu
NOTE: You must position the transmitter’s IR port
directly in front of the DCHR IR port, as closely
as possible, to guarantee a successful sync. A
message will appear on the DCHR if the sync
was successful or failed.
Send Frequency
Choose to send frequency via IR port to a transmitter.
Get Frequency
Choose to receive (get) frequency via IR port from a
transmitter.
Send All
Choose to send settings via IR port to a transmitter.