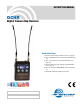
INSTRUCTION MANUAL DCHR Digital Camera Hop Receiver Quick Start Steps 1) Install receiver batteries and turn power on (pg. 5). 2) Set compatibility mode to match the transmitter (pg. 10). 3) Set or sync frequency to match transmitter (see page 10). 5) Set encryption key type and sync with transmitter (see page 11). 6) Choose analog or digital (AES3) output (see page 10). 7) Verify RF and audio signals are present. Fill in for your records: Serial Number: Purchase Date: Rio Rancho, NM, USA www.
DCHR Table of Contents Quick Start Steps................................................................. 1 DCHR Digital 2-Channel Receiver....................................... 3 Smart Tuning (SmartTune™)................................................. 3 Encryption............................................................................ 3 RF Front-End with Tracking Filter......................................... 3 Panels and Features..............................................................
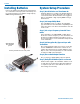
Digital Camera Hop Receiver DCHR Digital Stereo/Mono Receiver The DCHR Digital Receiver is engineered to work alongside the DCHT transmitter to form the Digital Camera Hop system. The receiver is also compatible with the M2T unencrypted and M2T-X encrypted digital stereo transmitters, and the D2 Series mono digital transmitters, including the DBu, DHu, and DPR.
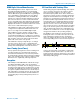
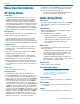
DCHR Panels and Features Audio Output Jack RF Link LED IR (Infrared) Port Headphone Output Jack Battery Status LED Belt Clip Mounting Sockets USB Port Battery Compartment Door When on Main Screen, UP and DOWN buttons will adjust headphone volume. 4 LECTROSONICS, INC.
Digital Camera Hop Receiver Battery Status LED USB Port When the battery status LED on the keypad glows green the batteries are good. The color changes to red at a midpoint during the runtime. When the LED begins to blink red, only a few minutes remain. The exact point at which the LED turns red will vary with battery brand and condition, temperature and power consumption. The LED is intended to simply catch your attention, not to be an exact indicator of remaining time.
DCHR Installing Batteries Power is provided by two AA batteries. The batteries are connected in series by a plate in the battery door. It is suggested that you use lithium or high capacity NiMH rechargeable batteries. System Setup Procedure Step 1) Install Batteries and Turn Power On Install the batteries according to the diagram marked on the back of the housing. The battery door makes a connection between the two batteries.
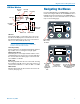
Digital Camera Hop Receiver LCD Main Window Receiver Name RF Level Headphone Volume Diversity Activity 520.000 DCHR 60 Navigating the Menus Frequency From the Main Window, press MENU/SEL to enter the menu, then navigate with the UP and DOWN arrows to highlight the desired setup item. Press MENU/SEL to enter the setup screen for that item. Refer to the menu map on the following page. Rx 0 -20 520.
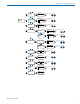
DCHR Diversity Diversity Setup DCHR LCD Menu Map Mode: auto Select option with arrow buttons BACK to select. Main RF Setup Smart Tune RF Frequency Searching... 470.1 492.6 614.3 Frequency Selects open frequency. Select frequency with arrow buttons. 607.900 MHz to toggle. to pause scan. Frequency Scan Scanning Wide... 470.1 492.6 to zoom scan. 614.3 BACK Clear Scan Freq. Group Edit Clear Scan Data? Yes No Group: u Add M+ Audio Setup Audio Level to select.
Digital Camera Hop Receiver Key Type Tools/ Settings Lock/Unlock Backlight RX Batt Setup Key Type Type: standard Lock Settings? unlocked locked Backlight always on 5 seconds 30 seconds Select option with arrow buttons BACK Select option with arrow buttons BACK BACK Alk. Lith. RXbar Batt Display graph voltage timer TX Batt Type TX Batt Type Edit Names Locale Restore Default About Rio Rancho, NM Display Setup LCD : normal to select. RX Batt Type RX Batt Type Alk. Lith.
DCHR Menu Item Descriptions RF Setup Menu SmartTune SmartTune™ automates the discovery of a clear operating frequency. It does this by scanning all the available operating frequencies within the system’s frequency range (in 100 kHz increments) and then selecting the frequency with the least amount of RF interference. When SmartTune™ is complete, it presents the IR Sync function for transferring the new setting to the transmitter.
Digital Camera Hop Receiver Get All Choose to receive (get) settings via IR port from a transmitter. Key Type Encryption Keys The DCHR generates high entropy encryption keys to sync with encryption-capable transmitters and receivers. The user must select a key type and create a key in the DCHR, and then sync the key with a transmitter or another receiver (only in shared key mode).
DCHR Locale When EU is selected, SmartTune will include frequencies 608-614 MHz in the tuning range. These frequencies are not allowed in North America, so they are not available when NA locale is selected. About Displays general information about the DCHR, including main firmware running in the receiver. 12 LECTROSONICS, INC.
Digital Camera Hop Receiver Audio Output Cables and Connectors MCDTA5TA3F TA5F mini female locking XLR to single TA3F mini female locking XLR for two channels of AES digital audio from DCHR. MCDTA5XLRM TA5 mini female locking XLR to full size male XLR for two channels of AES digital audio from DCHR. MCTA5PT2 TA5F mini female locking XLR to dual pig tails for two channels of analog audio from DCHR; allows custom connectors to be installed.
DCHR Accessories 26895 Replacement wire belt clip. 21926 USB cable for firmware updates AMM(xx) Whip antenna; straight. Specify frequency block (see chart below). About Whip Antenna Frequencies: Frequencies for whip antennas are specified by the block number. For example, AMM-25 is the straight whip model cut to the block 25 frequency. L-Series transmitters and receivers tune across a range covering three blocks.
Digital Camera Hop Receiver Service and Repair If your system malfunctions, you should attempt to correct or isolate the trouble before concluding that the equipment needs repair. Make sure you have followed the setup procedure and operating instructions. Check the interconnecting cables. We strongly recommend that you do not try to repair the equipment yourself and do not have the local repair shop attempt anything other than the simplest repair.
LIMITED ONE YEAR WARRANTY The equipment is warranted for one year from date of purchase against defects in materials or workmanship provided it was purchased from an authorized dealer. This warranty does not cover equipment which has been abused or damaged by careless handling or shipping. This warranty does not apply to used or demonstrator equipment. Should any defect develop, Lectrosonics, Inc. will, at our option, repair or replace any defective parts without charge for either parts or labor.