
User's Manual
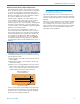


DSW Digital Wireless System
Rio Rancho, NM
21
Frequency Selection
Manual selection may be necessary if frequencies are
mandated by an authority, such as a major sporting
event. You can manually set the frequencies and set-
tings for the transmitters in the receiver, then connect
a transmitter and transfer settings. Or, of course, just
manually set the frequency in each receiver channel
and transmitter.
Using Smart Tune
TM
is the easiest way to find and
set good operating frequencies. The process scans
the tuning range of designated channels, identifies a
good operating frequency and prompts the operator
to connect a transmitter and transfer the settings. The
transfer can be completed or skipped, and scanning
will then continue with the next receiver.
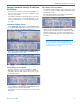
Manual Frequency Selection
From the Main Window, press the numbered channel
select button under the LCD on the front panel to open
the receiver setup screen. Rotate the encoder to select
the EDIT option.
Press the encoder to highlight the EDIT option and
then rotate the encoder to select the left or right hand
frequency item. The left hand item adjusts frequency in
1 MHz steps, and the right hand item adjusts frequen-
cy in 25 kHz steps.
Selected item is indicated with
ruled lines above and below
Press the encoder to highlight the selected item and
then rotate it to set the frequency. Then press the
encoder to de-highlight it, rotate the encoder to select
the other frequency item and press the encoder to
highlight it.
Adjust in 1 MHz steps
Adjust in 25 kHz steps
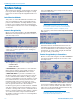
After adjusting the frequency, press the BACK but-
ton on the front panel or the encoder to de-highlight
the item. Then press the BACK button to leave the
EDIT option. Use the SEL RX option or return to the
Main Window to move to another receiver to adjust its
frequency.
Selected receiver
Select the SEL RX option
and press the encoder
Press the encoder to de-highlight SEL RX. Select the
EDIT option and repeat the above procedure.
Using Smart Tune
TM
for Frequency Selection
When new frequencies must be discovered, this auto-
matic frequency scanning and setup function is by far
the easiest and quickest way to get up and running.
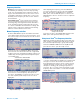
Select the SMART TUNE item in the Top Menu and
press the encoder to open the setup screen.
A check box next to each receiver indicates whether
or not the channel will be included in the scanning and
setup process. Press the channel select buttons on
the keypad below the LCD to check or uncheck each
channel. Normally, a single scan on each channel is
adequate to identify good operating frequencies. If
you prefer, up to 10 scans can be performed on each
frequency. Select the number of scans with the NUM
SCAN PASS option.
Selects the number of scans on each channel