
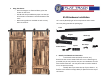
Installation Sheet

2. Lay Out The Wall
o Using the track centerline that we found in the
previous step measure from the floor up to mark
the height.
o Measure horizontally 1/2” inward from the
position of where you want the shutter to stop.
This is the location of your 1st hole.
o Level across from the 1st hole to locate the
opposing end hole of the track.
o Make sure the marks for the end holes are level
across and centered to cover the opening with the
panel once complete.
o Most often the track is centered over the open
area.
3. Drill The End Holes
o Use a 5/32’’ drill bit to drill into your header for
the two end holes previously located.
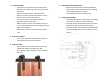
4. Hang The Track
o Place the Spacer on the back of the track along
with Fender Washer up against the wall.
o Insert Wood Lag with the Stop on the outside of
the Track.
5.
Drill The Remaining Track Holes
o With the two ends of the track fastened down
with the door stops installed, drill the remaining
holes using the spacer as a guide.
o Insert and fasten down the Wood Lags.
6. Installing The Hangers
o Locate the position of the door hangers according
to the type of hanger you have purchased.
o Once the location of the hanger holes are found
and marked, drill the holes for the hangers.
o Place the hanger over the drilled holes and install
the provided #10 wood screws to fasten it to the
shutter.