
User`s manual


3
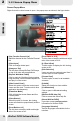
3-6 FM Schedule
(Only Applicable to Specific Products)
Schedule Table
All scheduled events are
listed here with its
references: starting time,
ending time, channel
number, duration and
comments.
[ADD] button
Click to open the Schedule
Setting dialog box and add
a new event.
[DEL] button
Highlight an event on the
schedule table and click
this button to delete it.
[CHANGE] button
Highlight an event on the
schedule table and click
this button to make
changes to its event
details.
[CLEAR] button
Click this button to clear the
schedule table and delete
all events.
[Save] button
Click the button to save any
addition or changes.
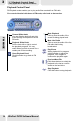
Click the Add button in the
main FM Schedule dialog
box to open this dialog as
shown in the figure in the
box.
[Action]
When scheduling an
event, select an action
from the options provided
here, which include: Radio
Record and Radio Show .
[Channel]
Select a channel from the
drop down list for the
event being scheduled.
[Compression Format]
Select a compression
format from the drop down
list for the recording.
[Compression
Attributes]
The bigger value you
select the better sound
quality the compressed file
will be.
FM Schedule
Click on the control panel, then the third tab to open the FM Schedule dialog box as
shown in the figure below.
[File Prefix]
[Comments]
You can type in the
program name, comments,
or notes as desired.
Information input here
often serves as a reminder.
[Silent Record]
Tick this option to set a
scheduled recording to
proceed silently.
[After the task is
finished...]
Tick this option to enter
standby mode after the
scheduled event is
completed.
Type in the box the prefix
of the file names of your
desire. For example, if you
type "music" in the box, the
recorded file names will be
"music 1", "music 2",
"music 3", etc.
[Time]
You can schedule a single
recording or power-on
event or set it as an weekly
event.
FM Schedule Setting
FM MODE
37