Table of Contents 1 English Overview 1-1 Introduction ......................................................................1 1-2 Features ...........................................................................2 1-2-1 Multiple Video Processing ...................................2 1-3 Launch the Application ...................................................... 3 1-4 Switch between Modes ....................................................3 1-5 Reading the Status Window ..............................
Table of Contents 3 FM Mode English (Only Applicable for Specific Products) 3-1 Control Panel ..................................................................33 34 3-2 Scan Channels .................................................................. 35 3-3 Audio Setting .................................................................... 35 3-4 Change the Folder for Sound Files .................................. 36 3-5 Channel List .....................................................................
1 1-1 Introduction Before you start to read this manual, we have to remind you that Digital TV, Analog TV input source and FM mode are applicable to specific products, please check that if your products support these functions. WinFast PVR2 is a powerful and easy-to-use application that comes with your WinFast multimedia product to provide the most feature-rich video/audio entertainment.
1 1-2 Features 1-2-1 Multiple Video Processing OVERVIEW Features TimeShifting function allows users to view recorded video when the recording is still in progress. Never again will you miss a second of your favorite show for taking a break to get the popcorn. Power-up scheduling of pre-set recording with auto power-on of PC in S3 (Standby) or S4 (Hibernate) mode. DirectBurn allows you to record programs directly into VCD/DVD in real time.
1-3 Launch the Application 1. WinFast PVR2 shortcut is added to the Program list in Start menu. You can choose it to launch WinFast PVR2. When you run the WinFast PVR2 application for the first time, the default is set to TV mode. You can identify which mode you are currently in by reading the status window. How to enter TV Mode 1 OVERVIEW After the WinFast PVR2 application is successfully installed, shortcuts are added to provide several ways to launch the application.
1 1-5 Reading the Status Window OVERVIEW Indications on the status screen give 1-5-1 Status Window in Video Input Mode 1-5-2 Status Window in TV Mode Video Input mode information concerning currently active mode. The following pages tell you how to read the status windows on the control panels. CVBS What is a status window? The Status window is the part of control panel that shows information on the current status (refer to figures below).
1-5 Reading the Status Window TimeShifting mode - Standby There are 4 types of actions in TV mode: 1. With no recording in progress 2. With recording in progress 3. With TimeShifting standby 4.
1 1-5 Reading the Status Window (Only Applicable to Specific Products) OVERVIEW FM mode 1-5-5 Status Window in FM Mode 1-5-6 Status Window in FM Playback Mode FM Playback mode With no recording in progress With recording in progress Channel Number of the live FM radio broadcast. Frequency of the current live FM radio channel. Indicates playback is in progress. Name of the sound file that is being played back. Channel Number of the live FM radio broadcast.
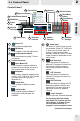
2 2-1 Control Panel Control Panel 1 14 Channel list 11 Channel Controls 13 Signal Indicator 10 Record button 12 DirectBurn button 3 LiveBroadcast Switch 9 TimeShifting Button 2 FM Switch TV MODE 1 Power off 4 Various functions 5 Video Input 1 7 Volume 5 Controls 6 Twinview Controls Power off 5 Click to close the application. 2 FM Switch LiveBroadcast Switch Click to broadcast on-going TV show via internet.
2 2-1 Control Panel 7 5 Volume Controls: Control Panel 2 2 Click to turn the volume up/down. The scroll bar indicates the status of volume controls. Mute button TV MODE Click to mute the audio. Click again to resume system sound. 8 1 Software Settings Configuration Click to open the setup dialog box. Turn the button right to increase the volume. To decrease the volume, turn the button towards the left. Schedule Click to preset the recording schedules.
2-2 Digital TV 2 2-2-1 Scan Channels 2-2-2 Add a New Frequency Scan Channels Scanning for channels is the first thing you need to do when you use the application for the first time. Otherwise, there will not be any channels available for viewing. To scan for channels, please click on icon on the control panel, then click on label to open Scan Channel dialog box as picture below. 4. [Scan] button Click the button to start scanning for all available channels. 2.
2 2-2 Digital TV 2-2-3 Video Capture Setting 2-2-4 Change the Folder for Saved Media Files Digital Video Capture Setting Click on the control panel, then label to open the Digital Video Capture Setting dialog box as shown in the figure below. WinFast DTV Dongle BDA Driver TV MODE Fig. 3 [Device] By default the device used is WinFast DTV1000 T. Or users can select other available Leadtek devices. [Image Format] The formats available are: JPEG, BITMAP, PNG, and TIFF.
2-2 Digital TV 2-2-5 Video Setting 2 Video Setting Click on the control panel then shown in the figure below. label to open the Video Setting dialog box as Light Brown TV MODE Fig. 4 [MPEG-2 Codec] The default value is Leadtek PVR2 Codec. [Renderer] Users can select either VMR, VMR 9 or Overlay Mixer as renderer. The default renderer is Overlay Mixer. [Hardware Accelerator] Users can turn on/off the hardware accelerator.
2 2-2 Digital TV 2-2-6 General Setting General Setting Click on the control panel, then shown in the figure below. label to open the General Setting dialog box as TV MODE Fig. 5 [Keep EPG Data for] Users can choose the number of days (0 to 7 days) he wishes to keep the EPG data for. [Time Mode] The time mode can be either 12 hour or 24 hour mode. [Quick Tune List] Users can choose to view the submenu by Auto Popup or Popup by clicking.
2-2 Digital TV 2 2-2-7 EPG EPG-Electronic Program Guide EPG is an on-screen guide for scheduled broadcast television programs, allowing users to navigate and select content by time, channel, etc. In areas where Electronic Program Guide is applied, you can use this function by clicking on the button on the Control Panel (See Fig.7 below). Users can view channel lists and set recordings directly into WinFast PVR2 via the online channel guide. TV MODE 1 2 3 4 Fig.6 Fig.
2 2-3 Analog TV (Only Applicable to Specific Products) 2-3-1 Scan Channel 2-3-2 Add a New Frequency Scan Channels Scanning for channels is the first thing you need to do when you use the application for the first time. Otherwise, there will not be any channels available for viewing. First, click on to switch to Analog input source. To scan for channels, please click on icon on the control panel, then click on label to open Scan Channel dialog box as picture below. TV MODE 1.
2-3 Analog TV (Only Applicable to Specific Products) 2-3-3 Device Setting 2 Device Setting Click on the control panel, then shown in the figure below. label to open the Device Setting dialog box as TV MODE Fig. 10 [Analog Video Device] All available video devices are shown in the list. [Analog Audio Device] Select an audio output device from the drop-down list. [Mixer Device(Playback)] Select an audio output device from the drop-down list.
2 2-3 Analog TV (Only Applicable to Specific Products) 2-3-3-1 Audio Setting Audio Setting Click on the control panel, then shown in the figure below. label to open the Device Setting dialog box as AUX-in TV MODE AUX-in Fig. 11 Line in Connector (Blue) Fig. 12 If you use the external connection (please refer to Fig. 12, connecting the audio cable to the Line in connector of the motherboard/sound card.) for audio out, please change both Audio-Out and Recording Control Line to Line In.
2-3 Analog TV (Only Applicable to Specific Products) 2-3-4 Video Setting 2 Video Setting Click on the control panel, then shown in the figure below. label to open the Video Setting dialog box as TV MODE Fig. 15 [Renderer] Users can select either VMR, VMR 9 or Overlay Mixer as renderer. The default renderer is Overlay Mixer. Note: If your PC is connected to two displays, please change the Renderer to "VMR 9" to obtain correct video for both displays.
2 2-3 Analog TV (Only Applicable to Specific Products) 2-3-5 Analog Video Capture Setting 2-3-6 Change the Folder for Saved Media Flies Analog Video Capture Setting Click on the control panel, then label to open the Analog Video Capture Setting dialog box as shown in the figure below. TV MODE Fig. 16 [Analog Capture Profile] Please see Page 28 for detail. [Add] button Click to add a capture profile. [Edit] button Click to edit a capture profile. [Delete] button Click to delete a capture profile.
2-3 Analog TV (Only Applicable to Specific Products) 2-3-7 Add a New Capture Profile 2 Add a New Capture Profile You can create your customized capture profile here for the function of Recording and DirectBurn. Click on the control panel, then label to open the Analog Video Capture Setting dialog box as shown in the figure below. Step 2-2 Step 1 TV MODE Step 2-1 Fig. 17 Step 1 Click on the Setting button , and then the fourth label as the picture showed above.
2 2-3 Analog TV (Only Applicable to Specific Products) 2-3-7 Add a New Capture Profile Step 3 Step 4 Step 6 TV MODE Step 7 Step 5 Step 8 Fig. 18 Step 3 Name your own Capture Format Profile. Step 4 Click on the Video Codec drop-down list to choose a codec you want to use. Note: If the codec you want to use isn't in the list, please download it first, and install it in your PC. Step 5 Select the Capture Resolution you want to use. Note: The resolution depends on the codec you choose at step 4.
2-3 Analog TV (Only Applicable to Specific Products) 2-3-7 Add a New Capture Profile 2 Step 9 TV MODE Step 10 Fig. 19 Step 9 Now you can choose the capture format you just created from the drop-down list. Step 10 Click on "OK" to apply the setting you've made. Now when you use the function of Record or DirectBurn the capture profile will be automatically adopted. If you want to change the Capture Profile, you can go back to the same setting page to make the changes.
2 2-3 Analog TV (Only Applicable to Specific Products) 2-3-8 EPG EPG-Electronic Program Guide EPG is an on-screen guide for scheduled broadcast television programs, allowing users to navigate and select content by time, channel, etc. In areas where Internet Electronic Program Guide is applied (EX: USA and Japan), you can click on the button on the Control Panel (See Fig. 21 below), and directly link to Internet Electric Program Guide web sites to view channel lists and programs.
2-3 Analog TV (Only Applicable to Specific Products) 2-3-8-1 Import XMLTV Data 2 The figures bellow shows the steps of importing XMLTV data into WinFast PVR2. 1 2 TV MODE Click on the Import XMLTV Data button to start import. 3 Choose your downloaded program guide and Open it. Click on OK to load new program guide in XML format. 4 Map each channel number to channel names manually and click Apply. Click Exit to view the programs of the mapped channels.
2 2-4 TimeShift Mode Introduction TimeShifting is a type of recording that enables you to view, rewind or stop the playback of recorded video when its recording is still in progress. This function is used when there is interruption during viewing of a TV broadcast and you do not want to miss any of it. By clicking the Time Shifting button, you start recording the TV broadcast.
Introduction 2-4 TimeShift Mode 2 Features How TimeShifting Works The figure below shows the steps of entering TimeShifting mode. TV MODE 2 1 Press the TimeShifting button Playback/ recording progress bar Play button Stop button TimeShifting button TimeShifting is in progress. The progress of playback/recording is shown on the scroll bar at the bottom of the screen. In TV mode, the screen is playing live TV.
2 2-5 LiveBroadcast Live Broadcast allows clients from different IP to watch the same program as the host via internet. Before using Live Broadcast, please make sure that the host and the clients are already connected to the internet. Control Panel 9 1 1 Live Broadcast Switch Live Broadcast Switch TV MODE Click to start/stop Live Broadcast. The icon lights on, when Live Broadcast mode is on. 2 2 Stop Stop Click to stop Live Broadcast, and turn back to TV mode. How to Use Live Broadcast Fig.
2-6 DirectBurn 2 2-7 Fine Tune Channels DirectBurn Disc Output Format choosing drop-down list TV MODE Device choosing drop-down list Browse button Advance and Normal Mode switch This popup menu is shown when users click on control panel's DirectBurn button. There are two modes for DirectBurn setting, please click on the Advance and Normal mode switch to switch to the advanced mode to make advanced setting.
2 2-8 Capture File Popup Menu 2-9 Screen with Multi-language Selections Capture File Popup menu This popup menu is shown when users right-click on control panel's Record button. The user can customize the captured file Size Limit, the Split File size, and the recording Time Limit. TV MODE TV MODE And you can check the box of "Silent Recording" to proceed silently.
2 2-10 Schedule Schedule You can use this function by clicking on the button on the Control Panel (See page 7). All scheduled events are listed with their starting time, ending time, channel name, lapse time and capture format. TV MODE [Add] button Click this button to open the TV Schedule Setting dialog box as Fig. 25 and add a new event. [Edit] button Select an event and then click this button to change its settings in the TV Schedule Setting dialog box.
2 Introduction 2-11 Playback Mode In Video Playback mode, you can playback recorded TV while live TV is still playing on the screen in picture-in-picture (PIP), picture-and-picture (PAP), and picture-on-picture (POP) style. 2-11-1 Control Panel Features 2-11-2 Twinview Picture-And-Picture Twinview Control Panel TV MODE 1 Channel Up/Down 3 Snapshot Button 2 Control Buttons *Refer to the Control Panel section for controls that are identical with those on the control panel of Video Input mode.
2-11 Playback Mode 2 2-11-2 Twinview Picture-in-Picture Twinview Screen Controls Exit WinFast PVR2 Click to close the application. Minimize Click to maximize the viewing window only. Frameless Click to hide the screen frame and the control panel. Doubleclick the screen in order to restore the control panel. TV MODE Maximize Click to maximize the viewing window.
2 Introduction 2-12 Screen Popup Menu Features Screen Popup Menu Right-click on the virtual screen to open the popup menu as shown in the figure below. TV MODE [Use Favorite Channel List] Add this channel to the Favorite Channel list. [Video Input] Click to change video input. [Always on Top] Tick this item to keep WinFast PVR2 stays on top of all other active applications. [Explore WorkArea Folder] Click to open the WorkArea folder explorer.
3 3-1 Control Panel (Only Applicable to Specific Products) Control Panel Open Playback Panel Click to go in FM Playback mode. Record/Stop Recording When no recording is in progress, click this button to record the current live FM radio broadcast. Click it again to stop the recording. About WinFast FM Press the hotspot to pop up an information box. Click on the Leadtek logo to log on its website. Minimize Click to minimize the application.
2 3 3-2 Scan Channels Introduction (Only Applicable to Specific Products) Features Scan Channels Scanning for channels is the first thing you need to do when you use the application for the first time. Otherwise, there will not be any channels available for listening. To scan for channels, please click on the control panel, when the setting page appears, click on the second label from the right go to the FM Channel List dialog box to start scan channels.
3-3 Audio Setting (Only Applicable to Specific Products) 3-4 Change the Folder for Saved Sound Files (Only Applicable to Specific Products) 3 Audio Setting FM MODE Click on the control panel, then the first tab from the left to open the Audio Setting dialog box as Fig. 26 shows. Fig. 26 [Audio-Out Control Line]& [Audio Recording Control Line] If you use the external connection (please refer to Fig.12 on page 16) for audio out, please change both Audio-Out and Audio Recording Control Line to Line In.
2 3 3-5 Channel List Introduction (Only Applicable to Specific Products) Features FM Channel List Click on the control panel, then the second tab to open the FM Channel List dialog box as shown in the figure below. FM MODE [Edit] button Highlight a channel and click this button to edit the channel name. [Delete] button Select a channel and click this button to delete it from the channel list.
3 3-6 FM Schedule (Only Applicable to Specific Products) FM Schedule Click on the control panel, then the third tab to open the FM Schedule dialog box as shown in the figure below. Click the Add button in the main FM Schedule dialog box to open this dialog as shown in the figure in the box. [ADD] button Click to open the Schedule Setting dialog box and add a new event. [Action] When scheduling an event, select an action from the options provided here, which include: Radio Record and Radio Show .
2 3 3-7 Playback Control Panel Introduction (Only Applicable to Specific Products) Features Playback Control Panel FM Playback mode enables you to play audio files recorded from FM radio. For controls identical with those of FM mode, refer back to that section. FM MODE Channel Slider knob You can slide the knob left and right to surf through all frequencies of live FM radio. Playback Slider Knob Pull the knob left or right to control the playback progress.
4 4-1 Device Setting for Other Sources Device Setting for Other Sources Click on the control panel, then the shown in the figure below. label to open the Device Setting dialog box as Audio-Out Control Line 3 Recording Control Line Recording Volume Video Standard 2 4 1CVBS Most of the device settings for other input sources are the same as the setting on page 15 and 16. However, to obtain correct sound and video from other input sources, please double check the following setting: 1.
5 5-1 Remote Model 1 WinFast PVR2 Function To use remote control, please make sure that the remote controller is enabled. To enable remote control, please right-click on the icon on the toolbar at the bottom right of the screen (as Fig.30 shows). Choose "Setting", then set Remote Controller to "Enable", then click OK. (as Fig. 31 shows). Capture Device Remote Controller Enable MCE Remote Fig. 31 Fig.
5-1 Remote Model 1 Button Function 1 Power Press to open WinFast PVR2 function choosing menu (as Fig.34 shows on page 47), or press to closeWinFast PVR2 application. 2 TV 3 FM (only applicable to specific products) 4 DVD 5 Boss Key Change the input source in TV Input mode. Change the Input source in FM Input mode. Press to open PowerDVD. Hide the application. 6 Mute Press to mute the audio. 7 Full Screen Press to display the video full- screen. 8 Enter Press to execute your selection.
5 5-1 Remote Model 1 Windows Vista MCE Function Remote Model 1 also supports Windows MCE. To enable MCE remote, please right-click on the icon on the toolbar at the bottom right of the screen (as Fig. 32 shows). Choose "Setting", then check the box in front of "MCE Remote" then click OK(as Fig. 33 shows). The following keys are active only when MCE window is active or selected. Capture Device Remote Controller Enable MCE Remote Fig. 33 Fig.
5 5-1 Remote Model 1 Button Function 1 Power Press to open/close MCE. 2 TV 3 FM (only applicable to specific products) 4 DVD 5 Setting Switch MCE to My TV. Change the Input source in FM Input mode. Press to open DVD menu. Press to open MCE setting page. 6 Mute Press to mute the audio. 7 Full Screen Press to display the video full- screen. 8 Enter Press to execute your selection. 9 Return 10 Up/Down Move the cursor up or down. Return to the last screen.
5 5-2 Remote Model 2 TV/FM (only applicable to specific products): Press to switch between Video Input mode and FM mode. Channel Surf: Press to start channel preview. Numeric Keys: For entering a TV channel number or radio frequency to switch to that channel. Full Screen: Click to display the video full-screen. Boss Key: Hide the application. Power: Press to open/close the WinFast PVR2 application. Display: Display the current channel number on the screen.
5 5-3 BIOS Setting for Power ON/Off by Remote Control BIOS Setting for Power On/Off by Remote Control WinFast PVR2 provides you a convenient function to use your remote control to power on/off you computer. Please follow the instruction below to make sure that it can function correctly. Scenario 1 1. Turn on the computer. Before entering Windows, please press “Delete” to enter BIOS settings. (Different motherboards may have different ways to enter BIOS settings.) 2. Locate “Power” settings, then “APM 3.
5 5-3 BIOS Setting for Power ON/Off by Remote Control Scenario 3 1. Turn on the computer. Before entering Windows, please press “Delete” to enter BIOS settings. (Different motherboards may have different ways to enter BIOS settings.) 2. Locate “Power” settings, then “APM 3. After entering APM Configuration”. Configuration page, please change “Power On By PCIE Devices ” setting to “Enable”. 4. Save the changes and restart the computer.
2 5-4 Advanced Function for Remote Control Advanced Functions After you finish the BIOS setting (please refer to the previous section) for the remote control, you can use the advanced function of the remote control. 1. TV: When the computer is on, pressing the button will launch WinFast PVR2 application. When the computer is off, pressing the button will turn on the computer and launch WinFast PVR2 application. Power: Turn the computer on.
6 6-1 Hot Keys You can use the hot keys as shortcuts to control a variety of functions. Hot keys Controlled Functions Number Pad 0-9: Channel Number S: Audio Switch Spacebar: Snapshot Enter : Display ESC: Stop/Quit F / Alt + Enter: FullScreen M: Mute Ctrl + C: Hide Control Panel Ctr l+ E: Explore WorkArea Folder Ctrl + R: Record Ctrl + T: Ctrl + S: Record Transport Stream Skin Selection Page Ctrl + H: TimeShifting Ctrl + L: Adjust the screen Brightness, Saturation, etc.