
User's Manual


29
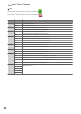
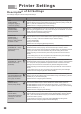
Printer Settings
8
Description of All Settings
Use settings configure mode to modify these settings.
Settings Description
Display: R (ROTARY DIR.), Press the confirmation key to modify this setting. Then
use the selection keys to switch between left-to-right and right-to-left operating
mode (“L” and “R”). Press the confirmation key to save this setting.
L (Left to Right Mode).
R (Right to Left Mode).
(Please see P.32 Configuring Operating Direction)
Display: L (Mode DYNAMIC SN. LAST), Press the confirmation key to enable
backwards serial number jumping. Use the selection key to select a number
between 0-9. The printer will jump back the specified number of serials and continue
printing as normal. Press the confirmation key and this setting will be saved.
Continue printing as normal and the printer will jump back the correct number of
serials.
***This setting is only for use in conjunction with a serial number print messages.
(Please see P.33 Configuring Dynamic Serial Number)
Display: N (Mode DYNAMIC SN. NEXT), Press the confirmation key to enable
backwards serial number jumping. Use the selection key to select a number between
0-9. The printer will jump forwards the specified number of serials and continue
printing as normal. Press the confirmation key and this setting will be saved.
Continue printing as normal and the printer will jump forward the correct number of
serials.
***This setting is only for use in conjunction with a serial number print messages.
(Please see P.33 Configuring Dynamic Serial Number)
Display: H (ACTIVE NOZZLE Mode), Press the confirmation key to modify this
setting. Then use the selection keys switch between using all nozzles(“B”), just even
nozzles(“E”), or just odd nozzles(“O”).
(Please see P34. Configuring Active Nozzles)
Display: D (DENSITY Mode), Press the confirmation key to modify this setting.
Then use the selection keys to switch between the various density options. If
ACTIVE NOZZLE is set to “B” the two options are normal (“1”) and darker (“2”). If
ACTIVE NOZZLE is set to “E” or “O” the four options are normal (“1”) and increasing
shades of darkness (“2”, “3”, “4”).
(Please see P35. Configuring Print Density)
Display: S (SPACE Mode), Press the confirmation key to modify this setting. Then
use the selection keys to switch between head (“SPACE HEAD”) and tail (“SPACE
TAIL”). Then use the selection keys to pick the distance between messages in
continuous mode in (0-9cm).
***This mode is only used in conjunction with CONTIUNOUS printing mode.
(Please see P36. Configuring Space between Messages)
FIRE
(FIRING MODE)
Configures “single” or
“continuous” printing.
Display: F (FIRING MODE), Press the confirmation key to modify this setting. Then
use the selection keys to switch between single and continuous printing modes (“N”
and “C”). Use the confirmation key to save this setting.
(Please see P31. Configuring Continuous Printing)
Display: P (PURGE PRINT), Press the confirmation key to test the printhead. Then
print using the suggested motion. The printer should print “0123456789”. To exit this
mode, press the function key to exit this mode.
(Please see P40. Printhead Printing Test)
PURGE PRINT
(PURGE PRINT)
Test the printhead.
ROTARY DIR.
(ROTARY DIR•)
Set the operating
direction, LEFT-to-RIGHT
or RIGHT-to-LEFT.
DYNAMIC SN. LAST
(DYNAMIC SN﹒ LAST)
Serial Number Jump
(Backwards).
DYNAMIC SN. NEXT
(DYNAMIC SN﹒ NEXT)
Serial Number Jump
(Forwards).
ACTIVE NOZZLE
(ACTIVE NOZZLE Mode)
Set the printhead to only
use a group of nozzles.
DENSITY
(DENSITY Mode)
Set the printing density.
SPACE
(SPACE Mode)
Set the distance between
messages in continuous
print mode.