
User's Manual


22
1
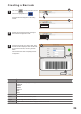
Creating a Time Stamp
2
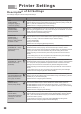
Configure the format of time stamp, batch
modification, and time displacement. The time
stamp can be previewed on the right side of the
configuration menu.
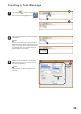
Left click on to create a time stamp. The
icon will now be highlighted such as .
The click on the editing window to enter the time
stamp configuration menu.
12/06/2015
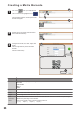
3
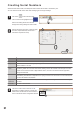
The timestamp will be shown in the editing
window after the time stamp setup is completed.
To return to the time stamp setup, just double
click the time stamp.
You can create a time stamp to keep track of date or time.
The printer will automatically update the time stamp’s date and time.
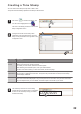
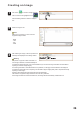
Time stamp
format
Commonly used formats are listed in the settings.
Select your format from the list of formats.
To create your own format, select the customize option.
After selecting the customize option, enter your desired format.
To learn more about creating a custom time format, see the next page.
Time
displacement
The printer can be configured to add a fixed amount of time to the time stamp from the date of printing.
For example, if displacement was set to 15 days and the print date was 2/11/2016, the time stamp
would display 2/26/2016.
Preview
The preview will display the current time and the print time.
The current time will be displayed on top, and the print time on the bottom. The print time will include
any time displacement you have added, and will be output in the format of your choice.
2
1
Parameters Description