
User's Manual

Basic Operations
4
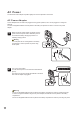
1
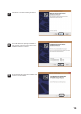
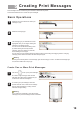
Click the function key to switch between settings configuration
mode and print mode.
When in printing mode, the mode indicator panel will display
numbers. These numbers indicate which message is selected.
When in settings configuration mode, the mode indicator panel
will display letters. These letters indicate which setting is being
configured.
2
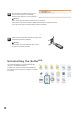
The printer comes with 10 preloaded print messages
(numbered 0-9) for testing purposes.
The printer comes with sample print messages pre-loaded.
This manual will use the sample messages to illustrate basic operations.
16
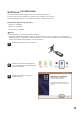
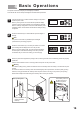
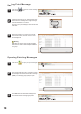
Press the selection keys to select different print messages or
settings.
3
Press the confirmation key to confirm print mode. The current
print message will be displayed on the LCD preview.
When in function setting mode, the LCD preview will display
the description of the selected settings. You then press the
confirmation key to confirm the setting you are changing.
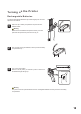
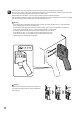
Size of printing area
The auxiliary roller can
be lifted off the print
surface if required.
Vertical reference line
(marks printhead
location)
RUN ERR INK BAT PWR
4
Place the printer flush against the printing surface, ensuring that the main and auxiliary printer are properly
positioned.
Use the vertical reference line to correctly position the printer on the print surface.
To maintain quality printing, make sure that the main and auxiliary roller are directly in contact with the print
surface.
On uneven surfaces, the auxiliary roller can be lifted slightly off the print surface to ensure quality printing.
However, if the gap between the auxiliary roller and print surface is too big, it may result in poor printing.
Please test multiple times when lifting the auxiliary roller off the print surface.
Note
Warning