OPERATION MANUAL This device complies with part 15 of the FCC Rules. Operation is subject to the following two conditions: (1) This device may not cause harmful interference, and (2) this device must accept any interference received, including interference that may cause undesired operation.
Copyright The contents of this manual, including text, images, and illustrations, are subject to copyright protection. Any reproduction, dissemination, transmission, forwarding, publishing, or disclosure of the manual’s contents without written permission, is strictly prohibited. Important Notices The warranty will be voided if any unauthorized alteration or modification of the hardware or software occurs.
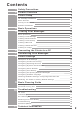
Contents 1 2 3 4 3 5 6 7 3 8 9 10 3 11 S a f e t y P r e c a u t io n s 3 P r o d u c t O v e r v ie w 5 Printer Setup 8 Ink Cartridge Installation 8 Micro SD Card 9 Turning on the Printer 10 Software Installation 12 Basic Operations 16 C r e a t i n g P r i n t Me s s a g e s 18 Basic Operations 18 Creating a Text Message 20 Creating Serial Numbers 21 Creating a Time Stamp 22 Creating a Barcode 24 Creating a Matix Barcode 25 Creating an Image 26 C o n n e c t i n g t h
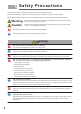
1 Safety Precautions Please follow the safety precautions to operate the hand printer safely and correctly. Please follow the safety precautions to avoid any injury and any damage to the printer and the cartridge. Please follow the safety precautions to avoid damage resulting from improper usage that would void the warranty. Warning Warning: Failure to follow the instructions when operating the printer may cause bodily injuries or severe damage to the printer.
Caution Do not mix different brands of batteries. Mixing may result in abnormal heat, battery rupture, or leaking battery fluid. Please remove the batteries and store them safely if the printer will not use for a long period. Leaking battery fluid may cause damage to the printer. Do not use non-genuine ink cartridges. Such use may cause poor printing, ink leakage, or damage to the printer. Do not intentionally shake the printer.
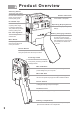
2 Product Overview Auxiliary Roller The auxiliary roller assists the main roller ensuring the printer runs smoothly to achieve quality prints. Status Indicators These indicators display the current status of the printer. Printhead Cap Please use the printhead cap after printer usage or cartridge replacement. This protects the printhead ensuring quality prints. Operating Display Panels Used to configure printing and settings.
Handy Printer Operatin g Display Panel The actual display panel may differ slightly from the one depicted in this manual. Status Indicators Function Key RUN: Active Printing (Green) This indicator will blink whenever the active button is depressed and will remain blinking until the active button is released. RUN ERR INK BAT PWR This key is used to switch between printing mode and settings configuration mode.
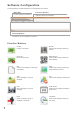
Softwar e Configu ration The actual interface may differ slightly from the one depicted in this manual. Menu Bar Function Buttons Contains settings and operations. Use the function buttons to connect your printer, as well as create and upload print messages. Editing Window This window is used to create and interact with print messages. There are a total of 10 message slots (0-9) that allow for up to 10 messages to be stored. F uncti on B u t t o n s 7 Connect Connect to the printer.
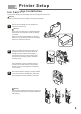
3 Printer Setup Ink Cartridg e Installat ion The actual ink cartridge may differ slightly from the one depicted in this manual. Warning Please turn off the power when installing or removing ink cartridges. 1 Take out the ink cartridge from the package and remove the printhead cap. Warning Do not touch the inkjet head or soft plate electrodes at the bottom of the cartridge to avoid any damage or oxidation. Please do not discard the printhead cap.
Micro SD Card The actual micro SD card may differ slightly from the one depicted in this manual. The micro SD card should be already installed in the printer. Please check to see whether the micro SD card is installed in the printer. Warning The micro SD card stores the print messages. The printer cannot be operated without the micro SD card. Please keep the micro SD card securely locked in the printer at all times. Please do not remove the micro SD card unless absolutely necessary.
Turning on the Printer Rechargea ble Batteries The actual rechargeable batteries may be differ slightly from the ones depicted in this manual. 1 Open the cap of battery compartment and place the four batteries inside. Warning Please ensure the batteries are placed correctly. Incorrect placement will prevent the printer from turning on. 2 After correctly placing the batteries, securely close the battery compartment’s cap. 3 Turn on the power switch.
AC Power The actual AC Power adapter may differ slightly from the one depicted in this manual. AC Power Adapter The AC adapter does not need to be plugged in during printer operation, but it can be plugged in to charge the batteries. The four rechargeable batteries must be placed in the battery compartment in order to connect to the power adapter. 1 Make sure the AC power adopter is plugged in to the printer and the AC power socket.
Softwar e Installat ion The actual software may differ slightly from the version depicted in this manual. In order to create new print messages, the software must be installed on your computer. All required installation files are on the USB flash drive that is included with the printer. Suppor t ed Ope rating S y s tems ‧Windows 8 (32bit/64bit) ‧Windows 7 (32bit/64bit) ‧Windows Vista (32bit/64bit) Warning ‧“.NET Framework 4.0” is required to install this software.
4 You may change the directory where the software is installed, or leave it in the default location. Click the “next” button to proceed. To change the installation directory, click the "Browse..." button on the installation screen. 13 5 Click "Install" begin installation. 6 To complete installation, the FTDI CDM driver package must be installed. Click “Extract” to begin installing the drivers.
7 Click “Next” to continue installing the drivers. 8 The FTDI CDM driver package installation is now complete. Click the “Finish” button in the installation window to continue. 9 All required files have now been installed. Click “Finish” to exit the installer.
10 After the software is installed, there will be a shortcut for the software on the desktop. Double click the shortcut to open the software. Warning If you cannot open the software, please reboot your computer. If the software still cannot be opened, please uninstall and then reinstall the software. If you still cannot open the software please contact the distributor. 11 Please unplug the flash drive and store it properly after completing the software installation.
4 Basic Operations The printer comes with sample print messages pre-loaded. This manual will use the sample messages to illustrate basic operations. 1 Click the function key to switch between settings configuration mode and print mode. When in printing mode, the mode indicator panel will display numbers. These numbers indicate which message is selected. When in settings configuration mode, the mode indicator panel will display letters. These letters indicate which setting is being configured.
5 Once the printer is correctly aligned and flush with the print surface, hold down the active button. When the active button is held down, the RUN LED will light up. The mode indicator panel and LCD preview will turn off. Then the printer will beep indicating that it is ready to print. While holding the active button, move the printer until the message is printed completely. After the message has been printed, the printer will beep again. At this point, release the active button.
5 Cr eati ng P r i n t M e s s a g e s Print messages must be created using the software included with the printer. This section describes how to create new print messages. Basic Operatio ns 1 Select the slot you would like to create your message in (0-9). 2 Select the message type. 3 The message type you selected will now be highlighted. Now you can begin creating the message in the editing window. You can access the advanced editing menu by double clicking the recently created message.
Saving Print Message 1 Left click on to save the current message that is being worked on. 2 A dialogue box will pop up, select the first radio dial to save the message as a single message. Click the OK button to continue. To save a group of messages, select the second radio dial. 3 Select the location you wish to store the file, enter the file name, and click “save” to save the message file. Warning PBM files are used to store single messages.
Creating a Text Messag e 1 Left click on 1 to create a new text message. The icon will now be highlighted such as . 2 String 2 The editing window will now contain the default message text. Note To enter typing mode, click on the message. A black frame should appear, indicating that typing mode is now active. To exit typing mode, click the message again. The message cannot be edited outside of typing mode. 3 Double click the message to enter advanced editing mode.
Creating Serial Number s Select the base serial number, all subsequent serial numbers will increase or decrease by one. You can combine a serial number with other message types in a single message. 1 Left click on to create a serial number. The icon will now be highlighted such as . Move to the editing window and click the background to being editing the serial number. 2 Set the start value, step value, number of digits, end value, repeat After End, and font size. Click OK to complete the setup.
Creating a Time Stamp You can create a time stamp to keep track of date or time. The printer will automatically update the time stamp’s date and time. 1 Left click on to create a time stamp. The icon will now be highlighted such as . The click on the editing window to enter the time stamp configuration menu. 2 Configure the format of time stamp, batch modification, and time displacement. The time stamp can be previewed on the right side of the configuration menu.
Custom Time Format Note If the format is entered correctly, the printer will display a If the format is entered incorrectly, the printer will display a . Output Code Description Year yy Two-digit year (20YY). yyyy Four-digit year (YYYY). M Month without a leading zero if less than 10. MM Two-digit Month with a leading zero if less than 10. d Day without a leading zero if less than 10. dd Two-digit Day with a leading zero if less than 10.
Creating a Barcode 1 Left click on 1 to create a barcode. The icon will now be highlighted such as . A sample barcode will appear in the editing window. 2 123456789 2 Double-click the preset barcode message to enter barcode configuration mode. 123456789 3 Configure the format, text, height, width, and if the text should be displayed under the barcode. To preview the barcode, click the “generate” button. Click the OK button after completing barcode configuration.
Creating a Matix Barcode 1 Left click on 1 to set up a matix barcode. The icon will now be highlighted such as . Click the editing window, and the preset matix barcode will appear. 2 Double-click on the preset matix barcode to enter matix barcode setup. 3 Configure the format, text, width, height, and quality. Then click generate to preview the matix barcode. Click ok to finish setup.
Creating an Image 1 Left click on to create an image message. The icon will now be highlighted such as . Click the editing window to select an image to use. 2 Select an image to use. Note Make sure your image is in one of the four supported image formats: •BMP •JPG •GIF •PNG 3 After selecting an image, it will be imported as a message and displayed in the editing window. Warning This printer only prints in black and white.
6 Connecti ng the Printer to a PC In order to transfer print messages or configure settings it is necessary to connect the printer to a computer. This section describes how to connect the printer to a computer using the included software. 1 RUN ERR INK BAT PWR Please unplug the AC power adapter before connecting the printer to a computer. The battery charging indicator must be off before connecting the printer to a computer. Make sure to turn on the printer before connecting it to a computer.
7 Tr ans fe rri ng Pri n t Messag e s The printer will only print messages that have been transferred to it through the provided software. This section describes how to transfer messages to the printer using the provided software. 1 Make sure the printer is connected to the computer. (Please see P27. Connecting the Printer) 2 To select the message that will be transferred, 3 Select the first radio dial to transfer the currently selected message slot.
8 Printer Settings Descrip tion of All Settings Use settings configure mode to modify these settings. 29 Settings Description FIRE (FIRING MODE) Configures “single” or “continuous” printing. Display: F (FIRING MODE), Press the confirmation key to modify this setting. Then use the selection keys to switch between single and continuous printing modes (“N” and “C”). Use the confirmation key to save this setting. (Please see P31.
Settings Description AUTO SPIT (AUTO SPIT Mode) Activates the auto cleaning function of printhead to prevent the nozzles from clogging. Display: C (AUTO SPIT Mode), Press the confirmation key to modify this setting. Then use the selection keys to switch between different time lengths (0-90 seconds). When powered on and not printing, the printer can periodically release a very small amount of ink from the printhead for cleaning purposes. This setting configures the time interval between releases.
Configu ring Continu ous Printing Switching between single and continuous printing 1 Press the function key to enter settings configuration mode. Use the selection keys to select “F” or “FIRE” mode, then press the confirmation key. 2 Use the selection keys to switch between the two firing modes. 3 Function Items Description Normal Single printing Continuous Continuous printing Then hit the confirmation key to save the setting. The printer will beep when the print mode is successfully changed.
Configu ring Operatin g Directio n You can change between left-to-right and right-to-left operation. 1 Press the function key to enter settings configuration mode. Use the selection keys to select ROTARY DIR mode ("A"), then press the confirmation key. 2 Use the selection keys to switch between the two firing modes. Function Items Description Left to Right Configures the printer for left-to-right operating mode. Right to Left Configures the printer for right-to-left operating mode.
Configu ring Dynamic Serial Number The serial number may be configured to jump forwards or backwards 0-9 values. 1 Jump the serial number backwards. Press the function key and select to the "DYNAMIC SN. LAST" to the serial number of change setting mode (LAST). Press the confirm key to enter the setting mode. You can advance the value of the serial number to the later number. Mode DYNAMIC S N﹒ L A ST Mode DYNAMIC S N﹒ NEXT Press the function key and select to the "DYNAMIC SN.
Configu ring Active Nozzles The nozzles in use can be configured based on your printing needs. Use of different nozzle modes will result in different print results. 1 Press the function to enter settings configuration mode. Use the selection keys to select “H” or ACTIVE NOZZLE mode, then press the confirmation key. Mode A CT IVE N OZZLE 2 Use the selection keys to switch between the three firing modes, then use the confirmation key to save your selection.
Configu ring Print Density Change print density. 1 Press the function key to enter settings configuration mode. Use the selection keys to select “d” or DENSITY mode, then press the confirmation key. 2 Use the selection keys to switch between the two or four firing modes, then use the confirmation key to save your selection.
Configu ring the Spacing Between Messag es This setting only applies in continuous printing mode. 1 Press the function key and select SPACE (“S”) to configure the spacing between messages. Then press the confirmation key. 2 Use the selection keys to switch between “HEAD” and “TAIL” mode. Then press the confirm key to configure spacing values. The two modes can be used concurrently. In that case, the spacing between each message is equal to the sum of SPACE HEAD and SPACE TAIL.
Configu ring the Softwar e Languag e 1 Click “languages” tab on the menu bar. 2 Select your desired language from the drop down menu. •English(en-US) •Traditional Chinese(zh-TW) •Simplified Chinese(zh-CN) •Japanese(jp-JP) Checking Hardware Settings, Configuri ng Date and Time 1 In order to check device settings or configure printer date and time, the printer must be connected to a computer. Device settings are different from the software settings described in previous pages.
Resettin g the Printer to Factory Default Settings The printer can be reset to factory default settings from the manufacturer. Note When resetting the printer to the original factory settings, the print messages will be left intact. 1 Press the function key to enter settings configuration mode. Use the selection key to select “R” or RESET mode. Press the confirmation key to reset settings to the factory default. 2 Press the confirmation key again to confirm the reset.
9 Basic Cleaning Guide Cleanin g the Printhea d Please clean the printhead when the print quality deteriorates, or when the printhead has collected dust or contaminants. Use a clean tissue to gently and slowly wipe the inkjet head surface from top to bottom or bottom to top. Do not wipe horizontally, horizontal wiping may result in damage to the printhead. After cleaning, please perform the automatic printing tests. If the results are clean and clear, no further cleaning is required.
Printhea d Printing Test Use the PURGE PRINT setting to test the printer. 1 To perform a printhead test using all nozzles, select PURGE PRINT (“P”) in settings configuration mode. 2 To confirm, press the confirmation key. Then position the printer flush against the print surface and scroll normally to test the printer. At first the printer will release a small amount of ink to clean the printhead before continuing to print the test pattern. When the test is completed the printer will beep.
10 Troubleshooting Ink Level When the ink level is low, the INK LED will light up. The INK LED lights up when the ink level is below 50%. When the ink level is below 50%, print quality will begin to decline. The INK LED will remain lit until the cartridge is empty. When the cartridge is empty, please replace it with a new one. You can change the level at which the INK LED lights up through the firmware settings. (Please see 37.
Error Messag es If there is an error, the ERR LED will light up, and the Mode Indicator Panel will display an error code. RUN ERR INK BAT PWR Please use the error message descriptions on this page to resolve any issues. Error codes Description Error 0 Cannot detect Micro SD card Check if a micro SD card is present in the SD card slot, or if one has been installed incorrectly. Correctly insert a micro SD card. (Please see P9.
Resolvi ng Poor Print Quality Print Result Description Print is horizontally stretched Vertical misalignment or banding Print message printed several times Print messaged is slanted to one side Check if the main roller is not contacting the print surface. The main roller must be flush with the print surface. If it is not flush with the surface, this printing condition may occur. This printing condition may be caused by an uneven print surface.
Trouble shootin g If the printer does not function properly, refer to this page for troubleshooting. If the problem cannot be resolved, please contact the distributor for further information. Issue Potential Solution Printer will not turn on Check if the battery level is low or if batteries were properly installed. Please check if the battery level is low. Please check if the batteries were installed properly. (Please see P10. Turning on the Printer and P41.
Firmwar e Updates Please use the provided software to update your printer’s firmware. Warning The distributor will provide the firmware update files. 1 Your printer needs to be connected to computer software. (Please see P27. Connecting the printer to a PC) 2 Please click the "Firmware Update" button in the menu bar. 3 When “Firmware Update” is clicked, all the status indicators on the handy printer will light up.
Technic al Informa tion Item Description Printing technology HP Thermal Inkjet Printing speed Maximum 30m / min Nozzle array 300 points (150 points x 2 columns) Inkjet printing direction Transverse printing/from top to bottom Printing height Maximum 12.
Best Profess ional Handy Printers To purchase ink cartridges or for maintenance , please contact the distributor.