
User Guide

TOOLS REQUIRED:
Outdoor Installation (Concrete)
• 5/8” Expansion Shields, 5/16” bolt
• Drill with 1/4” & 5/8” carbide tipped drill
bits
• Pencil/Marker
Indoor Installation (Carpet/Wood)
• 1 1/2” x 14 wood or chrome screws
• Phillips Head Screwdriver
INSTRUCTIONS:
OUTDOOR (CONCRETE) INSTALLATION:
SStteepp 11
Mark three holes on the floor thru the 5” flange where
post should be mounted.
SStteepp 22
Drill three 1/4” pilot holes followed by 5/8” dia.
holes to the depth of the shields
SStteepp 33
Bolt thru flange and into shield to fasten post to floor
INDOOR (CARPET/WOOD) INSTALLATION:
Step 1
Position post in desired location
Step 2
Remove carpet and padding under flange. Cover
frayed ends with flange
Step 3
Secure Post by drilling screws thru 5” dia. flange
NNoottee::
These fastening procedures and products have been found to be
effective in a wide variety of applications, however as always, we rec-
ommend that the installer assess the application of the product, flow pat-
ter of expected traffic, and the specific flooring composition to properly
select the appropriate fastening system
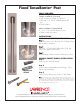
Fixed TensaBarrier
®
Post
Lawrence Metal Products Inc. • 800.441.0019 • 631.666.0300 • Fax: 631.666.0336 • www.lawrencemetal.com
e-mail: service@lawrencemetal.com • PO Box 400-M • 260 Spur Drive South, Bay Shore, New York 11706-0779 USA
Expansion
shields
Screws