
Installation Guide

One Piece ADA/Barrier Free Showers
36” ADA Gelcoat & Solid Surface Transfer Showers
60” ADA Gelcoat & Solid Surface Roll-In Showers
Installation Instructions
3. Carefully tilt shower against a stud wall and remove the
shipping and handling blocks from the underside of the
shower.
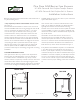
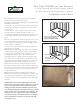
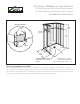
4. Install no-caulk drain tting. Do not install drain until
shower is to be immediately installed. The shower should
never be stood up right on a at oor surface with drain
attached. This will warp the shower and may void the
warranty. (See Figure 7)
5. Prepare the drain pipe to receive the drain tting.
6. Clean the installation area and underside of shower.
Make sure the oor is free of grease, water and other
contaminates that may affect adhesion.
7. Trial t the shower in the framing enclosure. Carefully tilt
the shower into the installed location. If installing into a pit,
avoid dropping the shower. Level the shower and check the
t. Draw a line along the oor at the front of the shower.
This will assist in locating the 100% silicone and mortar for
the nal installation. Note any adjustments to the framing
at this time. Carefully remove the shower. Do not allow the
shower to stand up on the drain tting. If required, make
adjustments to the framing.
Note: Trial tting the unit before the wet adhesive and mortar is
in place under the unit is a very worth while step. It is important
to resolve any framing issues before the wet support materials
are in place to avoid making a big mess of the project. Prepare
to apply the Thin-Set mortar. Note the importance of applying
the proper amount of Thin-Set. To have a successful installation,
the Thin-Set must be in Full Contact with the bottom of the
shower. Do not apply an excessive amount of Thin-Set. The
void under the shower can be greater than 1/2” to as little as
1/16” depending on the model, threshold height and job site
conditions.
YOUR MISSION IS TO INSTALL PROPERLY AND
MAINTAIN WARRANTY FILL ENTIRE VOID BETWEEN
BOTTOM OF UNIT AND SUB FLOOR. MAINTAIN
FACTORY 2% SLOPE OR FALL TO THE DRAIN.
Excessive bedding compound will create high spots
pushing the oor up causing the units to drain improperly.
8. Mix “Thin Set” non-shrinking bedding compound into a
thin soup like slurry. Laurel Mountain recommends Laticrete
#317 for concrete oor applications, and
Laticrete # 253 for wood oor applications.
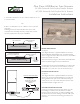
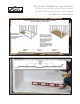
9.
(See Figure 8) Apply a 3/4” to 1” wide bead of 3M 560
polyurethane adhesive across the area of the sub oor
where the threshold will rest. This will assist in adhering
the bottom of the threshold to the sub oor.
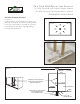
10. (See Figure 9, Pictures 2 & 3) Apply the “Thin Set” a
shovel full at a time using a notched trowel estimating the
amount needed to COMPLETELY ll the void between
the oor and the unit. Use care not to disturb the bead of
silicone.
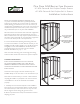
11. Stand shower up right. If necessary, place a hammer
handle into the drain pipe to guide it into the drain tting.
If installing the shower into a pit, use great care not to
drop the shower, but lower it into the installed position
with care. Do not tighten drain to waste pipe until after
braces are removed in step 20.
12. With the shower in the installed location, leveled and
plumb, note if any high spots or bulges are present in
the oor or along the threshold. Bulges would indicate
excessive Thin-Set. If the bottom edge of the shower
threshold is not in contact with the sub oor, this also
indicates excessive Thin-set. (See Picture 4) Note if these
conditions are present before tilting the shower forward,
as indicated in the next step.
13. CAREFULLY, tilt shower unit forward to inspect
bottom to ensure full contact between shower bottom
and Thin-Set. Add Thin-Set until proper contact is achieved.
If bulges were noted, or if the shower will not contact
the sub oor, remove excessive Thin-Set. Use care to not
remove TOO much Thin-set.
3/4” to 1” Bead of 3M 560
polyurethane adhesive.
A
pply at threshold location.
Do Not stand up shower
with drain fitting
installed or shower
floor will warp.
(Tilt shower against wall)
Adhesive
Trowel “Thin-Set”
one shovel full
at a time.
Figure 7